Writing tests that get you to the magic 75% code coverage requirement is easy, but writing great tests that protect you from regressions is a real skill. In this blog post, I’ll suggest six practical tips to help you write great Salesforce tests that don’t become a maintenance headache.
Of course it doesn’t matter how good your tests are if you never run them, and so the final tip is on how to automate your tests. I’ll show you how to do this with a free test automation tool from Gearset (shameless plug – I’m a part of the Gearset team).
The Importance of Writing Great Tests
Great tests help you catch problems early, while they’re easy to fix. They prove your code works as expected, and help track progress towards meeting business requirements. Great tests can also be easily automated to protect your work against regressions and test compatibility with new features.
Unfortunately, not all tests are created equal, and bad tests can cause more problems than they solve. At their worst, they provide a false sense of security while not actually providing any protection. They may not be testing the correct behaviors, or not really testing anything at all. This can lead to disaster when your production deployment causes disruption despite ‘passing’ all tests.
Six Tips to Better Tests
1. Arrange – Act – Assert
The three A’s are a good practice for unit tests on all platforms, but is even more important in Salesforce. Start by arranging anything you need for your test, including preparing test data. It’s often a good idea to pull this into a separate method, as it helps keep your test compact and easy to read. Next, you act, executing your business rules or logic against the things you’ve arranged. Finally, all good tests should assert their results to check the outcome. A test that does not assert the result is no test at all!
Here’s my separated method for preparing my test data.
2. Run Tests as Real Users
By default, Salesforce tests run at a System level and have visibility into all org properties and configurations. This, of course, is a very different context to the one in which the code will be exercised by a real user. Make sure some tests run using real user profiles, to check that the test is successful when constrained by their permissions.
Below is the separated method for createUser, where we set our user profile.
3. Use Test.startTest() and Test.stopTest()
If you have a large number of tests, running them can be quite compute intensive. Salesforce enforces governor limits on your activity to limit performance degradation. Using Test.startTest() gives you a new set of governor limits for the “act” stage of your test. Test.stopTest() then allows you to return to your previous governor limits. It also causes any asynchronous code queued up during your act stage to execute before the “assert” stage. For example, it allows you to test @future methods to check they are working as expected.
4. Exercise Bulk Triggers
Aim to have at least one test per trigger that calls more than one object – ideally around 10-20 objects. This is not to test the limits of how many objects can be called, but to test that calling the trigger with multiple objects works.
Note: Don’t add too many objects, as Sandboxes tend to have limited performance and can end up timing out, causing tests to fail, even if that same trigger would run perfectly on your Production instance.
5. Isolation – Run Tests with seeAllData=false
A good unit test should exercise a single, specific behavior, and should be immune to changes in other areas of the application. Isolating your tests ensures they’re only interacting with data that’s relevant to that specific test. By explicitly setting seeAllData to false, you’ll ensure your tests won’t be affected by data changing within your org. This has only recently become the default for Salesforce tests, but it’s still good practice to call it out so anyone else reading your test will know the constraints applied.
6. Automate Test Execution (For Free)
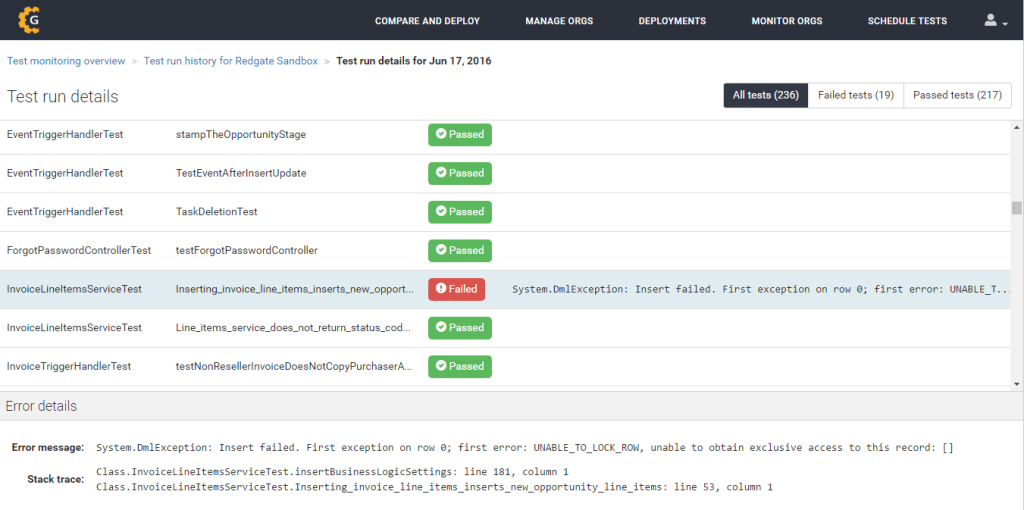
Although tests are automatically run when pushing changes to Production, there is no easy way to re-run tests once the changes have been deployed. Automation helps you catch silent failures before they become deployment blockers. The free unit testing tool from Gearset allows you to create automated unit testing jobs in a few clicks. Track code coverage and test results, get daily status reports, and jump into debugging any failures.
Automating your tests with Gearset is easy:
- Log into Gearset using your existing Salesforce credentials.
- Authorize the orgs you want to automate testing for.
- Create a test job from the Schedule tests menu, and click Save.
Gearset will now automate your tests every day and notify you of the results!
About the Author
Jason Mann is a technology enthusiast focusing on understanding the deployment challenges the Salesforce community face and working with them to deliver world-class solutions. As one of the team behind Gearset, you’ll often find him at Salesforce community events, canvassing opinion on the latest developments, and demonstrating new solutions to make release management ingeniously simple.
About Gearset
Gearset is a fully-featured release management solution for the Force.com platform which removes error-prone, manual deployment steps and enables easy automation, reporting and change management.
You can find out more about Gearset’s free unit testing at https://gearset.com/unit-testing, and more about Gearset at www.gearset.com.