In Wave, row-level security is enforced using predicates, and it works a bit like this:
<dataset column> <operation> <value>
You can go for simple comparisons or get sophisticated and apply security at a record owner, role-based or even team-based level. For the skinny on that, see this post:
http://explore.wave6.com/blog/how-security-is-applied-to-dashboards-of-salesforce-analytics-cloud
But… once you go down that road, it can get tricky to open up rows so that, for example, System Administrators can see all records. One common approach is to create a formula field on the target object that always evaluates to ‘View All’, a field on the User record that can be set manually and add to the security predicate ‘ViewAllField__c == $User.ViewAllField__c’. If you set the field to ‘View All’ on a user’s record, voila, they can see all records.
Let’s see if we can streamline and add some flexibility by using security features we already have available via custom permissions applied per profile. If you’re not familiar with custom permissions, custom permissions let you define access checks that can be assigned to users via permission sets or profiles, similar to how you assign user permissions and other access settings.
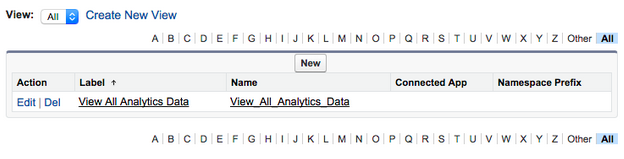
Step 1: Create a custom permission
- Navigate to Setup | Develop | Custom Permissions.
- Click New and set the label to ‘View All Analytics Data’ and the name to ‘View_All_Analytics_Data’ and hit Save. Note that you could be put any name in as long as it matches Step 3.
Step 2: Assign that Custom Permission to one or more profiles
- Navigate to Setup | Manage Users | Profiles.
- Select System Administrator (or any other profile you prefer).
- Select Custom Permissions and enable ‘View All Analytics Data’ custom permission.

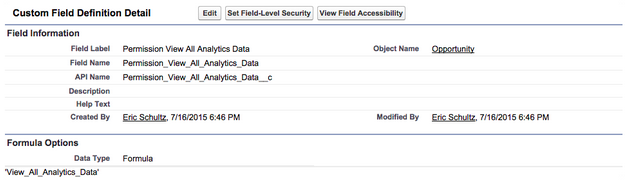
Step 3: Create a formula field on object that always evaluates to the Custom Permission Name.
- Navigate to Customize | Opportunities | Fields and click New.
- Set as Formula and then Text.
- Set Label as ‘Permission View All Analytics Data’ and Name ‘Permission_View_All_Analytics_Data’.
Note that while in this case we call it ‘Permission_View_All_Analytics_Data’, you could name it anything as long as it outputs to the developername of the custom permission you are targeting.
Step 4: Update Dataflow with this JSON
- Copy and paste the following JSON into a file locally on your computer.
- Navigate to Data Monitor.
- Click Upload and select the file you saved.
- Navigate to Data Monitor and Start the Dataflow
Don’t be wary, this a lot but most will be copy and paste. Note if you already have an existing dataflow, you will want to Download from Data Monitor and append this JSON to it before uploading.
This dataflow digests all records in SetupEntityAccess, CustomPermission, PermissionSet and Profiles like such:

The real magic, though, is the step Augment_Opportunity_View_All_Profiles. It matches the word written in Opportunity.Permission_View_All_Analytics_Data__c to any Custom Permission with the same developername. It then returns any profiles associated to the custom permission and stores them in the column named SetupEntityAccess.ViewAllAnalyticsData.PermissionSet.ProfileId.
To control visibility, the Register_Opportunity step’s rowLevelSecurityFilter parameter is set to ‘SetupEntityAccess.ViewAllAnalyticsData.PermissionSet.ProfileId’ == “$User.ProfileId”. This checks if the current running user’s profile is in the set of acceptable profiles to view each row as determined by the Augment_Opportunity_View_All_Profiles step.
After the Dataflow finishes, voila (again)! A dataset called OppViewAllProfiles will be created, and any user with a profile assigned the View_All_Analytics_Data custom permission will see every opportunity row in this dataset.
Conclusion
Of course, it doesn’t have to stop here. We could have another field on Opportunity that evaluates to different custom permission names based on, say, business unit. There we could grant users access to not all but a subset of records. And who knows… possibly you’ll find other novel applications using this technique.
In an upcoming blog post, we will demonstrate how to add even more flexibility by creating security predicates based only on permission sets.