Ever since managed packages were rolled out several years ago, the installation process has been following a multi-step wizard. Though this process is interactive, ISVs and admins alike have been asking to make this simpler and shorter – much like installing an app to your mobile device.
All ISV apps are distributed as managed packages. Once an app clears Security Review, it can be publicly listed on the AppExchange for customers to download.
With the Summer ’14 release, we made this real. All publicly listed packages now use the simplified installer when you click on
![]() and install it to an org.
and install it to an org.
OK, so you may ask: if this feature has already been there since Summer ’14, why am I only telling you about it now? Aren’t we closer to Summer ’15?
Hmm… that’s true. The reason I am writing this now is to tell you about a cool way you can use this for all package installations, whether privately listed or those which you directly install with the package URL.
I also want to tell you about couple more features of this simplified installer:
- Release Notes
- Post Installation Instructions
By using Release Notes and Post Installation Instructions, you can communicate with your customers in-the-app as opposed to sending follow-up emails.
So let’s get started.
1. Using Simplified Installer for All Installations
Package Upload:
The package upload screen looks like this. So in one single page, you can provide links for both Release Notes and Post Install Instructions.
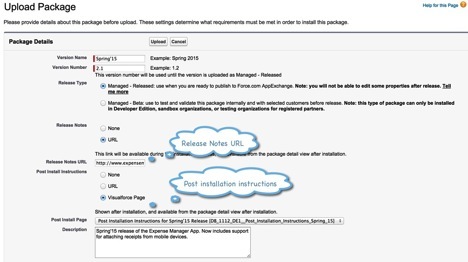
And here is an image of the package post upload:

Package Installation:
This is really simple. All you have to do is append the following to your installation URL – &newUI=1. (You don’t have to do anything on AppExchange with the URLs – installations originating from AppExchange will automatically redirect the user to the new simplified installer.) That’s it. Told you it was simple. And more good news – with Summer ’15, this will become the default installer so every package you install will follow this new UI by default.
You can see that the new installer reduces the 4-page installation wizard down to a single page!

2. Release Notes for the Package Version
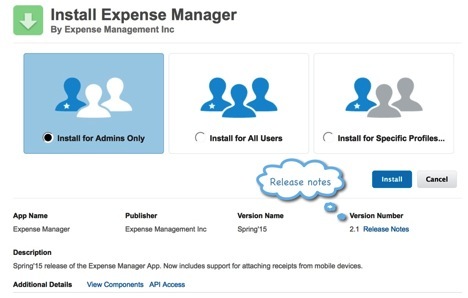
We want to make it easy for you to share release notes with your customers. In the screenshot above, you saw how you can provide a URL to release notes for the uploaded version. The release notes can be hosted anywhere you would like and customers can view it while installing the package.
This image below shows the link to Release notes.
3. Providing Post-Installation Instructions
As your apps get more complex and you need admins to do some steps post installation, you need to provide a guide on how to do those. These could be as simple as modifying page layouts or more complex like creating approval processes, updating custom settings, etc.
With this feature, you have the ability to provide the installation instructions in two ways –
- As a URL
- As a VF page contained inside your managed package.
Best Practice
Use URLs for Post Install Instructions and host the page. This will help you maintain the page or make any appropriate changes. If you provide a VF page, you won’t be able to change it without uploading a new version and upgrading your customer to the new version.
Post installation, this is how it will appear to the installer. This example considers a VF page for instructions. URL would behave similar to that for Release Notes:

The ISV team at Salesforce is constantly striving to build features to make our partners’ lives easier. We are hopeful that you will find these enhancements are taking us further in that direction. Please provide any feedback you have on the partner community.
Helpful links: ISV Force Guide, Spring’15 Release Notes