Intro
The Spring 12 release brings a host of exciting new features to Site.com. Tools like Repeaters, Data Tables, and Data Functions allow regular people to quickly and easily create compelling websites driven by your organization’s data. In this tutorial, we’ll show you how to create two data-driven pages: one that lists all of your company’s products, and connected page that displays the details for a single product. This post assumes that you’re familiar with creating basic pages and templates in Site.com. Some knowledge of web technologies and building custom objects in force.com is helpful.
The Project
Cirrus Computers is in the midst of revamping its website. Phase 1 of the project is complete, with a beautiful redesign and graphics uplift, all built and run on Site.com. Phase 1 also included a static products page and other static pages dedicated to each of its products. But Cirrus’ product line is evolving considerably, with new notebooks and tablets coming out every month, and sales managers would like the product listings they’re already managing in Salesforce to appear automatically on the Cirrus website, with a consistent look and feel for product details and key information when a visitor clicks through.
Getting Started

A single tab to manage all of your websites.
The first thing you’ll notice in Spring 12 is the new Site.com tab. Prior to Spring 12, all Site.com sites were listed under the Sites tab. In Spring 12, the Sites tab has been renamed to Site.com:
The Site.com tab lists all of your existing websites and, as of Spring 12, also allows you to import, export, and duplicate websites built and managed in Site.com:

More on that later, but for now let’s focus on the task at hand: transforming Cirrus’ static product listing and product detail pages into a data-driven pages that our Sales & Marketing team can control. Under the Products tab, we can see the current list of active Cirrus Products:
 Cirrus sales reps are using these product listings in the Sales Cloud, and we’ve got a mandate from management to publish this list to the Cirrus website…and to keep it updated as new products are added and other products are changed.
Each of these product listings has very specific details on product attributes like dimensions and weight:

These important product details should appear on the website, but only when the product is active and has been published. Since sales and marketing have robust approval processes and security controls in place for Products, this is the ideal data source for our website’s product listing.
Creating the Product Listing Page
The Site.com studio shows all the existing pages in the Cirrus website:

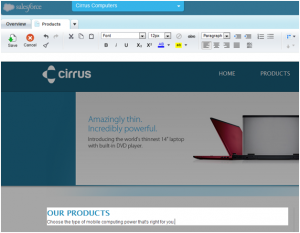
The current product page in the website contains a static listing of Cirrus products:

Let’s start by deleting that old static text, and using the Content Block as a header for the product listing. By double-clicking the Content Block on the page (or by selecting the context menu and editing), we can change the text:

Data Binding in Site.com: Data Tables, Repeaters, Data Functions
Spring 12 provides 3 ways to add force.com object data to your page:
| Repeaters & Repeater Elements | The rawest, most flexible way to add data to your page. Use a repeater to set up your data connection, then use one or more repeater elements to display field values with complete formatting flexibility. We’ll use Repeaters and Repeater Elements later when we build a Product Detail page. |
| Data Tables | When you need a nicely-formatted table of data, nothing beats the Data Table. |
| Data Function | Use a Data Function when you need to run a calculation on data stored in force.com. Let’s say you need to keep a running count of all the products you sell. Just set up a Data Function to count those products! Remember: the result is always one row with a Data Function. |
Using Data Tables to Add a Product List
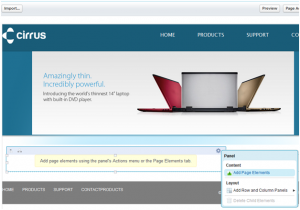
Now let’s add that product listing. A Data Table provides a convenient preformatted table to display any data in your force.com org. Use it to quickly add nicely-formatted data to a page. Select the middle panel on the Page Structure and add a page element:

This will bring up the Page Elements tray. This is where you’ll get a glimpse of several new features in Site.com. For now, we’ll want to focus on the Data section. Specifically, we want to add a Data Table to the page:

Adding a data element to a page is new in Site.com for Spring 12. You can read about the full functionality on page 144 of the Spring 12 Release Notes, but for now let’s use the data connection dialog to choose the Product display:

Note that the Product object is selected, and I’ve added a filter to display only products whose Publish field is checked.
| SECURITY NOTE: In order to display objects and field values in Site.com, you must make those objects and fields available to a special profile for your Site.com site. In the Create Data Table dialog above, the link to the Cirrus Site’s guest user profile is accessible from this dialog. Your site’s profile will not be available from the Profiles list under Setup. |
When creating a data table, you use checkboxes to select which fields you’d like displayed. In this case, let’s keep it simple, with just product name and description:
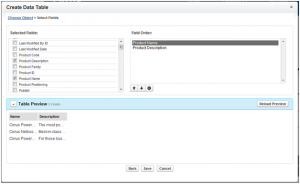
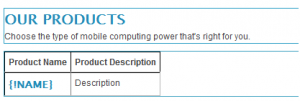
Saving the data table will bring you back to your page in the Site.com Studio. You can see there’s now a table on the page, with placeholders for the product name and description:
Let’s fancy the table up a bit: put product names in bold, give more friendly error messages, and test the page out. In the Page Structure sidebar, you can get a sense of the data repeater’s structure:

The Default View is displayed to site visitors when the page runs and retrieves products successfully. You can see how it contains entries for both Product Name and Product Description. Let’s make the product listings pop a little by editing the column:

By editing the column, we can customize its display. I’ll add an <h4> tag to either side of the name (in practice you’d probably do this with CSS styling):

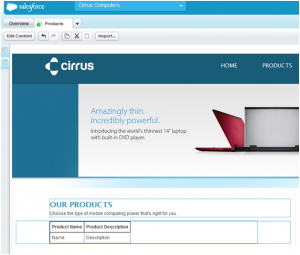
The product name will now be bigger, and show in blue, as you can see in the studio:

The Error View will be shown to visitors if there’s a problem connecting to or retrieving data from Salesforce. Let’s make this a friendly error message:

Let’s make the error message much friendlier for site visitors:

Let’s configure another friendly message for when no products are available to display:

We’ll put in some friendlier text for when no data is found:

Now we’re ready to test out our page. On the Products page, click the Preview button:
![]()
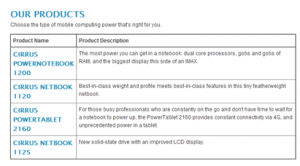
This will take you to a preview of the product page. Note that all the products with the Publish flag checked are listed, and our new styling is applied:

Let’s say product management adds a new, improved netbook to the Products tab in Salesforce:

Just clicking the Publish checkbox will make this available in the product table on our Site.com preview:
From here, we could easily add more Product fields to the table, style the table differently using Cascading Style Sheets, or even add Javascript events to pop up more information on each product when it’s clicked. But before we move on, let’s take a moment to reflect on what we just accomplished: in less than 5 minutes of work, we managed to take our product master list from Salesforce and integrate it, in real time, to our website. How much time would it take you to do that with traditional platforms and silo’ed website systems?
Creating a Product Detail Page
Now that we have our product listing, our site visitors are naturally going to want to click through and get full details on each product. Before Spring 12, we’d typically do this by creating a single page for each product, with each page linked to a Site.com template to enforce overall styling. But with Data elements in Site.com, there’s not need to create separate pages for each product: just create one Product Detail landing page, then link to it from the Products page we just altered!
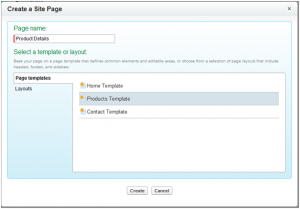
We start by creating a new page called Product Details. We can base this page off of one of our site templates to enforce a consistent look & feel:
Once this is created, let’s be sure to drag the page over to the Landing Pages area of the studio so that it doesn’t appear in the navigation map:

Remember: we want our visitors to drill down to this page when they select a product from the Products page. That’s why we’re putting this in the Landing Pages section.
Let’s open up the Product Details page in the Site.com studio. In the editable panel, we’ll want to add a Repeater element:

Repeater elements are simpler than the Data Table we used earlier. Because of this, they give you lots of flexibility in formatting and layout. We’ll use this to our advantage here. To configure the Repeater element, we’ll choose Product as the Salesforce object as we did with the table. But since we only want to display one product at a time, we’ll add a filter to narrow the product list down to a product specified in the browser’s URL:

Note the dynamic nature of this page: we’re telling Site.com to reach into the page’s URL, pull a query string parameter out of that URL, then use that parameter to choose the details of the product that gets displayed on the page.
We might also use the LIMITS section to arbitrarily limit the results to a single product:

Saving the connection places a repeater on the page. This does not actually display data, but sets up the connection and the data filters. Note that it also places items in the page structure:

Note that the repeater has Default, Error, and No Data views, just as the data table we used earlier did. To display product fields on the page, we simply add Repeater Elements to the Default View:

From here, we can choose the field we’d like to display, and set display options:

We can add Repeater Elements for each field we want to display:

We’ve got a product name and product description here, and we could easily add others. You can also use Content Blocks within a Repeater to get unprecedented flexibility around the display of data. To do this, you just add a Content Block to the Default View, then use standard force.com substitution values (e.g. {!field-name} ) and format to your heart’s content.
Let’s use a Content Block to add the product’s dimensions and weight here:

Let’s add nicely-formatted details in the content block:

Now that we have a nice product detail page, it’s not going to do us much good standing on its own. We need to link to it from the Products page we improved earlier. Let’s open up the Products page. Recall that we had placed a data table on that page to show the list of all published products:
Our goal now is to turn that product name into a link that leads to our detail page and passes the product code to our detail page. Clicking the Edit button for the Name column will bring up its properties dialog:

If we check the button to make this field a link, we can then use the HREF field to determine what data is passed (Product Code) and what page it’s passed to:

Note how we’ve linked to the ProductDetails page and are passing in the product code in this completed dialog:

Now if we preview the products page, each product name is a link:

Clicking one of the product names takes a visitor to the product detail page, and that product’s fields are displayed nicely formatted:

Displaying your product (or other) data on a Site.com site is easy! Now that we have a great product detail page, we’ll probably want it to have an inquiry form for the product in question. But that’s another blog post, and another new feature in Spring 12: Web to Object forms! Stay Tuned.