The Summer ’12 release introduced a number of useful features to Visual Workflow’s cloud designer. Subflows promote encapsulation and reuse of flows by allowing you to embed one flow as a step in another. I’ve been asked about how to use subflows several times in recent weeks, and thought a basic tutorial would help people start to use this powerful feature.
Creating Subflows
Our goal here is to create a flow that creates a basic customer support case. Our flow will use inputs from flows that call it, and will return the Id of the created case to its parent. We’ll embed this flow in several other flows, and can reuse it any time to very quickly create a case.
The basic process is straightforward:
- Create your subflow
- Specify inputs & outputs for the subflow and create subflow logic.
- Create the parent flow
- Embed the subflow in the parent flow, passing inputs and outputs.
Start by creating a new flow in the cloud designer. We’ll call this flow ‘Create Case’ so we can use it later. Our flow needs a set of inputs and outputs to create the case and return the Salesforce Id of the created case. When using subflows, you simply create variables and set their visibility. Our flow needs several inputs and a couple of outputs:
Inputs
| Variable Name | Data Type | Input/Output Type |
|---|---|---|
| vaContactId | Text | Input Only |
| vaCaseSubject | Text | Input Only |
| vaCaseDescription | Text | Input Only |
Outputs
| Variable Name | Data Type | Input/Output Type |
|---|---|---|
| vaCaseId | Text | Output Only |
| vaCaseNumber | Text | Output Only |
Create each of these variables in your subflow using the Resources tab. When you create a variable, you can set that variable’s Input/Output Type:
 You can set a variable’s visibility to Private, Input Only, Output Only, or Input and Output. This setting determines what happens when you use this flow as a subflow. We have 3 inputs and 2 outputs, so we’ll be prompted to map Contact ID, Case Subject, and Case Description as inputs when we embed this flow within another. We’ll also be prompted to map Case Id and Case Number as outputs when the subflow finishes executing. These settings are how you share data between parent flows and subflows.
You’ll also need to create a few constants to populate the case:
Constants
| Constant Name | Data Type | Value |
|---|---|---|
| cCaseOrigin | Text | Phone |
| cCaseStatus | Text | New |
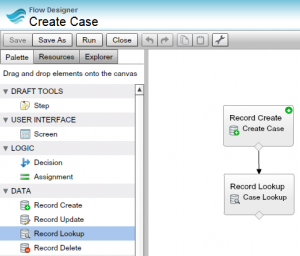
Now that the subflow has variables, we need it to actually do something with them. Drag a Record Create element into the flow and configure it like this:
 This step maps the input variables to fields in the case, and uses the constants we declared to set the case status and origin. It also captures the Case Id to the vaCaseId output variable.
Save the Create Case element and set it as the Start Element in the subflow:

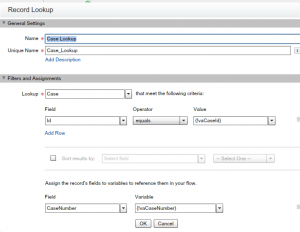
Our Create Case subflow is 95% complete! We’ve used inputs, created data, and populated data in one of our two outputs. The only thing remaining is to retrieve the case number to populate our one remaining output. To do this, simply drag a Record Lookup onto the flow and use it to look up the case we created and populate the vaCaseNumber output variable:

Save the Create Case flow, then activate it and we’re ready to embed it!
Embedding the Subflow
Now it’s time to use the Create Case flow within another flow. Creating cases is useful in several places, and we can reuse that subflow.
While we won’t dive into the details of creating the parent flow, you can get the full view of how it’s done by installing this package in a sandbox or developer edition org:
Once your subflow is created, it will appear in the Flows section of the designer:

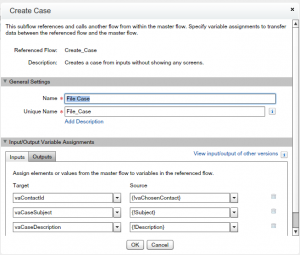
To embed your Create Case flow, just drag the flow onto the canvass of your Customer Service flow in the designer, and configure the inputs and outputs:

The Create Case subflow is now just another step in our overall flow:

A Few Quirks
Many developers embed their flows in a Visualforce page to enhance styling and to create very rich interaction between the flow and other page elements. When using Apex controllers to read flow variables, only variables in the top level (parent) flow are available to Apex. Keep this in mind as you use subflows.
Summing It Up
Subflows are a powerful feature for encapsulating and reusing work you’ve already done in the cloud designer. They can perform very complex logic, allowing business users creating other flows to simply drag them into their own flows and reuse them.
