 I’ve blogged before on how applications running on Heroku, and elsewhere, can retrieve data from Force.com using the REST API, but not so much about the opposite direction. Heroku announced the Data Clips feature back in February, but it wasn’t until Craig Kerstiens mentioned that you can retrieve JSON-formatted data that I realized Data Clips provide a really easy integration point for Heroku Postgres.
If you’ve used Apex callouts and System.JSON before, you can go read Craig’s blog entry and figure it out pretty quickly; otherwise, here’s a step-by-step example, using the ‘Shakespeare Drone Factor’ Data Clip – a listing of characters from Shakespeare’s plays, ordered by their average number of characters per paragraph (how much they ‘drone on’!).
First, create a new Force.com Developer Edition (DE) environment. Even if you’ve already got one, or more, go ahead and create a new one. It’s easy to keep reusing DE’s, filling them up with cruft, but I like to create a fresh one for each project, even if it’s just a little experiment.
Now, we grab the JSON representation of the data by appending .json to the Data Clip URL: https://postgres.heroku.com/dataclips/ljfeywbwtxbcabardaxvcstjyodi.json. Clicking this URL will likely download the JSON data, but it might show up in your browser. In either case, you’ll get about 88k of JSON data. The data is in the form of an array of objects, with no whitespace, since it’s intended for consumption by an app. Here’s an excerpt, formatted for readability:
As you can see, the data has a very simple structure – an array of objects, each object with four properties: character_name, letter_count, paragraph_count and drone_factor.
Now we need to create a corresponding Apex class. Copy a single object from the dataset:
and paste that into Simon Fell‘s excellent JSON2Apex tool. This will result in the following code:
Create an Apex Class (Your Name | Setup | Develop | Apex Classes | New), paste the code in, and click ‘Save’. Hitting the ‘Run Test’ button shows that everything looks good:
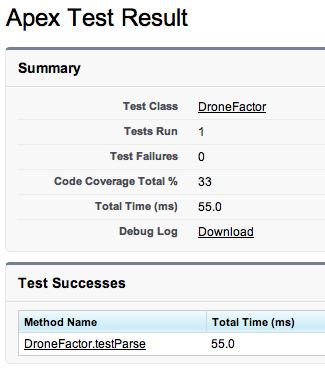
You might be wondering about that 33% code coverage. Let’s take a closer look, clicking on the ’33’:
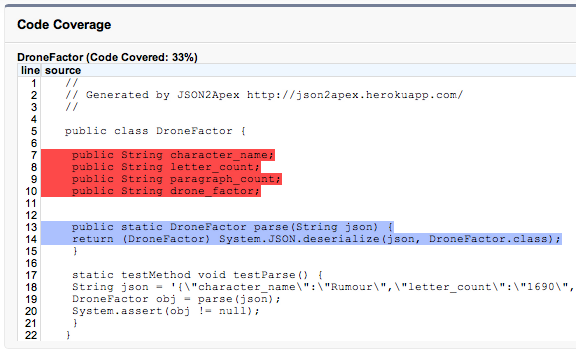
As you can see, we’ve tested the parse method, but we haven’t explicitly assigned anything to the fields. In a real-world case, you would add more test methods as you implemented more functionality, and move code coverage past the 75% mark, but we’ll just note that as a ‘todo’ and move on.
Now we have a class to represent the records we can retrieve from the Data Clip, we need to write some code to retrieve them. I’ll create a new class, called DroneFactorClient, to do the work:
The get() method is very simple. First, we set up an HTTPRequest with the Data Clip JSON endpoint, then we send the request, parsing the response into a List of DroneFactor objects. In a real app, rather than sample code, we would use a Custom Setting for the endpoint, but I’m pasting it directly into the code here for brevity.
Let’s give this a quick test. Open the Developer Console (Your Name | Developer Console), click the box next to the ‘Execute’ button and paste in the following code:
Check ‘Open Log’, hit ‘Execute’ and… Uh oh:

Apex Code can’t go calling any old endpoint on the Internet! We need to create a ‘Remote Site’ setting to give it permission to call Heroku Postgres: Your Name | Setup | Security Controls | Remote Site Settings | New Remote Site.
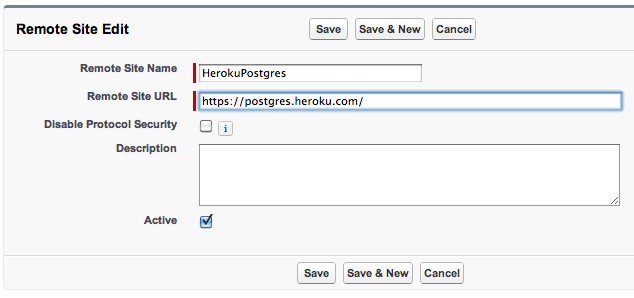
Note that you cannot have spaces or any other special characters in the Remote Site Name.
Try executing the code snippet again, and…

Success – second time lucky! Let’s filter the log on the string ‘DEBUG’ and see what we got:

The client retrieved 925 drones, the first one being the character ‘Rumour’. Things are looking good. Let’s create a simple Visualforce page to show the data. First, enable ‘Development Mode’ for yourself. Your Name | Setup | Manage Users | Users, click ‘Edit’ next to your User record, check ‘Development Mode’ and click ‘Save’. This setting lets you edit Visualforce pages right on the page.
Before we create the Visualforce page itself, we need to tweak the DroneFactor class to make the four instance variables properties, giving them accessor functions so that they can be accessed from Visualforce. Navigate to the DroneFactor class (Your Name | Setup | Develop | Apex Classes | Edit DroneFactor) and replace the four ‘public string’ lines with the following:
Now to create the Visualforce page – go to the URL in your browser’s address bar, leave the hostname as-is, but change the path to /apex/DronePage. For my DE, the resulting URL is https://na9.salesforce.com/apex/DronePage. Hit enter, and you’ll get an error page:
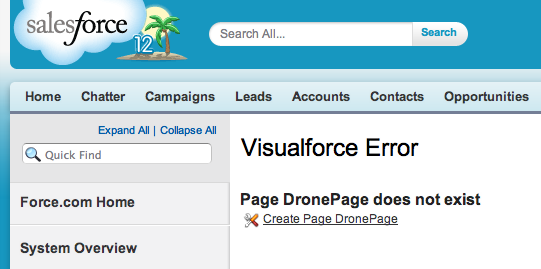
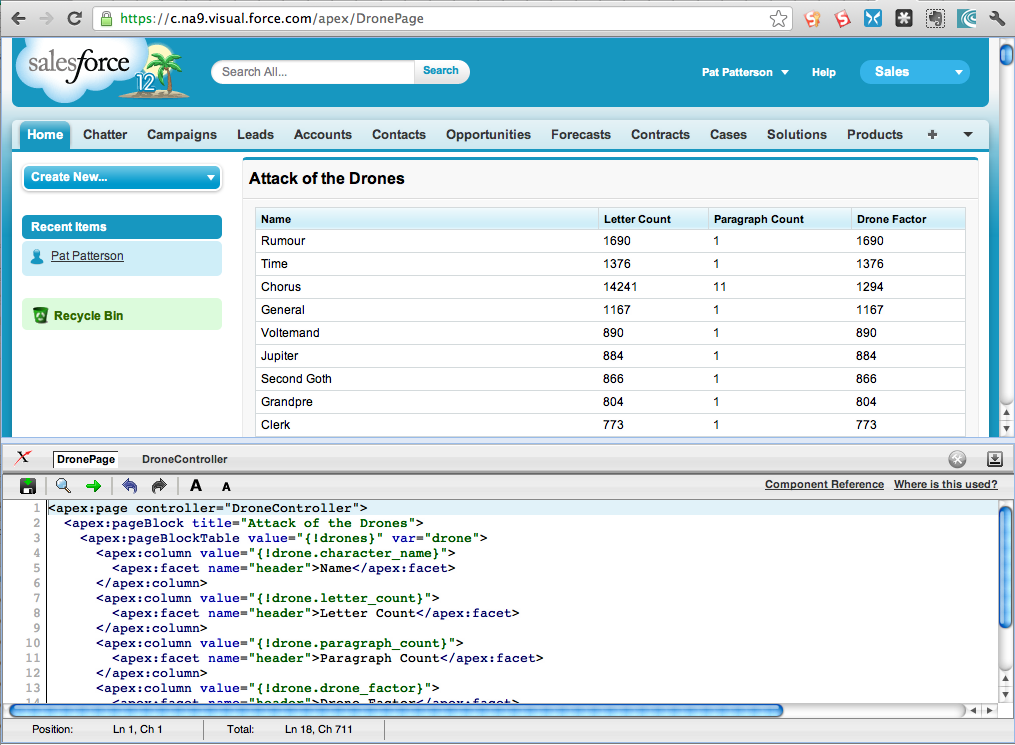
Click the ‘Create Page’ link, and you’ll see a default Visualforce page. Let’s create a simple table to show our Drone data. In the editor pane at the bottom of the page, replace the default code with the following:
Hit the ‘Save’ icon and you’ll be told that the Apex class ‘DroneController’ does not exist. Our Visualforce page can display Drone Factor data, but it needs a controller to go retrieve it. Click the ‘Create Apex class ‘public with sharing class DroneController” link to create the controller, and then the ‘Create Apex method ‘DroneController.getDrones” link. Don’t worry about the subsequent error; just click the ‘DroneController’ button to edit the controller code. Replace the getDrones() function with the following:
You should be rewarded with a nicely formatted table of Drone Factors:
If this is your first time working with Apex and Visualforce, congratulations – you just created a data integration from Heroku Postgres to Force.com! To go further with Force.com, check out the Developer Workbooks, and the recording of the recent Introduction to Force.com webinar.