
After the Map Component I shared a few weeks ago, here is another example of a simple Lightning Component.
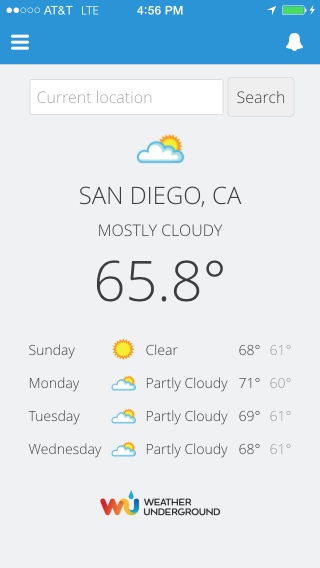
The Weather Component leverages the Weather Underground API and shows the current conditions at your current location, as well as a three day forecast. You can also specify specific locations in the search bar. For example: Boston MA, San Francisco CA, Mumbai, Paris France, SFO, LHR, etc.
The component doesn’t call the Weather Underground API directly. Instead, it invokes an @AuraEnabled method in its Apex Controller which makes the API call on the client application’s behalf. This workflow allows you to use the Remote Sites security infrastructure to control which services your Lightning Components can acccess.
Installation Instructions
To install the Weather Component in your own org:
- Click this link to install the unmanaged package in your org
- Sign up for a free Weather Underground API key
- In the developer console, open the WeatherController Apex class, replace YOUR_API_KEY with your actual Weather Underground API key, and save the file
- In Setup, select Administer > Security Controls > Remote Site Settings, click New Remote Site, specify WeatherUnderground as the Remote Site Name and http://api.wunderground.com as the Remote Site URL. Click Save.
Testing as a Lightning App
- Open the developer console
- Select File > Open Lightning Resources, select WeatherApp, and click Open Selected
- Click Preview (upper right corner)
Testing as a Component in the Salesforce1 App
Add the component to the Salesforce1 menu:
- In Setup, select Administer > Mobile Administration > Mobile Navigation
- Select Weather in the Available list
- Click the Add button to add the Weather tab to the Selected list
- Click the Up button to move the Weather tab closer to the top of the menu
- Click Save
Test the component in the Salesforce1 application simulator:
- In Salesforce, remove the part of the URL that comes immediately after salesforce.com and append /one/one.app to the URL immediately after salesforce.com
- This starts the Salesforce1 Application simulator
- Click the menu button in the upper left corner
- Select Weather in the menu
- Preview the component
Further Improvements
You can continue to improve the component. For example, you could:
- Allow the user to choose a temperature measurement unit (Fahrenheit and Celsius)
- Present a pickup list to the user when the location is ambiguous
- Cache the last location and use it as the default when the component is reloaded