Summer ’15 Platform Release brought us the awesome Lightning Connect Custom Adapters: you can connect to external data sources and use them as custom Salesforce Objects writing custom Apex code.
After I read Introducing Lightning Connect Custom Adapters by Lawrence McAlpin, I wanted to get my hands dirty and try to implemented my own version of the adapter thinking of a “pseudo-real” use case.
If you are a TL;DR person, here is the code:
At first the DataSource namespace documentation has been published here, this way you can understand all the objects / interfaces / methods we’ll be using in this example.
In my use case we have:
- A MongoDB server which stores several invoices
- A NodeJS server that proxies Salesforce / MongoDB hosted on Heroku
- A Custom Adapter implemented in Salesforce
The Data Model
An external system writes invoices records on the MongoDB server, storing data on the invoices table, following the model (you can simulate it by POST requesting on the following Heroku REST service):
Where:
- contractid: is a custom external id for the Contract object
- accountid: is a custom external id for the Account object
- _id: MongoDB id
- created: is the created date (date/time field)
- amount: is the amount of the invoice (number)
- description: is a generic description
MongoBD REST interface
The next step is to give MongoDB a REST interface.
I’ve changed an old Project by Ricard Fredin, adding support for:
- Basic authentication
- Environment variables for MongoDB host name and port
- Added support for $oid, $date and $regex BSON types
- Support for Heroku Button
This is the updated repository with all the infos of the current changes and original project of the new Heroku Crest project.
This project comes with an Heroku Button:
This means you can easily deploy this MongoDB proxy on your personal Heroku account:
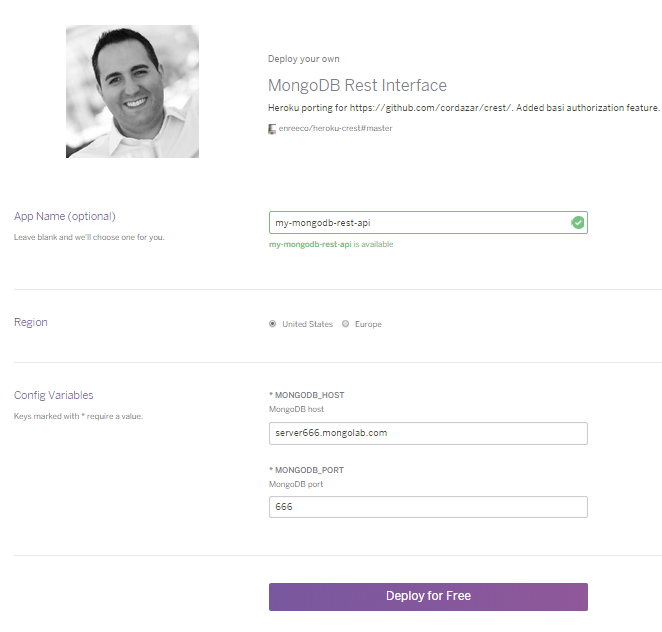
You need to set your app name, the host name and the server port.
Let’s populate the DB
The last thing to do is to create at least one database on your MongoDB server with one valid user (with at least read permissions) and one table.
In our example we have a “lighthningconnect” database with an “invoices” table.
To see if your Heroku app works, make a get request:
You can also use POST/PUT/DELETE methods.
To populate your instance, make a post request of this kind:
BODY:
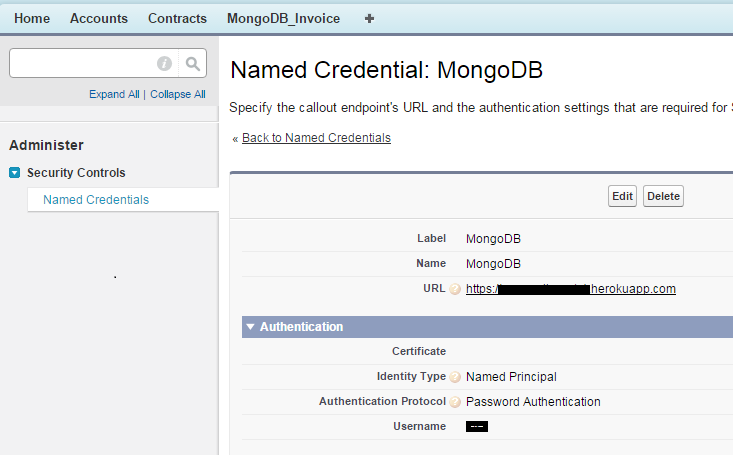
Once the MongoDB REST interface is set up, we are gonna create a new Salesforce Named Credential: this way we can setup access to the REST server (and MongoDB server) with a simple configuration on the interface, every time we make a callout to this endpoint:
The Lightning Custom Adapter implementation
The whole code of the Salesforce implementation can be found here.
The implementation is similar to the one of Lawrence McAlpin’s post.
The main modification involves the handling of the named credential and MongoDB database and table names.
Open the MongoDBDataSourceConnection.cls file and change the first lines:
If you want to change the mappings, you can do it easily by modifying the following map:
And the sync() method:
Finally we can analize how the query is really done using the REST proxy we just installed on Heroku:
Basically we do a GET HTTP callout to our endpoint (the Named Credentials will work as a charm to authenticate user) and parse the result to create the object that will be used to present the query result.
The getSoqlQuery() method has been modified from Lawrence’s implementation, in order to adhere to the Heroku Crest application requirements (a JSON input query): we support all basic filters and result ordering.
Configure the Data Source
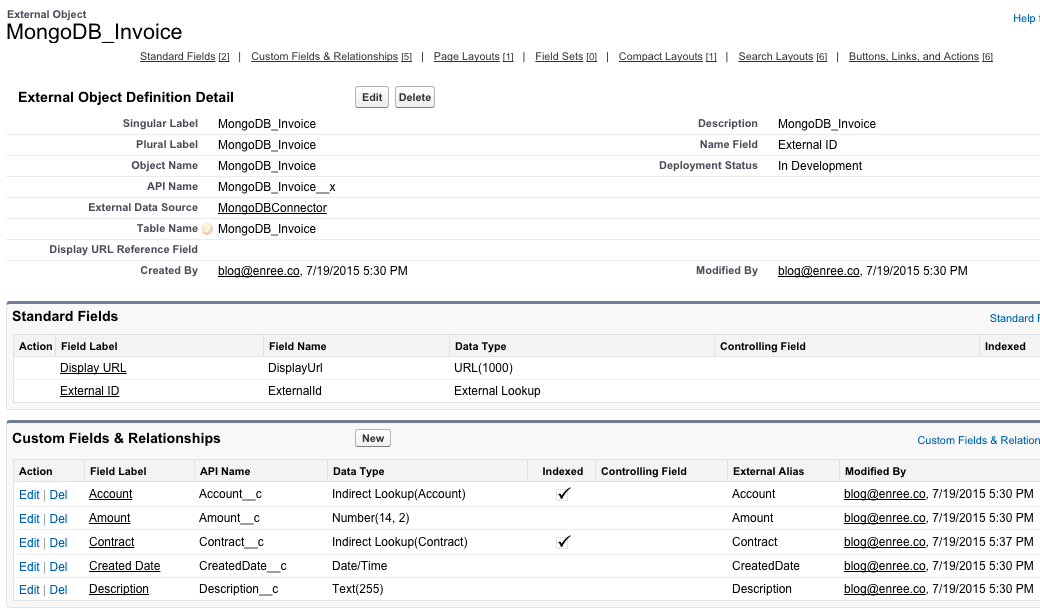
Once we have uploaded the two classes, we can configure the External Data Source:
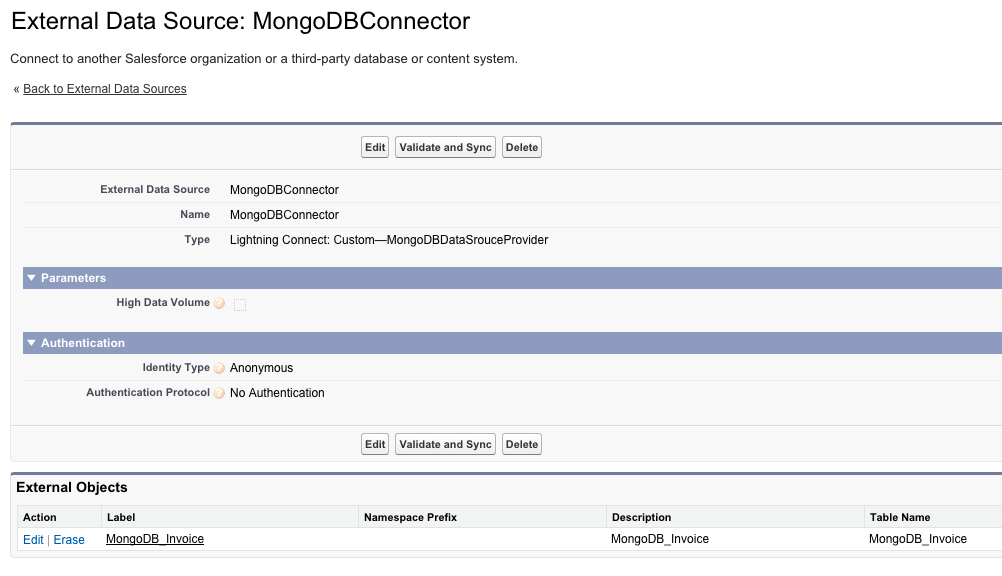
Click on the Validate and Sync button to get the new External Object named MongoDB_Invoice.
Configure the External Object’s lookups
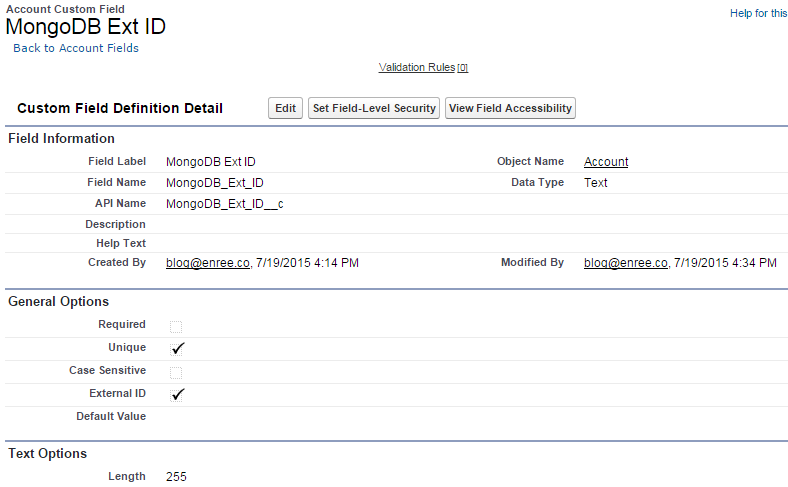
Next step is to link this External Object to actual Account and Contract records referenced by the “contactid” and “accountid” fields on the “invoices” table.
For this reason we will create two new fields on the Account:
and Contract standard objects:
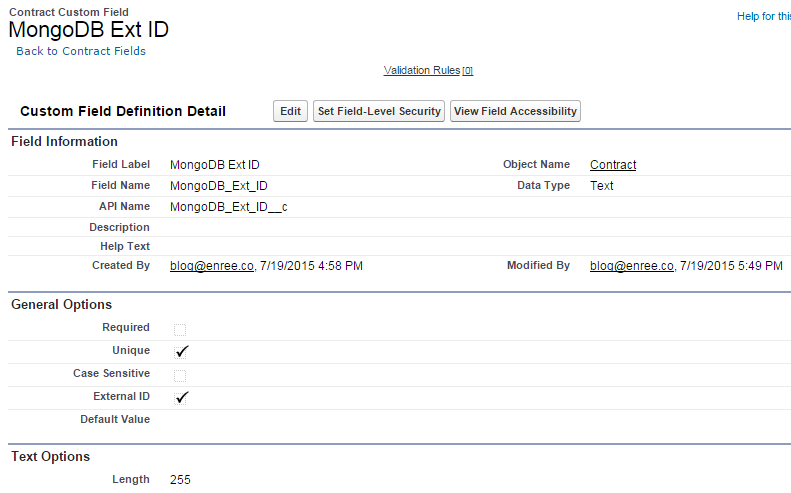
Then we can change the Contract__c and Account__c fields on the MongoDB_Invoice__x external object to be indirect lookups: follow this article but you have to change the field types of both fields type to be Indirect Lookup instead of External Lookup.
This is what you get after changing field types:
This way each record of type MongoDB_Invoice__x that have a “Contact__c” field equal to Contact.MongoDB_Ext_ID__c will be linked to the Contract as if it were a standard lookup field (the same happens for the Account object).
Use the External Object on your app
Next step, create a new custom tab for the MongoDB_Invoice__x object (I’ve configured the “All” list view to show all fields):
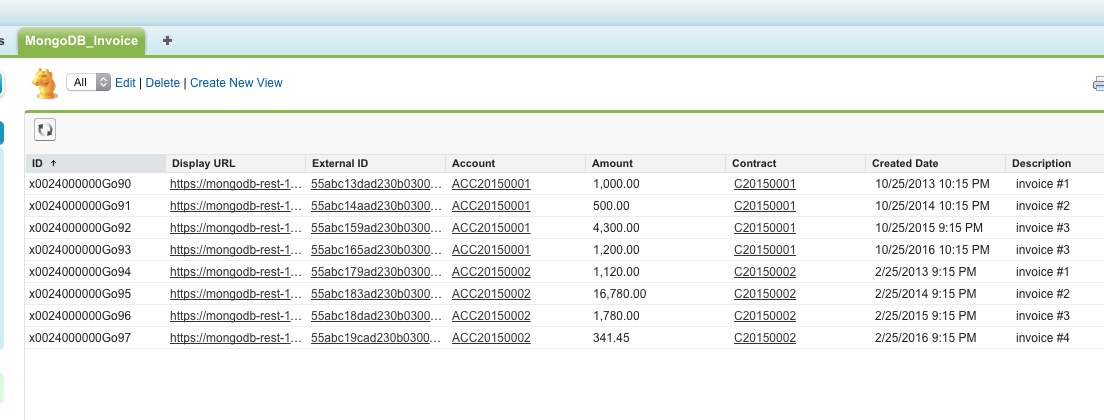
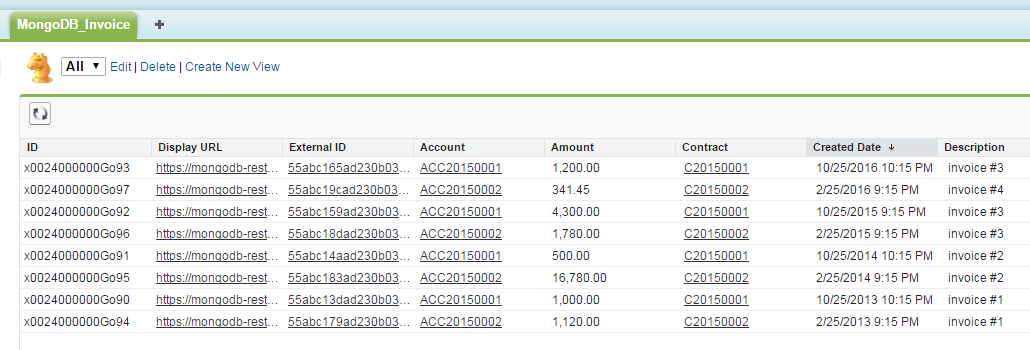
You can sort all columns (here the Created Date field):
Click on an External ID value you get all object info:
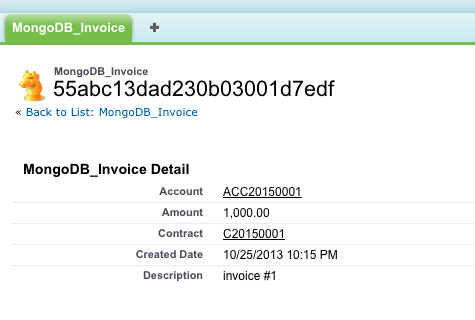
Where the account:
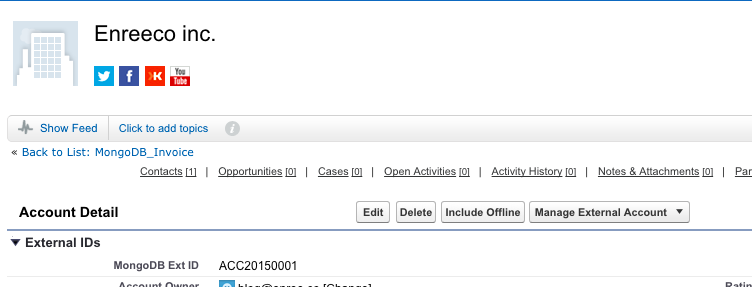
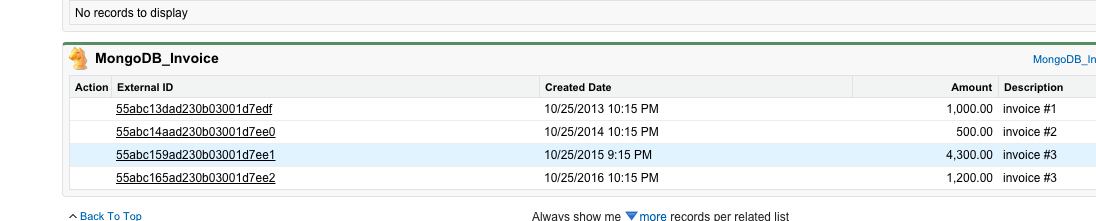
And its related lists:
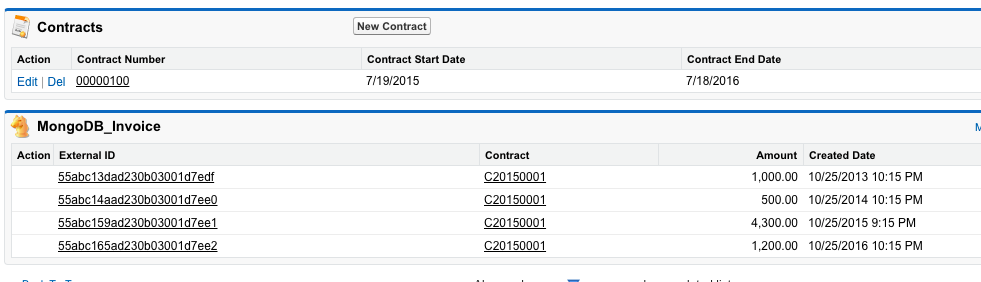
And the contract:
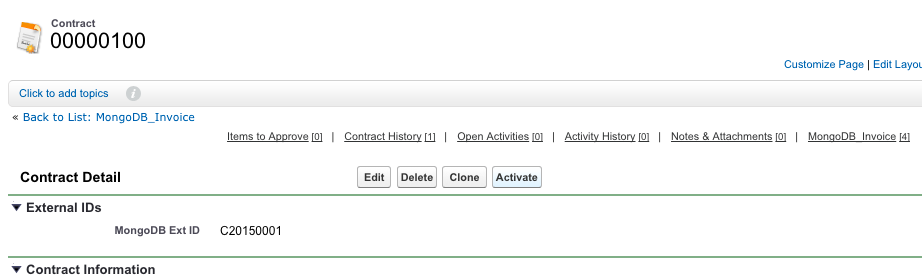
With its related lists:
Query External Objects
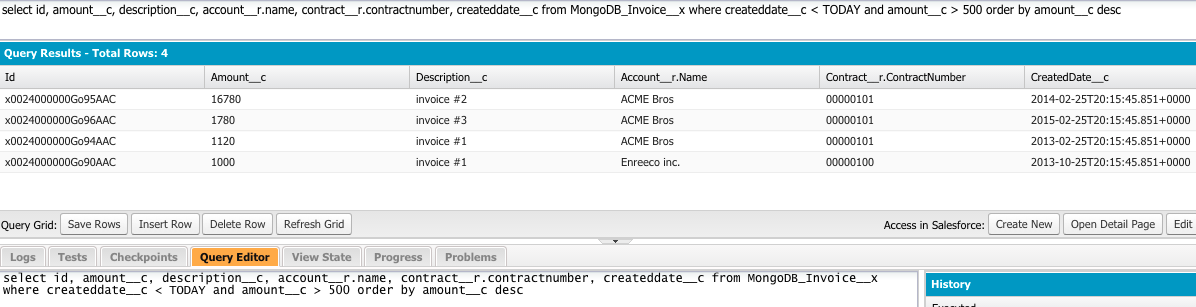
Finally there is an example of a complex query:
You can certainly improve this implementation and add better query handling, speaking as a pure developer, it’s been a real funny implementation. Can’t wait to see DML statements to be added as well!
Stay tuned for the next platform releases!
About the author
Enrico Murru (enree.co) is a Solution Architect and Senior Developer at WebResults (Engineering Group).
He started working on the Force.com platform in 2009 and since then he grew a big experience following the growth of the platform; he is also a huge Javascript lover. In the last years he began to write technical blog posts for the dev community trying to document his fun with the Force.com platform. His daydream is to become the first italian Force.com evangelist, sharing his passion to all developers, and spend the rest of his professional life (and more) learning and experimenting with new technology.