This is the final installment of our five-part series that looks at the changes and opportunities Salesforce DX offers app developers today. Over the course of this series, we have talked about:
- What Salesforce DX is (and isn’t)
- Paths to Adoption
- Getting Started with the Salesforce CLI
- Scripting and the CLI
- Continuous Development with Salesforce DX
The content in this series is a collaboration between the Salesforce DX and Salesforce Evangelism teams.
Continuous development with Salesforce DX
With agile development methodologies, developers deliver faster and more often. Adopting Salesforce DX will help you achieve this with continuous development on the Salesforce Platform.
In this final post of the Getting Started with Salesforce DX series, we will go through a brief refresh on collaborative development with source version control, as it is a prerequisite for Continuous Development. Then we will discuss the three different stages of Continuous Development with Salesforce DX: Continuous Integration (CI), Continuous Deployment and Continuous Delivery (CD).

Collaborative development with Version Control System
We have seen in previous chapters of this series that in order to get the most benefits out of Salesforce DX, you should adopt source driven development. Shifting your project’s resources to a Version Control System (VCS) may not be a small effort but it allows you to precisely track content revisions and provides better collaboration capabilities.
On top of being able to track source code history, VCS generally supports automated triggers. For example, a VCS can call a script when project sources are modified (pull request, branch merge, etc). This type of automation opens the door for Continuous Integration.
Continuous Integration (CI)
CI is a practice that is enforced with a tool that automates testing. Automation tools are in charge of running integration jobs that automatically build the project and execute unit tests and integration tests. We will see later in this post that these automation tools can also be used for Continuous Deployment and Continuous Delivery.
In the context of Salesforce development, it’s special that CI cannot run locally on a single machine as it requires a Salesforce org. It needs to spin up an org to deploy the project and run some tests. This is where Salesforce DX comes in handy.
We won’t dive into the technical details of configuring a specific CI software, as it would be too complex. However, we are going to cover the high-level steps that are required. In short, CI configuration with Salesforce DX requires that you perform the following:
- Install Salesforce CLI on the CI host.
- Obtain or create a digital certificate to secure your connection to the Salesforce org.
- Create and configure a Connected App in your Dev Hub org.
- Authorize your Salesforce CI user to access this Connected App.
- Configure a Salesforce JWT (JSON Web Tokens) authentication flow. This allows the CI host to securely perform headless (without human interactivity) operations on your Dev Hub org.
If you are interested in setting up a CI environment, I suggest you try the Continuous Integration Using Salesforce DX Trailhead module. It guides you through setting up Travis CI with Salesforce DX in less than two hours. If you just want to peek at a fully configured Travis CI environment, you can also jump to the .travis.yml file containerd in this repository.
Once the CI environment is setup is complete, it runs integration jobs that are composed of four steps:

Retrieving sources
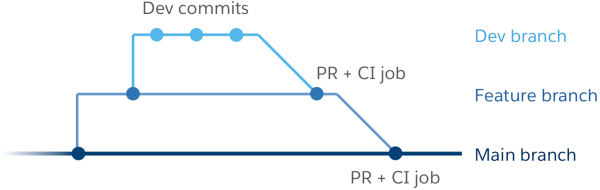
A CI tool is hooked up with a VCS repository. The VCS triggers an integration job when it detects a change in the project source code (i.e. a commit or a pull request).
Let’s assume that you use Git as it is the most popular VCS nowadays. In the ideal world, every developed feature is a separate branch. Every developer implementing a feature works on a sub-branch. When their work is done, they submit a pull request (PR) on the feature branch. The PR triggers a CI job and is tested before being merged into the feature branch. This allows to maintain a stable build on the feature branch.
When the feature development is complete, the same process is applied to merge the feature branch on the main project branch.
Building and deploying
A key requirement for CI is to be able to automatically build and deploy the project based on the information stored in the repository.
With Salesforce DX this has become as simple as executing two Salesforce CLI commands and it generally takes less than a minute:
You can also lint the JS source code of your Lightning components with the Salesforce CLI before deploying it. This code analysis tool helps to enforce coherent syntax rules and best practices across a team of developers. The linter will warn you about all sorts of code issues. Some of them are benign such as extra trailing spaces. Others can cause bugs such as the redefinition of the same variable name across different scopes or missing braces after a control statement.
Note that you can customize the linting rules to fit your preferences with an ESLint configuration file.
Every developer should run the linter on their local source code before committing their changes (you could even automate it with some shell script as we saw in the previous chapter). Then you can do a final pass in the CI job to enforce coherent linting rules across your team.
Running tests
The main goal of a CI tool is to run unit tests as well as integration tests.
As a reminder, a unit test is a test that involves a small unit of code and no third-party system. For example, you can run an Apex unit test that executes a function and makes some assertions on the returned result.
An integration test is a test that guarantees that your code works in conjunction with an external system. For example, you can test a call to a web service. In that case, the outcome of your test partly relies on an external system. As a consequence, you may have to mount a specific test environment with your web service as you should avoid testing directly on a production environment (#BadPractice).
Automating both types of tests is a great way to limit the risk of regressions introduced by code modifications.
The Salesforce CLI allows you to run Apex tests with the following command:
Furthermore, if you want to deploy a robust project, you can also test your Lightning source code with the Lightning Testing Service (note that this feature requires extra setup).
Cleaning the test environment
Whether the tests pass or fail, the CI tool must always clean the testing environment afterwards as a best practice (doing so will prevent you from running into an active scratch org limit issue). In the past, this was a complicated and error-prone process. Thanks to Salesforce DX, all it takes now is just a single command to delete your test scratch org:
Wrapping it up
If you followed the previous steps, you now have all of the pieces of the puzzle that are required to assemble you CI build script. To complete it, you will need to chain the different Salesforce CLI commands together with &&. These symbols allow to execute commands one after another while aborting if one fails.
This gives us the following CI build script (note the use of the line-ending / character for line breaks):
Continuous Delivery (CD)
Once the CI build is completed and tested, the next step is to generate the project deliverable. Using a single deliverable guarantees that the same build will be used across both the User Acceptance Tests (a Sandbox in the context of Salesforce) and the production environments.
Generating the deliverable can be generally be done by the same automation tool that does CI. Deliverables can be generated after each CI build and you can automatically provision staging environments with those deliverables. Automating this whole process gives us Continuous Delivery.
Salesforce DX offers three options to generate a project’s deliverable: leveraging Second Generation Packaging, creating a Managed Package or using the Metadata API.
Releasing via Unlocked Packages
As Salesforce DX changes the game in terms of Salesforce development, there is a new option that is currently in Beta in Spring ’18: Unlocked Packages. You can find out more about unlocked packages in the second part of this series.
Here is an overview of the commands involved to release and install an unlocked package (we assume that you already have created the package itself):
Releasing via a managed package
Salesforce DX can also create a deliverable in the form of a managed package. This option requires that you manually create a managed Package first. Salesforce DX can then automatically create new package versions with a command and install it with a second command.
Here is an overview of the commands involved in a managed package release and deployment (we assume that you already have created the managed package itself):
Releasing via the Metadata API
Just like in traditional Salesforce development, the Salesforce CLI allows you to deploy your project with the Metadata API. In short, Salesforce retrieves the metadata from a scratch org as a set of files (the deliverable). It then uses the metadata API to deploy it on the target environment.
Here is an overview of the commands involved in a metadata deployment:
Note that you can also run a “check-only” deployment to validate that the release won’t cause any errors. This will simulate the release without modifying the target org.
Continuous Deployment
Continuous Deployment takes Continuous Delivery a step forward by automatically deploying content into production after passing the integration tests. Yes, you read that correctly: automatically! This approach assumes that every change is technically safe to be deployed to production without human intervention if the build passes the tests.
This practice can be useful to shorten the customer feedback loop and eliminates the concept of release dates. However, business requirements generally control the release cycle. In most of the cases, business performs some user acceptance tests and needs to sign off the changes before the release. Thus, Continuous Deployment is only recommended for a very limited set of projects.
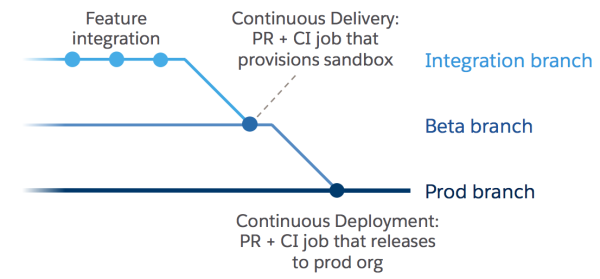
An interesting option to leverage this practice in the Salesforce ecosystem is to associate a staging environment to a beta branch of your VCS. When you have integrated features for a release in a branch, merge this branch onto a beta branch. You can then configure a CI job to provision a sandbox with the source from this branch and give access to this sandbox to your customers or business users. They can test this beta and decide whether it is ready to go to production. If they decide so, you can then merge the beta branch onto a production branch and automate the release to your production org with a CI job.
Closing words
This concludes our Getting Started with Salesforce DX series. In this final post we have covered the different stages of Continuous Development: integration, delivery and deployment. We have presented all of the tasks that these different stages aim to automate and given you an overview of how to achieve it with Salesforce DX.

We will leave you with this animated recap of the Salesforce DX continuous development flow:

Keep building those awesome modern apps that your users love and get rid of manual development chores with Salesforce DX. Remember to keep an eye out for unlocked packages as they mature and get closer to GA.
In the meantime, if you’re looking to get more hands on with Salesforce DX at TrailheaDX, check out the Emerging Tech for Developers Bootcamp.
Resources
- Salesforce DX Developer Guide
- Trailhead modules:
About the author
Philippe Ozil is a Senior Developer Evangelist at Salesforce where he focuses on the Salesforce Platform. He writes technical content and speaks frequently at conferences. He is a full stack developer and a VR expert. Prior to joining Salesforce, he worked as a developer and consultant in the Business Process Management (BPM) space. You can follow him on Twitter @PhilippeOzil or check his GitHub projects @pozil.