
This is the second installment in a series exploring how to begin working with your apps in modular pieces, incorporating packages into your app development lifecycle, and what packaging may mean for your team’s change management and release processes. Over the course of this series, we’ll talk about:
- Part 1: What even is a package, anyway? How can you start to experiment with segmenting your org?
- Part 2: How can you start to organize metadata from an app, let alone an entire org, into packages? How do you tackle organizing your metadata and projects in source control?
- Part 3: What do these changes mean for app builder workflows? What will happen if I install an unlocked package into my production org today?
- Part 4: How can you define a successful Git branching strategy that works best for most team sizes? How, when and where should packaging be added to your continuous deployment?
In this post, we’ll look at getting your Salesforce DX project ready to work with multiple packages and segmenting an app into packageable modules. In the last post, we talked about what the shift to package-based delivery can offer teams and walked through extracting metadata from your org to begin migrating to a modular app dev model. If you haven’t read that post yet, it’s a good idea to go check it out and come back here when you’re caught up.
Approaching package construction using deployment dependencies
When I started to think about packaging and creating units for my packages, I started by thinking about deployment. Packaging is meant to make deploying easier, more standardized and repetitive. So I thought, why not look at creating smaller units of metadata (which may or may not turn in to packages) based on my most successful deployment habits?
I asked myself: What are the most common reasons my deployments have failed? Is there a pattern to the deployment order/release shapes I started relying on for my releases?
The resounding answer, to both questions, was dependency management. We talked about this a bit in our last post. Dependencies come in many forms, but managing the dependencies between metadata that cause bottlenecks during deployment seemed like a good place to start. So I decided to build layered packages, based on the dependency management patterns I’ve come to rely on during deployment.
Is this the only way to segment your org into packages? Absolutely not. But you’ll have to address the basic metadata dependencies that affect deployments (like the fact that any code or customizations that interact with custom objects or fields need those objects and fields to exist in order to deploy) no matter what organizing principle you choose.
Building a Salesforce DX project to support multiple packages
Instead of modifying anything about the Salesforce DX project containing my unmanaged package extract, I created a new and empty repository with the command sfdx force:project:create -n easy-spaces -p es-base. My initial sfdx-project.json looked like this:
1{
2  "packageDirectories": [
3    {
4      "path": "es-base",
5      "default": true
6    }
7  ],
8  "namespace": "",
9  "sfdcLoginUrl": "https://login.salesforce.com",
10  "sourceApiVersion": "43.0"
11}
I modified the default project-scratch-def.json to look like this:
1{
2    "orgName": "Easy Spaces",
3    "edition": "Developer",
4    "hasSampleData": "false",
5    "features": "ServiceCloud;ServiceWave;SalesWave",
6    "orgPreferences": {
7        "enabled": ["S1DesktopEnabled", "IsLiveAgentEnabled"],
8        "disabled": ["S1EncryptedStoragePref2"]
9    }
10}
Highlights:
- orgName: I always make sure my scratch orgs have a clear name that relates to my project’s purpose rather than ‘zturner Company’, which is the default value provided for me by Salesforce DX. This really starts to matter as you get more and more projects going — you’ll want your
sfdx force:org:listcommand to return meaningful information about what you’ve got going on. - features, orgPreferences: In addition to turning on features I needed, like Live Agent and Einstein Analytics, I also made some modifications that saved me time while developing. In particular, turning off the session-based cache (line 8) saved me having to go into Setup > Session Management > Cache Settings with every. single. scratch org.
The last thing I did before my initial project commit was to add a .forceignore file. This would allow me to better enforce separation of metadata between different modules. For the initial commit, the .forceignore was blank.
With my modified scratch org and my .forceignore in place, I had the basics of a Salesforce DX project that could support modular folders.
As I worked, I could add modules into my sfdx-project.json in a pattern first outlined by Andrew Fawcett, who works as Vice President of Product Management at Salesforce. For example, later in my project, my sfdx-project.json looked like this:
1{
2  "packageDirectories": [
3    {
4      "path": "es-base-objects",
5      "default": false
6    },
7    {
8      "path": "es-base-styles",
9      "default": false
10    },
11    {
12      "path": "es-space-mgmt",
13      "default": true
14    }
15  ],
16  "namespace": "",
17  "sfdcLoginUrl": "https://login.salesforce.com",
18  "sourceApiVersion": "43.0"
19}
With this markup, the Salesforce CLI could interact with three different folders in my project: ‘es-base-objects’, ‘es-base-styles’ and ‘es-space-mgmt’. (I ended up giving my ‘es-base’ folder the more precise name of ‘es-base-objects’ as I worked. (More on that below.)
Making sense of your package modules
Before I tried to start pulling apart the metadata I’d pulled out of my demo org, I did two things: deleted unneeded metadata pulled in by unmanaged packaging, and second, I looked for anything not compatible with packaging. (New in Summer ’18, you can check your org’s Metadata Coverage Report to see information about your org’s metadata.) I created a folder (which I didn’t list in my sfdx-project.json) to hold metadata I still wanted to commit to source but wasn’t related to my initial app modules.
Using metadata-based dependencies as my organizing principle for my package, my initial sketch looked like this:

But I also knew that I’d learn more about how best to organize my metadata as I worked. So I focused on building an initial draft of one module at a time, starting with my base package and working up.
This base module was focused on holding all the object-level metadata. I was specifically thinking that custom objects, page layouts, custom list views and any relevant custom or standard fields belonged here. This is the metadata I considered the first line of deployment dependencies.
I started by copy/pasting the entire ‘objects’ folder from my undifferentiated source project into my ‘es-base’ directory. I brought over ‘layouts’ and ‘tabs’ next. I then went into each of the copied folders and deleted any files that weren’t associated with objects (for example, Lightning App tabs). If I wasn’t sure from a file name, I could just look at the xml. For example, I could see tabs created for objects had a <customObjects> tag, and those created for Lightning App pages had a <flexiPage> tag.
After I deleted the unneeded files from my project’s ‘es-base’ folder, I pushed my small amount of metadata to a new scratch org. Once everything deployed, I opened the org and examined my deployment results. Success meant my objects, fields, layouts, tabs, etc. were landing in my scratch orgs. More complex dependencies like page layout assignments, FLS, weren’t included in my module.
I repeated the cycle of adding/editing metadata, creating and pushing to a scratch org, examining results in the scratch org until I was happy with the small slice of metadata and how it was deploying. At this point, I had a rough version of a base objects module.
Pragmatics of separation
If you’re looking at a similar approach and hoping to separate your objects into a truly independent module, you and your team will need to be aware of some implications of this approach. One is a side effect that comes with activation of flexipages (AKA the pages created with Lightning App Builder). When you activate a record-based flexipage, the Lightning App Builder creates an ‘actionOverrides’ tag for the ‘View’ action, which looks like this:
1<actionOverrides>
2        <actionName>View</actionName>
3        <comment>Action override created by Lightning App Builder during activation.</comment>
4        <content>Contact_Record_Page</content>
5        <formFactor>Large</formFactor>
6        <skipRecordTypeSelect>false</skipRecordTypeSelect>
7        <type>Flexipage</type>
8        <pageOrSobjectType>Contact</pageOrSobjectType>
9</actionOverrides>
If you activate a record-based flexipage as the org wide default, that tag will be added into the object-meta.xml for that object. If you activate a flexipage at the application level, this tag gets added into the application’s app-meta.xml file.
You’ll be unable to deploy any objects that contain this actionOverride tag without also having the related flexipage(s) in the same module. If you want to keep your objects truly separate, you’ll need to delete these tags from your object-meta.xml files.
This same pattern holds for any custom action overrides on an object. If you want to create a module that is truly object-only, you’ll have to separate out the actionOverride tags from your object-meta.xml.
Let’s look at an example taken from the Contact object, with a custom override on the ‘New’ action:
1<?xml version="1.0" encoding="UTF-8"?>
2<CustomObject xmlns="http://soap.sforce.com/2006/04/metadata">
3    <actionOverrides>
4        <actionName>CancelEdit</actionName>
5        <type>Default</type>
6    </actionOverrides>
7    <actionOverrides>
8        <actionName>Clone</actionName>
9        <type>Default</type>
10    </actionOverrides>
11    <actionOverrides>
12        <actionName>Delete</actionName>
13        <type>Default</type>
14    </actionOverrides>
15    <actionOverrides>
16        <actionName>Edit</actionName>
17        <type>Default</type>
18    </actionOverrides>
19    <actionOverrides>
20        <actionName>Merge</actionName>
21        <type>Default</type>
22    </actionOverrides>
23    <actionOverrides>
24        <actionName>NewContact</actionName>
25        <content>newContactOverride</content>
26        <formFactor>Large</formFactor>
27        <skipRecordTypeSelect>false</skipRecordTypeSelect>
28        <type>LightningComponent</type>
29    </actionOverrides>
30    <actionOverrides>
31        <actionName>View</actionName>
32        <type>Default</type>
33    </actionOverrides>
34    <compactLayoutAssignment>SYSTEM</compactLayoutAssignment>
35    <enableFeeds>true</enableFeeds>
36    <enableHistory>false</enableHistory>
37    <searchLayouts>
38        <customTabListAdditionalFields>FULL_NAME</customTabListAdditionalFields>
39        <customTabListAdditionalFields>ACCOUNT.NAME</customTabListAdditionalFields>
40        <customTabListAdditionalFields>CONTACT.PHONE1</customTabListAdditionalFields>
41        <lookupDialogsAdditionalFields>FULL_NAME</lookupDialogsAdditionalFields>
42        <lookupDialogsAdditionalFields>ACCOUNT.NAME</lookupDialogsAdditionalFields>
43        <lookupDialogsAdditionalFields>ACCOUNT.SITE</lookupDialogsAdditionalFields>
44        <lookupPhoneDialogsAdditionalFields>FULL_NAME</lookupPhoneDialogsAdditionalFields>
45        <lookupPhoneDialogsAdditionalFields>ACCOUNT.NAME</lookupPhoneDialogsAdditionalFields>
46        <lookupPhoneDialogsAdditionalFields>CONTACT.PHONE1</lookupPhoneDialogsAdditionalFields>
47        <searchResultsAdditionalFields>FULL_NAME</searchResultsAdditionalFields>
48        <searchResultsAdditionalFields>ACCOUNT.NAME</searchResultsAdditionalFields>
49        <searchResultsAdditionalFields>ACCOUNT.SITE</searchResultsAdditionalFields>
50        <searchResultsAdditionalFields>CONTACT.PHONE1</searchResultsAdditionalFields>
51        <searchResultsAdditionalFields>CONTACT.EMAIL</searchResultsAdditionalFields>
52    </searchLayouts>
53    <sharingModel>ControlledByParent</sharingModel>
54 </CustomObject>
For a base package of objects only, I would need to get rid of that custom ‘New’ actionOverrides tag. For a standard object, if I don’t need to deploy custom search layouts, I can even modify my XML to just:
1<?xml version="1.0" encoding="UTF-8"?>
2<CustomObject xmlns="http://soap.sforce.com/2006/04/metadata"/>
For a custom object (which I’ve given the name ‘My Custom Object’), your base object-meta.xml might look like this:
1<?xml version="1.0" encoding="UTF-8"?>
2<CustomObject xmlns="http://soap.sforce.com/2006/04/metadata">
3    <actionOverrides>
4        <actionName>Accept</actionName>
5        <type>Default</type>
6    </actionOverrides>
7    <actionOverrides>
8        <actionName>CancelEdit</actionName>
9        <type>Default</type>
10    </actionOverrides>
11    <actionOverrides>
12        <actionName>Clone</actionName>
13        <type>Default</type>
14    </actionOverrides>
15    <actionOverrides>
16        <actionName>Delete</actionName>
17        <type>Default</type>
18    </actionOverrides>
19    <actionOverrides>
20        <actionName>Edit</actionName>
21        <type>Default</type>
22    </actionOverrides>
23    <actionOverrides>
24        <actionName>List</actionName>
25        <type>Default</type>
26    </actionOverrides>
27    <actionOverrides>
28        <actionName>New</actionName>
29        <type>Default</type>
30    </actionOverrides>
31    <actionOverrides>
32        <actionName>SaveEdit</actionName>
33        <type>Default</type>
34    </actionOverrides>
35    <actionOverrides>
36        <actionName>Tab</actionName>
37        <type>Default</type>
38    </actionOverrides>
39    <actionOverrides>
40        <actionName>View</actionName>
41        <type>Default</type>
42    </actionOverrides>
43    <allowInChatterGroups>false</allowInChatterGroups>
44    <compactLayoutAssignment>SYSTEM</compactLayoutAssignment>
45    <deploymentStatus>Deployed</deploymentStatus>
46    <enableActivities>false</enableActivities>
47    <enableBulkApi>true</enableBulkApi>
48    <enableChangeDataCapture>false</enableChangeDataCapture>
49    <enableFeeds>false</enableFeeds>
50    <enableHistory>false</enableHistory>
51    <enableReports>true</enableReports>
52    <enableSearch>true</enableSearch>
53    <enableSharing>true</enableSharing>
54    <enableStreamingApi>true</enableStreamingApi>
55    <label>Show</label>
56    <nameField>
57        <label>My Custom Object Name</label>
58        <type>Text</type>
59    </nameField>
60    <pluralLabel>My Custom Objects</pluralLabel>
61    <searchLayouts/>
62    <sharingModel>ControlledByParent</sharingModel>
63    <visibility>Public</visibility>
64</CustomObject>
In your base module, objects then deploy with standard actions. You can deploy the metadata needed for your override—say, Lightning Components or Visualforce pages and supporting Apex — in later modules. You may have to manually activate/assign your overrides once you’ve deployed.
If you decide to take this approach, once you’ve created your basic object-meta.xml markup, you should update your .forceignore file to keep your markup intact as you continue to work.
Understanding .forceignore
As you build modular folders into your project, you’ll need to develop a robust .forceignore file.
The .forceignore file must live in the root directory of your project to work properly. Because of this, you’ll have only one .forceignore for your whole project. What you put in this file will control how the Salesforce CLI tries to fetch or deploy metadata between the Salesforce org you’re working with and the copy of your project on your local machine. The .forceignore file can be awkward to work with if you don’t understand how its syntax relates to your project and the files inside your project.
In the earliest stage of developing my es-base folder, my .forceignore looked like this:
1**profiles
2package.xml
3
4#es-base
5es-base/main/default/applications
As the documentation shows, the .forceignore file lets you use wildcard (**) operators to declare files that you’d like to ignore. These wildcards apply to your whole project. Here, I excluded any profile metadata from my entire project. You can’t use wildcards to exclude metadata from just one or two folders in your project.
I got more specific about the behavior of my ‘es-base’ folder by adding the ‘applications’ file. This meant my ‘es-base’ module wouldn’t interact with any application metadata — whether standard applications provided by Salesforce, like Lightning Sales or Lightning Service, or custom applications in my environment.
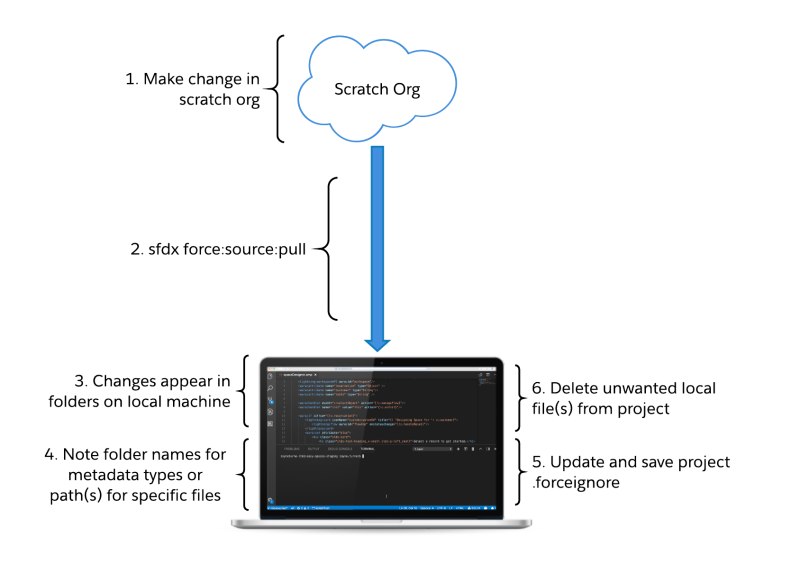
The pragmatics of getting your metadata separated into modules means that your .forceignore file can get rather long and repetitive. But keeping your individual folders clear of cruft is worth the effort. And so is avoiding an accidental deletion of metadata in your development environment after you delete local copies of files and run a push command. If you’re not sure what you should be adding to your .forceignore file, just watch what comes into your project folders as you run sfdx force:source:pull commands.
If you see files that you don’t want (like a custom app showing up in the folder you want to use for your data model), you should add that file to your .forceignore directory, delete the local copy of the file, and continue on your way. You can exclude all types of a certain kind of metadata from a module in your project (like I did with the application example above), or you can pick and choose specific pieces.
As I worked, I tried to keep my .forceignore as manageable as possible by enforcing a convention. I put all my project-wide exclusions at the top of the document and then added individual modules below, in sections. This becomes especially important while you’re working to isolate metadata and focus on certain parts of a project.
For example, later in my development, my .forceignore looked like this:
1**profiles
2**lightningExperienceThemes
3**applications
4**flexiPages
5**tabs
6**globalValueSets
7package.xml
8
9#es-base-objects
10es-base-objects/main/default/applications
11
12#es-base-styles
13es-base-styles/main/default/applications
14es-base-styles/main/default/settings
15
16#es-space-mgmt
17es-space-mgmt/main/default/contentassets
18es-space-mgmt/main/default/settings
19es-space-mgmt/main/default/objects
20es-space-mgmt/main/default/layouts
21es-space-mgmt/main/default/globalValueSets
You’ll notice that I have certain kinds of metadata declared at both the project level (**applications) and at the level of individual modules, (es-base-styles/main/default/applications). I found myself often commenting in/out wildcards to suppress kinds of metadata in order to have my force:source:push and force:source:pull commands just interacting with a specific kind of metadata. At the moment I grabbed this sample, I didn’t want any applications or flexipage or tab metadata going back and forth from my project and my scratch org because I wanted to just focus on the contents of a module’s aura folder.
As I moved into working with, say, flexipages or tabs, I could then either remove the wildcards for those metadata types or comment them out and test that my sfdx force:source:pull command was just interacting with the metadata I wanted. If I found errors, I’d update my .forceignore, clean up my project, and keep working.
Understanding how source syncs across your project
As you develop individual modules in your project, you may wonder how you make sure that metadata ends up in the right places as you’re pushing/pulling and modifying metadata on your machine. This is where understanding the relationship between the project directories in your sfdx-project.json and the force:source commands will help.
As you issue a force:source:pull command, the Salesforce CLI will use whatever project directory you’ve marked with default: “true” in your sfdx-project.json as the first place to add new metadata. I found it most manageable to use whatever module I was working most closely with as my default directory. But as I worked, I often found myself modifying my sfdx-project.json, depending on where I wanted the changes I just made to end up after my next pull command.
Once you’ve added a piece of metadata into a particular directory, the Salesforce CLI will respect your organization. The markup for the default package directory in your sfdx-project.json will not alter force:source:pull synching changes to metadata located in a directory that isn’t the default. What will interfere or block changes from pushing up from or pulling down to your local machine is the markup in your .forceignore file, as explained above, and removing a folder from your sfdx-project.json entirely.
As you work on moving metadata into meaningful units, you may find yourself working across multiple directories, altering many files and generally having to multi-task in order to just check the impact of changing one or two lines of code or markup. There are a few key things to keep in mind as you adjust to working this way:
- Use
sfdx force:source:statusoften — especially after making changes directly in your development environment. There may be wide-spread impacts of turning on or changing a feature in Setup or modifying something else directly in your org. Runningforce:source:statusfrequently will help you better understand the impacts of the changes as you make them. You’ll be able to better modify your .forceignore and avoid pulling down unwanted metadata. It can even help you uncover useful metadata types to add into your project. - Don’t expect
sfdx force:source:statusto act like a preview or sanity check of how your .forceignore will behave duringsfdx force:source:pushorforce:source:pull. It won’t. You’ll need to watch all your project folders carefully as you learn to work with your .forceignore file and figure out how to control the behavior of your push/pull commands. - Make sure you know how to find .org configurations for your project. They’re listed in the ‘.sfdx’ folder (this may be hidden on a Mac) contained within your main project directory. In that .sfdx folder, you’ll see another folder called ‘orgs’. Here, you’ll see every scratch org you’ve ever created and associated with your project listed. The files are labeled according to the system-generated scratch org username (like test-xmgpv1tmshae@example.com). You’ll need to delete org configurations from time to time, in order to correct problems with
force:source:pushandforce:source:pull(More on that below.) Be careful about modifying anything else in the .sfdx folder. Those files are intrinsic to the behavior of the CLI on your machine. - Intermittently,
sfdx force:source:pushandsfdx force:source:statusmay go blind to or skip over pieces of metadata. This is most likely to happen after you’ve tried to push metadata and encountered an error. You may or may not notice this behavior immediately, depending on the error. To get source to track properly again, you’ll need to delete the org file for the scratch org you’re working with and try your commands again. If you’re not sure which name matches the org you’re working with, you can runsfdx force:org:list. You can also delete all the org files. Another org file will be generated whenever you next interact with a particular scratch org. - Intermittently, after moving a file to a new folder on your local machine,
sfdx:force:source:pushmay stop working, and send error messages about unexpected files, pointing to the old file path for the metadata you moved. To fix this, delete the org file for the scratch org you’re working with and try your command again. - When in doubt, create a new scratch org. Two of the key benefits of scratch orgs are that they don’t take days to provision and they’re disposable. When you find yourself down a road you really, really don’t to be going down, or you get interrupted and lose your brilliant idea and none of your
force:source:statuschecks make sense anymore, or you’ve proven something works/doesn’t work to your own satisfaction — let the scratch org go. - Delete your old scratch orgs often. It will help keep you from burning through all your scratch orgs, and it will help you stay better organized. It will also force you to really use your source as your source of truth.
- Set aliases for your orgs. All of them. You’ll often change which scratch org is set as the default for your project, but you may find yourself wanting to run a push/pull/status/open for an old scratch org, or a sandbox, or another environment, and aliases will let you do that quickly and easily. They can also help you keep track of what scratch org matches what org configuration file. (It can also help you track which org you did x, y, z thing in, if you use meaningful aliases.) Lastly, some commands require the ‘-u’ parameter—scratch org deletion is one—and aliases will help you run those commands quickly and easily.
Where everything ended up
In the end, my modules were like this:

Highlights:
- More granular, focused modules are better. The ‘es-base’ module I’d started with didn’t account for other ‘shared’ metadata, like Apex classes and Lightning components that provided common services. So I decided to go for more isolation and create more base-level modules, rather than make a bigger ‘es-base’ package with more kinds of metadata. So ‘es-base’ actually became ‘es-base-objects’, ‘es-base-code’ and ‘es-base-styles’.
- Don’t modularize without a reason. As I broke out more complex metadata from my unmanaged source, I would ask myself why the metadata couldn’t go into a base package. If there was a metadata dependency in a piece of code or a component that meant it couldn’t go into a base module, I tried to picture what functionality would exist in that piece of metadata WITHOUT the dependency. If the functionality was deeply intertwined with the metadata dependency, then I knew that metadata belonged in my ‘es-space-mgmt’ folder. If there was functionality that would be useful to future applications or other parts of the org, I would then consider refactoring that metadata to become more modular.
- Your current state might have more flexibility than you think. As I started to create my ‘es-base-code’ module, I started to see more possibilities for isolating other parts of my application. I saw that some of the metadata I’d thought of as just being part of my application module was a whole layer of UI-focused code and Lightning bundles. By splitting off that layer, my simple ‘es-styles’ folder could actually become a more powerful ‘es-base-styles’ module.
- There may be no objectively right method. Do what’s right for your team. As I built, I had to be ready to make lots of subjective decisions about what ‘good’ modularization looked like for this org, and what was an unsustainable pattern. For example, I chose to split a permission set into two, to better align with my modules. Choosing to do this added time & complexity to overall developer workflows. It seemed like an acceptable trade-off, in order to have an object-level permission set to re-use later. However, I could have decided to keep my developer workflow more simple, and leave one, more complex permission set intact within the related application module. Then, in the future, another app could have its own permission set. Your modularization should match the working styles that make sense for your team.
- Be ready to make (new) workarounds part of your workflow. As you work, you will discover oddities in Metadata API coverage, tooling, etc. Some of these are discussed above. When you are building modules, you’ll need to decide how you want to keep or let go of metadata that can’t be deployed, or packaged, or that has other limitations. Giving yourself the ability to work with limitations responsibly is another essential reason to start small.
What’s next and what to do now
In our next installment, we’ll walk through the process of turning our modules into unlocked packages. We’ll talk about the implications of turning your modules into packages and the impacts on the app development lifecycle.
In the meantime, now is a great time to get hands on with Salesforce DX. You can sign up for a free 30-day trial org here that will give you a Dev Hub to experiment with. You can also dive deeper into Salesforce DX and source control on Trailhead: