Last fall, we announced a strategic partnership with Apple. As part of that partnership, we’re excited to introduce the new version of the Salesforce Mobile iOS Software Development Kit (SDK) – the first Salesforce Mobile SDK that is optimized for Swift, Apple’s powerful and intuitive modern programming language. The native SDK enables businesses and developers to build and deploy apps for iPhone and iPad with a familiar and powerful user experience, connected to customer data in Salesforce’s secure and trusted environment.
You can read more about the full set of changes here. In this blog post, we are going to view a few noteworthy features of the new iOS SDK and provide some insight as to how you can get started today. First, we’ve simplified the way we initialize the SDK by decoupling initialization from user authentication. Second, we’ve applied Swift-style naming conventions to many of the class, method and parameter names in the SDK. This makes using the SDK much more intuitive for existing Swift developers. Finally and perhaps most excitingly, we will show how developers can leverage the SDK to integrate Face ID and Touch ID in a quick and simple way.
Before we dive too deep into the SDK and Swift, let’s take a second to consider when you might want to use the SDK. The SDK is designed for use cases where the following conditions are met:
- Your company is familiar with iOS development.
- You want to build an experience tailored to your customers’ unique needs beyond what the Salesforce mobile app enables.
- You want to use features of iOS devices such as on-device machine learning, augmented reality, geo-fencing, location, photography and audio.
To show you how to get started, we are going to explore an example app built with Swift 4.2 and the new Salesforce Mobile SDK for iOS.
Introducing TrailInsurance!
TrailInsurance is a car-insurance focused application. Our end users should be able to see current insurance claims and submit new ones on their iPhone or iPad. TrailInsurance Co. claims adjusters use Service Cloud. Thus, the TrailInsurance app needs to retrieve from and create data in Salesforce. Finally, TrailInsurance Co. wants end users to be able to submit data not easily gathered in the standard Salesforce mobile app. With our requirements outlined, we can see that TrailInsurance development would benefit from building a custom mobile app utilizing the Salesforce Mobile SDK for iOS.
TrailInsurance also needs to collect information about accidents. Furthermore, TrailInsurance Co. needs to hear what their client experienced, in the client’s own words. Additionally, TrailInsurance Co wants to use features like Face ID and Touch ID for seamless authentication and access the camera to document data to support claims. Lastly, they want to make their app location-aware.
It starts with a Connected App
From the get-go, TrailInsurance Co. wants to enable customers to see their open claims details. This means identifying and authorizing the user, then retrieving data from Salesforce. The SDK provides out-of-the-box setup for identifying and authorizing the user. Bootstrapping the SDK requires knowing the OAuth 2 ConsumerKey from a Salesforce Connected App.
But there’s more to a Salesforce Connected App than OAuth 2 tokens. Developers editing the Connected App in setup can enable and disable advanced features — for example, screen locking, PIN protection, and push notifications. While we’ve had PIN protection for awhile, how that protection is implemented has changed with this SDK release. Enabling PIN protection on the Connected App now enables Face ID for authorization. This means developers don’t need to write code to handle Face ID (and Touch ID)!

When “Implements Screen Locking & PIN Protection” is checked on the Connected app, the end user can enable Face ID when they set a PIN! When Face ID authorizes the user, the PIN is no longer needed.
Metadata is key
One of the most powerful features of Salesforce is its metadata-driven architecture. Developers can access Salesforce metadata with the SDK to control the user interface. This allows developers to change what users see without releasing a new version of the iOS app. In our use case, this comes into play when displaying claim details by dynamically creating data queries based on org metadata.
Look closely at the line let layoutRequest = RestRequest(method: .GET, path: "/v44.0/compactLayouts?q=(objectType)", queryParams: nil) This code creates a custom REST request that retrieves the Compact Layout details. Any authenticated REST resource works, including custom Apex REST endpoints. When the request completes successfully, it parses the resulting JSON document to obtain a list of fields that are visible on the Compact Layout. The code uses those fields, along with the object type, to retrieve record details for those fields. While this example uses Compact Layouts, you could also pull field lists from custom metadata records.

Of course, retrieving records is only half the purpose of TrailInsurance’s app. If you’ve ever filed an insurance claim, you’ll be familiar with the types of information needed. Where was it? When was it? Who’s involved? Anyone hurt? What happened? What’s the damage look like? Gathering all that in the aftermath of an accident can be stressful. Making it as frictionless as possible is where iOS and the Salesforce Mobile SDK for iOS shine.
Mapping out what happened
TrailInsurance has a single scene to gather all the required information. However, it’s not an endless list of text fields — it is a view of a map.
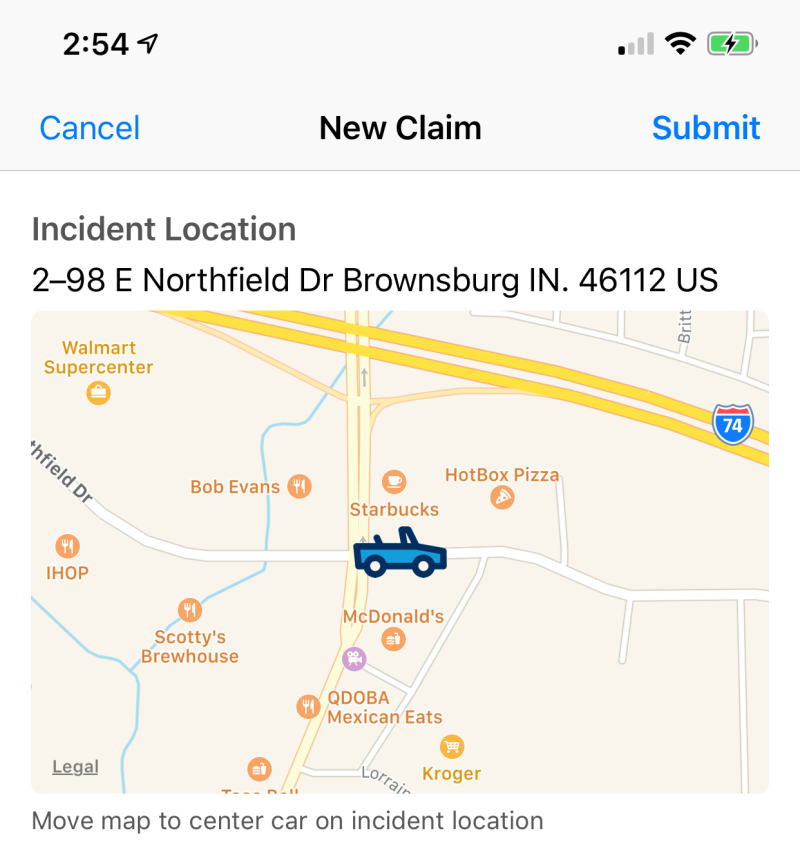
At the top we have a map, complete with a little blue car icon. That car icon is stationary, but the map below the car is movable. Users can indicate the accident location by dragging the map until the car is at the right location. Below that, we have a button for recording an audio description of what happened.

But we’re not just recording the audio — the iOS Speech framework is transcribing the recorded audio into text for us. This text will be uploaded as part of our claim, along with the audio. Pictures are worth a thousand words though, so the app also lets users take photos of the damage as part of their claim. As pictures are taken, they’re displayed as thumbnails in a stack view. In this case, the stack view allows us to display thumbnails in a grid like layout. We can access the other parties’ information in the device’s contacts and attach it to our claim.
The app layers a car icon on top of a scrollable map view. The user can shift or zoom the map underneath the icon which remains pinned at the center. iOS MapKit defines protocol functions and calls them when the map view changes. In the above code snippet, the protocol method mapView(_:regionDidChangeAnimated:) is called whenever the map’s view of a region changes. This allows us to invoke the iOS MapKit’s geolocation service to get the car’s position and provide its approximate address.
After identifying the accident’s location, the user taps a record button. The app starts a count-up time to the left and records the microphone’s input. The user taps the button a second time to stop the timer and recording, and the app processes the audio using the iOS Speech Framework.
Using just a few lines of code, we can invoke the standard UI for taking or selecting photos. In the code above, you can see how we create and present a UIImagePickerController. That’s all we need to write to show the standardized UI for selecting or in this case, taking photos. Of course, once the user has taken a photo, we’ll want to do something with it.
Thankfully, there’s a protocol method for that: imagePickerController(_:didFinishPickingMediaWithInfo:) In this case, we’re appending the image to our controller’s array of images. These images are displayed in the stack view below the button.

The standard iOS controls for images made adding photographs of the accident a breeze. There’s also standardized controls, called the ContactsUI framework, for selecting iOS contacts. This gave us a simple way of harnessing the existing, and familiar contact picker view. Now our users can easily add contact information for other driver(s) and witnesses.
Let’s talk about closures
Swift steps into the limelight when it comes time to actually send the new claim data to Salesforce. Much of the SDK’s interaction with Salesforce occurs asynchronously. We never know how quickly a given API call will return, so it’s hard to coordinate an entire set of calls, especially when we need the results of a query made in the first call to create data in later calls.
Swift helps developers reason out asynchronous logic with completion blocks. Completion blocks are often closures, similar to anonymous functions in JavaScript. Closures are an integral part of the Swift language. They enable developers to utilize named or anonymous functions as parameters in other function calls. These parameter-passed functions inherit the lexical execution scope of the function they were passed into.
That trailing function highlighted in the code is a closure. The send function self.send executes this closure when the asynchronous work completes. At first, closures can be a little hard to wrap your head around.
Completion blocks do not have to be closures though. Closures are first-class functions despite using a different definition syntax than standard functions. Because of this, we can chain together asynchronous work by specifying either pre-defined functions or closures as the completion blocks. Each completion block functions as the next step in the transaction. This is how TrailInsurance ensures its SDK REST calls complete in order. Before we look at how the syntax works, let’s look at the work required to create a new claim.
To submit a new claim, we actually have several discrete bits of work.
- Get the user’s Account ID.
- Create the Case.
- Create Contact records.
- Create CaseContact junction object records to associate contacts to the case.
- Generate a snapshot of the map view and upload it as a case attachment.
- Upload all the photos as case attachments.
- Upload the recorded audio file as a case attachment.
- Notify the user that the claim was submitted and direct them to the list of claims.
Each of these steps defines the next step as its completion handler. For example, we first query for the user’s account ID. When that call successfully completes, we call the create case function. When it finishes, we call the create contact records function and so on. Here’s what that looks like in the code.
Bringing it all together
We built the TrailInsurance app with the newest Salesforce Mobile SDK for iOS and Swift 4.2. Now our end-users have a quick and accurate way to view and create auto insurance claims. Applications like TrailInsurance help ease communication and increase responsiveness. For TrailInsurance Co, harnessing device features drives fast and accurate data collection. This shortens turnaround times which in turn leads to happier customers.
Want to learn more about writing iOS apps with Swift and the Salesforce Mobile SDK for iOS? You can check out the Salesforce Mobile SDK Basics and Native iOS modules. They walk you through installing and using the iOS SDK.