By integrating Google Tag Manager (GTM) with your Salesforce Community, you can enable your marketing team to manage the deployment of marketing tags and tracking pixels, without relying on a developer to modify any code. GTM allows you to track artifacts such as events, scrolling, form inputs, video views, and several other factors that paint a picture of what your users are doing in your community and how they are interacting with the functionality you’ve provided them with. The insights that you learn can prove to be very valuable in how you tweak the functionality in your community to better serve your users, and make completing the actions that they login to your community to complete much quicker and easier.
Proper configuration of Content Security Policy settings on the Salesforce side is one of the common challenges in setting up such an integration, in addition to other configuration that is required on both the Google Tag Manager side as well as on the Salesforce side to tie things together.
This step-by-step guide will walk you through the configuration required, both on the Salesforce Community Builder side as well as the Google Tag Manager side, in order to successfully setup this integration. Additionally, we touch on Content Security Policy considerations, as well as how to test and debug the integration once the setup is completed.
Obtain GTM tracking script
First, you have to create a new Google Tag Manager Container for your Salesforce Community. The container will host settings and configuration, specific to the integration with the Salesforce Community you are configuring.
Here are the steps to follow:
- Login to Google Tag Manager (GTM).
- Create an Account and a Web Container for your Salesforce Community if you haven’t already.
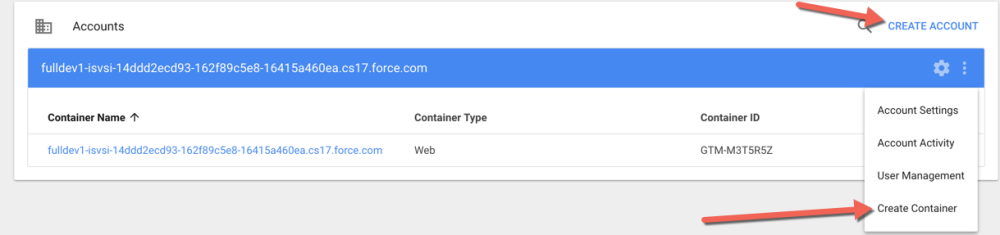
Create Account and Web Container for your Salesforce Community in the GTM admin console.
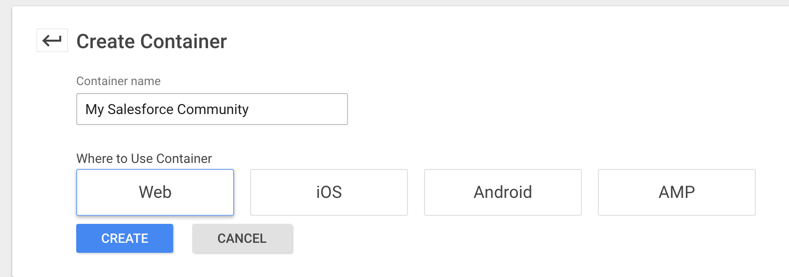
Complete the Create Container wizard with the Container name and selecting “Web” for Where to Use Container.
Next, you will be going through the following steps to generate / copy the Tracking Javascript Code, which you will later use in your Salesforce Community:
- Navigate to the container you’ve created for your Salesforce Community.
- Click on the code starting with “GTM-”.
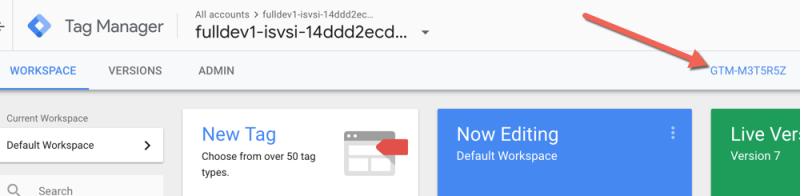
Find and click your GTM code, starting with “GTM-”, in the top right hand corner
3. Copy the code highlighted below to be placed in the <head> tag of the page.
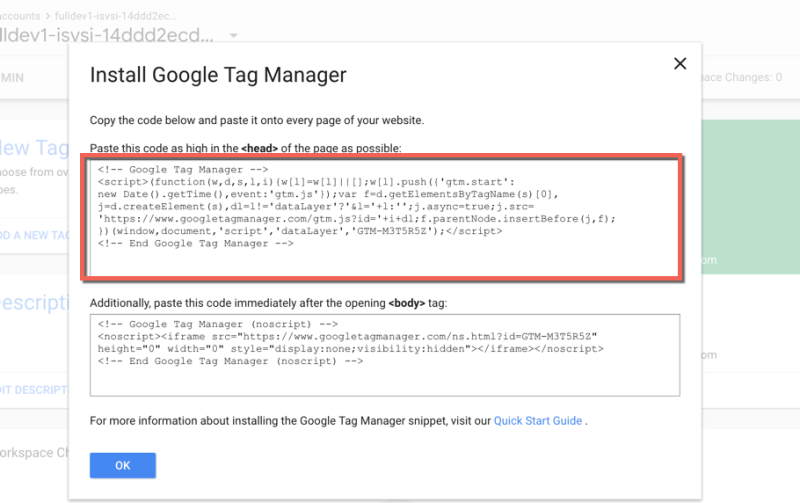
Copy the GTM provided code snippet to paste in the <header> of your site in Community Builder
Configure Google Tag Manager
Configure triggers
Configure GTM Triggers in order to listen to your Salesforce Community Web App for when to fire certain events, such as various HTML element clicks and page views.
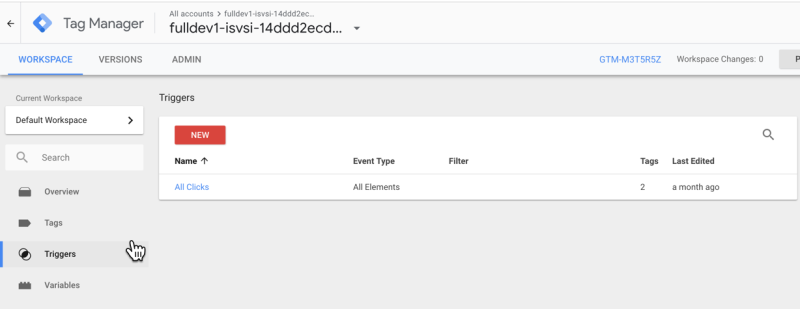
Find and click on “Triggers” in the left menu in the GTM Workspace section
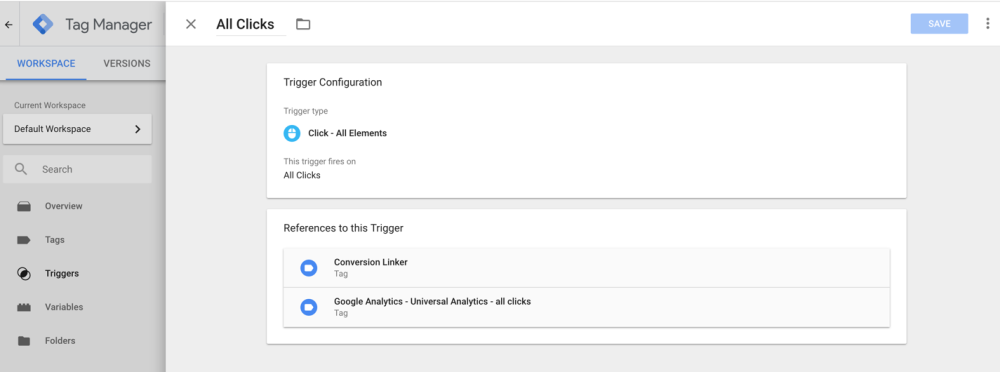
Finish configuring GTM Triggers
Configure tags
GTM allows you to configure a wide range of supported third-party tags, as well as flexibility to define custom tags to implement code that is not yet supported by the platform. You need at least one trigger configured for a tag, in order for that tag to fire.
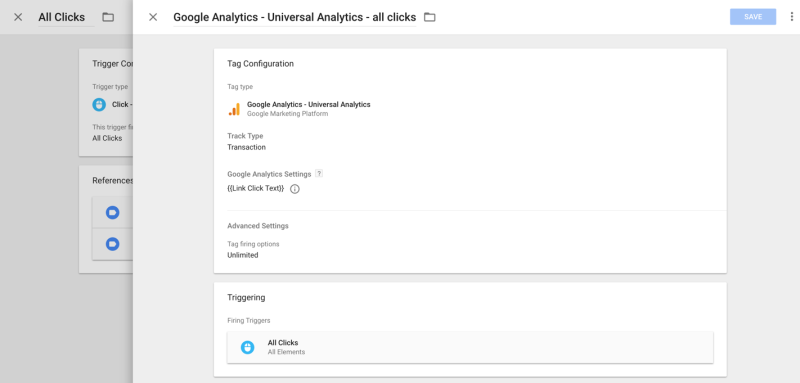
Finish configuring GTM Tags
The above are just examples of Google tag configurations to demonstrate this concept. Specific configuration will depend on requirements for tracking.
Turn on preview mode in Google Tag Manager
Click “Preview” to turn on preview mode in Google Tag Manager. Remain logged into your Google Tag Manager account and leave that tab open with preview mode on. Ensure that you execute the configuration steps for both Google Tag Manager and Salesforce within the same tab set / browser session. You will need this soon.
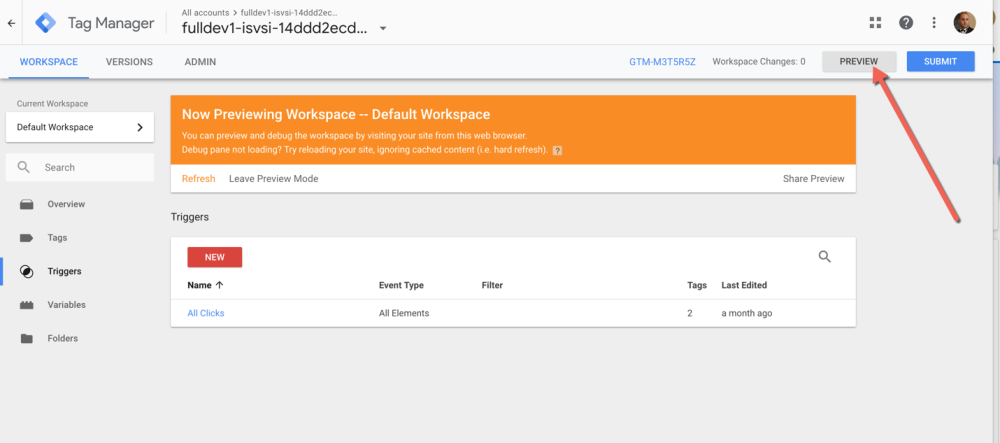
Find and click “Preview” in the top right, while in the GTM Workspace section
Configure Content Security Policy and Trusted Sites in Salesforce Community Builder
Now you will need to properly configure Content Security Policy settings in Community Builder, so that they do not interfere or block any of the Google Tag Manager script functionality.
Here are the steps to do so:
- In a new tab or window, but same browsing session as the one you’re logged into Google Tag Manager with, login to Salesforce and open the Community Builder for the specific community you’re configuring.
- Open Settings → Security
- Set the Script Security Level to “Allow Inline Scripts and Script Access to Whitelisted Third-party Hosts.”
- Add the following trusted sites under Trusted Sites for Scripts:
- GoogleAnalytics: https://www.google-analytics.com
- GoogleAnalyticsAdwords: https://stats.g.doubleclick.net
- GoogleTagManager: https://www.googletagmanager.com
- GoogleTagManagerDebug: https://tagmanager.google.com

In builder, open settings, Security, Content Security Policy
Note: For step #4 above, keep in mind that these URLs may be changed by Google from the time of writing this article. It is recommended to monitor Community Builder Resource Notices and browser console CSP errors to identify what URLs need to be whitelisted.
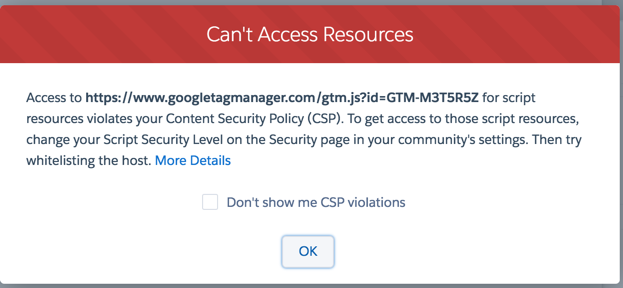
Example notice of CSP violation when in community builder
Example browser console errors of CSP violations
Add GTM Tracking Script to Salesforce Community
Next you will need to add the GTM Tracking Script Code into the <head> tag of your community, as follows:
- In a new tab or window, but same browsing session as the one you’re logged into Google Tag Manager with, login to Salesforce and open the Community Builder for the specific community you’re configuring.
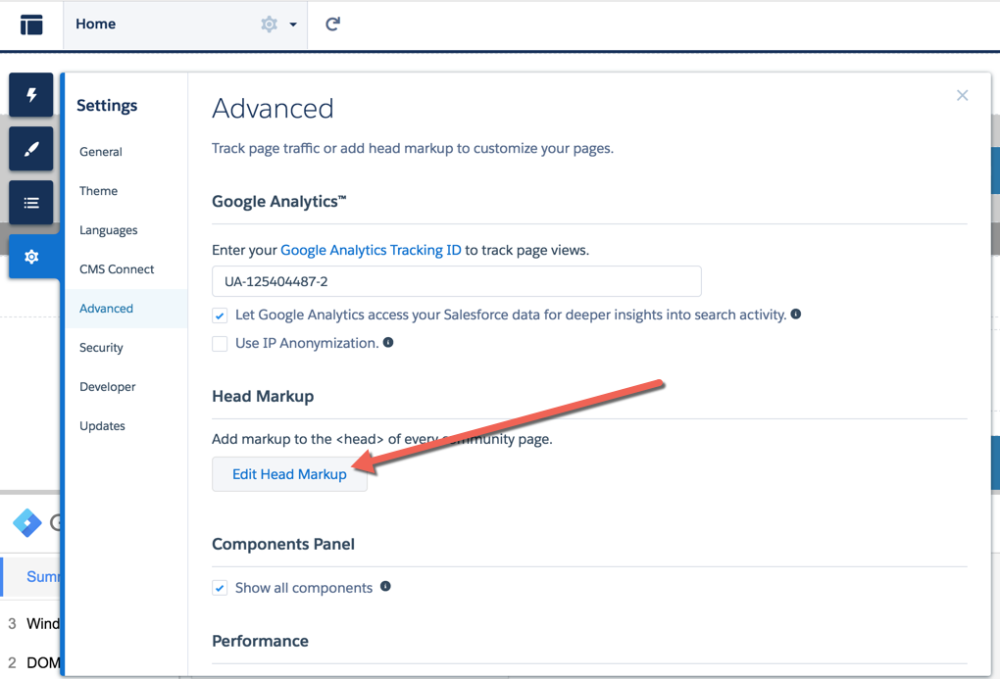
- Open Settings → Advanced
- Typically, you may be using Google Analytics Tracking in conjunction with Google Tag Manager, so you can set your corresponding Google Analytics Tracking Id here.
- Click on “Edit Head Markup.”
Open settings, Advanced and click on Edit Head Markup from Community Builder
5. Copy the GTM Tracking Script Code you obtained in the first step and paste it in the Head Markup within Community Builder.
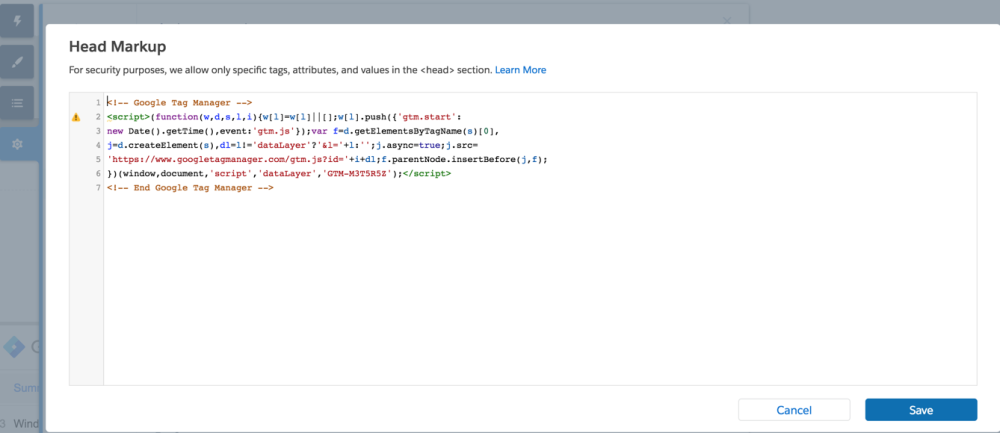
Example of pasted GTM code snippet in Head Markup of Community Builder
6. Click Save and Publish the Community.
Configure Content Security Policy Trusted Sites in Salesforce Setup
By now you may still notice some CSP errors in builder or your browser console. In order to resolve these, you will need to whitelist the domains used by Google Tag Manager for use with Communities from Salesforce Setup as follows:
- In a new tab or window, but same browsing session as the one you’re logged into Google Tag Manager with, login to Salesforce and go to Setup
- In the quick search, type “CSP” and go to “CSP Trusted Sites”
- Add the following trusted sites for resources, setting the context to “Communities”:
- GoogleAnalytics: https://www.google-analytics.com
- GoogleAnalyticsAdwords: https://stats.g.doubleclick.net
- GoogleTagManager: https://www.googletagmanager.com
- GoogleTagManagerDebug: https://tagmanager.google.com
- gstatic: https://www.gstatic.com
- gstaticssl: https://ssl.gstatic.com
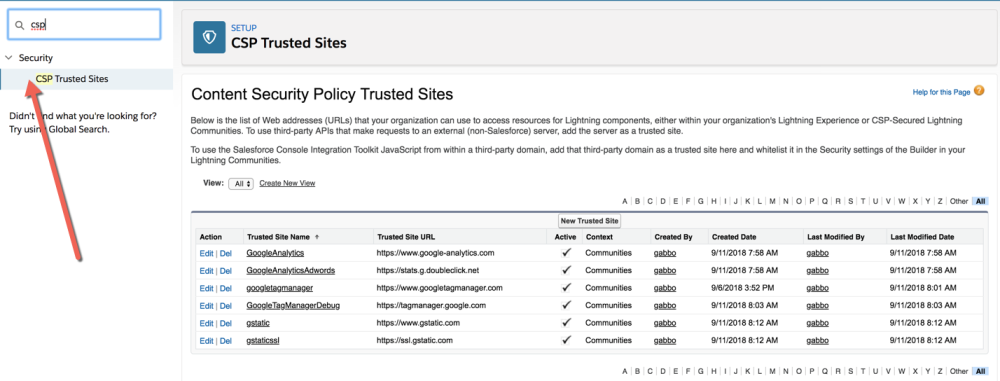
From Salesforce Setup, navigate to CSP Trusted Sites

Create GTM-specific Trusted Site entries with Communities Context
Testing / Debugging the Google Tag Manager implementation
Now that the configuration is complete, you can finally test and debug the events being fired from your community pages for Google Tag Manager. To do this, first make sure you still have your Google Tag Manager tab open and you’re still logged into your account, and have Preview mode on as outlined in Step #1. Then access the Salesforce Community within the same tab set / browsing session as the one you’re logged into your Google Tag Manager in preview mode with.

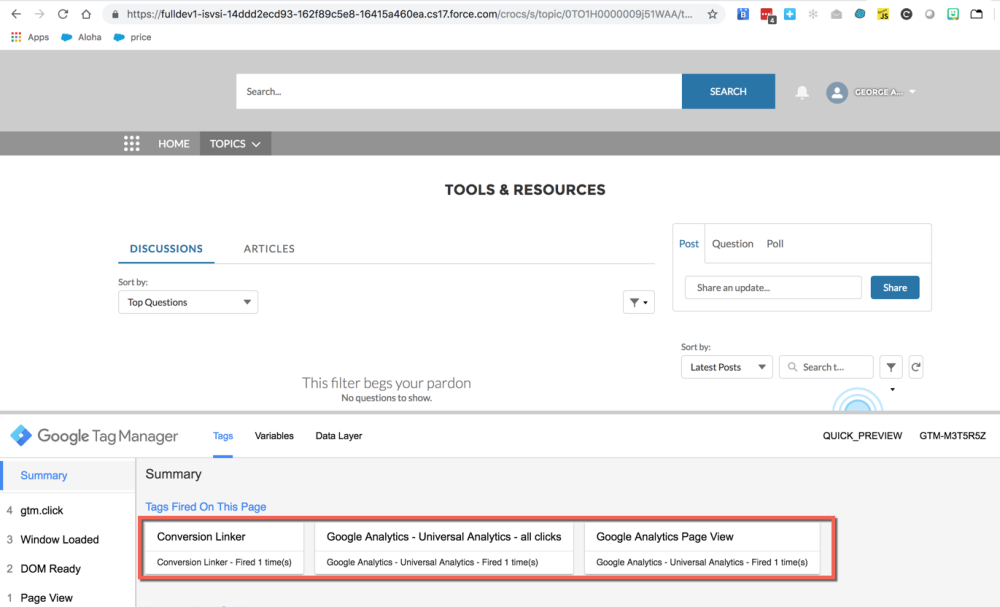
Monitor the GTM debug console for events firing, as your community home page loads
The Google Tag Manager preview / debug window should pop up at the bottom of the Community Home page when accessed. You will start to see which tags get fired on the page as you click around in the Community.
Monitor the GTM debug console for events firing, as you’re navigating to different pages
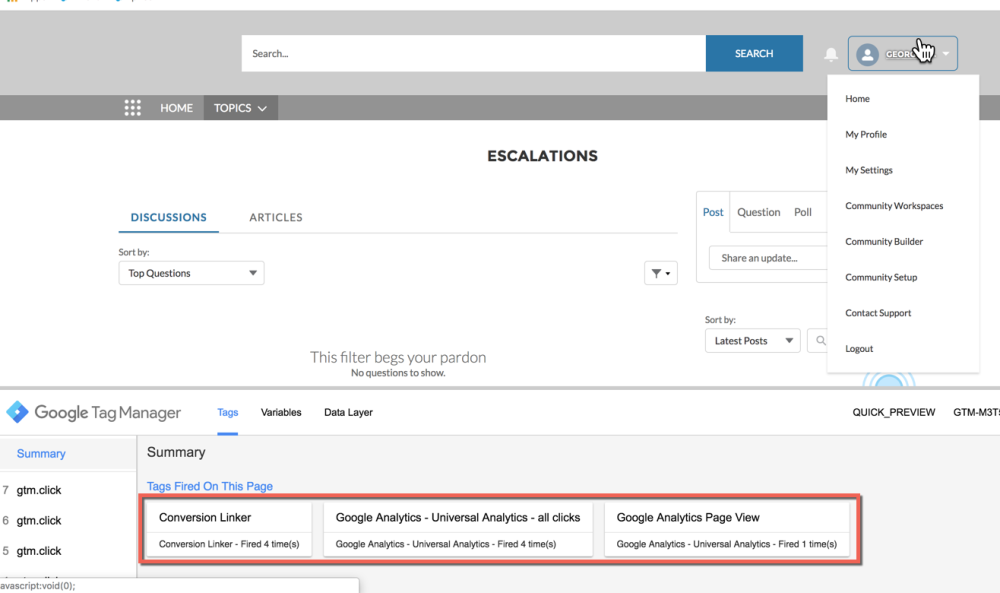
Continue to monitor the GTM debug console for events firing, as you’re navigating to different pages
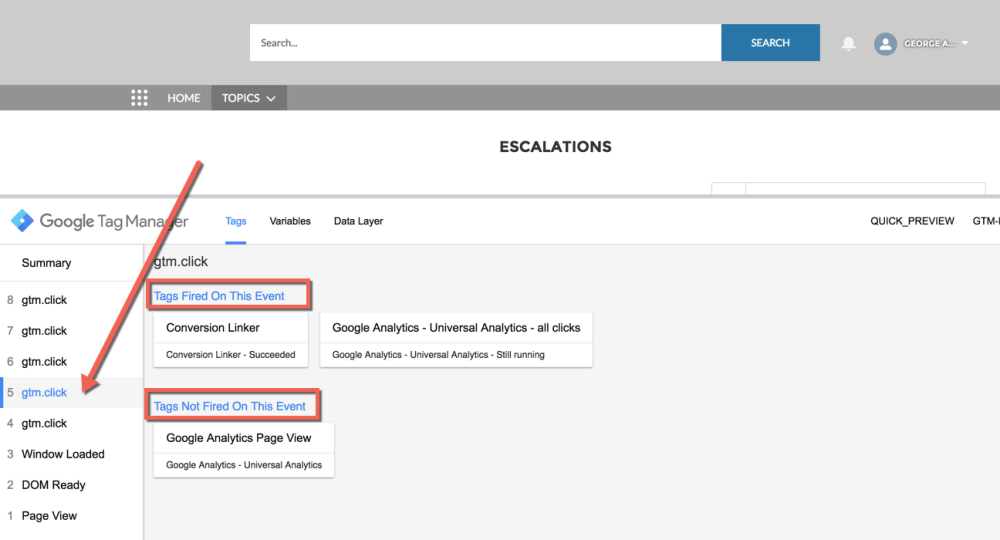
Monitor the GTM debug console for events firing, as you’re interacting with your community page
Conclusion
With the goal of successfully implementing the GTM integration for Community Cloud, we’ve covered the configuration on the GTM side, the configuration on the Salesforce side, Content Security Policy considerations, and testing / debugging methods. Hopefully those areas seem a little more clear at this point and if you’ve completed these steps, you should be seeing the events firing to GTM through the testing/debugging console with preview mode on.
More importantly, you’ve just enabled your marketing team to be able to track various events and artifacts in your community, without them ever needing to update code or requiring access to the Community Builder or Salesforce!
Resources
- Trailhead Module: Google Analytics Basics
- Trailhead Module: Community Cloud Basics
- Documentation (Google Support): GTM Triggers
- Documentation (Google Support): GTM Tags
About the author
George Abboud is an Architect at Salesforce, focused on Community Cloud Technical Architecture and Adoption. He is responsible for technical coordination between our family of customers and the Community Cloud product team on complex implementation matters. Follow him on Trailhead, Twitter, and LinkedIn.