Anyone with experience building Lightning communities has probably come across the phrase “clicks, not code” on more than one occasion. That ethos, of making it easy for anyone to build a site or community, has been a driving force of feature development in the Community Cloud and particularly Experience Builder (formerly Community Builder). But we also understand that for developers who build complex, enterprise-level Lightning communities, the lack of access to the code behind this user-friendly interface can hinder productivity.
To solve this problem and help you efficiently manage the end-to-end development lifecycle of Lightning communities, we introduced a new Metadata API type, ExperienceBundle, along with several new commands for Salesforce CLI. So whether you’re a developer, consulting partner, or ISV, you can quickly develop and deploy Lightning communities using your preferred development tools, including Salesforce Extensions for VS Code, Salesforce CLI, Workbench, or your favorite IDE or text editor.
The combined power of ExperienceBundle & Salesforce DX
The ExperienceBundle metadata type provides text-based representations of the Experience Builder settings and site components of a Lightning Community, such as pages, branding sets, and themes. This means that you can now programmatically edit any Lightning community.
And by introducing new Salesforce CLI commands, we’ve harnessed the power of Salesforce DX tooling for creating and publishing Lightning communities. Built around open APIs and the powerful Salesforce CLI, Salesforce DX streamlines the entire development lifecycle and gives you the flexibility to develop using the tools you already know.
Let’s take a closer look…
Buh-bye SiteDotCom, hello ExperienceBundle
Previously, the Network, CustomSite, and SiteDotCom metadata types combined to define a community. However, retrieving the SiteDotCom type produces a binary .site file, which isn’t human readable. So although you can package and deploy a Lightning community using this metadata type, you can’t edit it programmatically. Now, by retrieving the ExperienceBundle type instead of SiteDotCom, you can extract editable community metadata in a human-readable format.
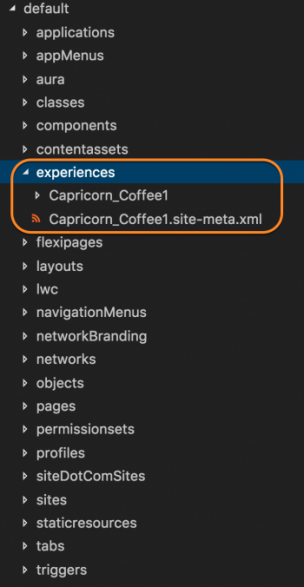
When you retrieve ExperienceBundle, the data is stored in a three-level folder structure. The experiences folder contains the retrieved Lightning communities in your org. Each community_name folder contains subfolders with editable .json files that define the community and represent the different elements you access in Experience Builder. You can programmatically modify these .json files on your local machine, and then deploy your changes to another org, such as a scratch org or developer sandbox.

Salesforce CLI commands for Lightning Communities
Three new commands speed up the process of creating and publishing communities when working with ExperienceBundle in scratch orgs.
force:community:template:listretrieves the list of templates available in your org for creating a community.force:community:createcreates a community using a template.force:community:publishpublishes your Lightning community to make it live. Each time you publish, you update the live community with the most recent updates.
The (much improved) way to develop Lightning communities
Let’s take a look at a sample programmatic workflow for developing a Lightning community, all the way from creation to going live.
Step 1: Enable the ExperienceBundle metadata type
To enable the ExperienceBundle metadata type, from Setup, enter Communities Settings in the Quick Find box and then select Communities Settings. Select Enable ExperienceBundle Metadata API, and save your changes.
Alternatively, you can enable this feature when creating a scratch org using a scratch org definition file.
After you enable ExperienceBundle, Metadata API calls (such as retrieve and deploy) and Salesforce CLI operations (such as pull and push) use the ExperienceBundle type instead of SiteDotCom.
Step 2: Create your Lightning community
With ExperienceBundle enabled, you’re ready to create your Lightning community. Gone are the days of manually creating communities in Setup. Now, using the shiny new force:community:template:list CLI command, you can quickly pull up a list of available templates and Bolt solutions in your org.
Next, using the force:community:create command, you can create a community in your scratch org—in this case, a Customer Service community called Capricorn Coffee.
The community is created asynchronously, so to confirm that it’s ready, run the following command:
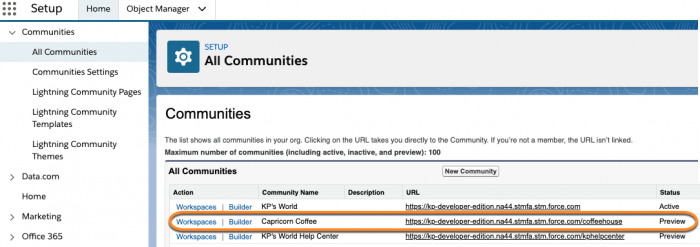
This command opens the All Communities page in Setup, where you can check that the Capricorn Coffee community is listed.
Tip: Not quite sure how to use a command? Simply run the command followed by
-hor--helpto see more details. For example,force:community:template:list -h.
Step 3: Programmatically edit your community
Now on to editing your Lightning community without using Experience Builder. With the new ExperienceBundle metadata type, you can modify multiple communities and their properties by updating just a few lines of code, all from the comfort of your favorite IDE or text editor. You can quickly clone an entire community, move components around, and create components and views.
Tip: Lightning communities comprise two single-page applications (SPAs)—loginAppPage.json and mainAppPage.json. loginAppPage.json is used for login pages and mainAppPage.json is used for all other pages.
An SPA is a web app that loads a single HTML page. Unlike a traditional website, which comprises several pages that the user navigates between, an SPA consists of multiple views that update the page dynamically as the user interacts with it.
So to the end user (or anyone using the Pages menu in Experience Builder), each file in the views folder is equivalent to a page.
To pull the newly created community from the scratch org to your local project, run:
This command pulls the experiences folder into your project along with other related metadata.
Let’s say you want to update the background color of your community’s views. As seen below, whereas you previously had to open the community in Experience Builder, click Theme | Colors, and set the Page Background Color…

…now you open the community’s brandingSets .json file and update the RGB value.
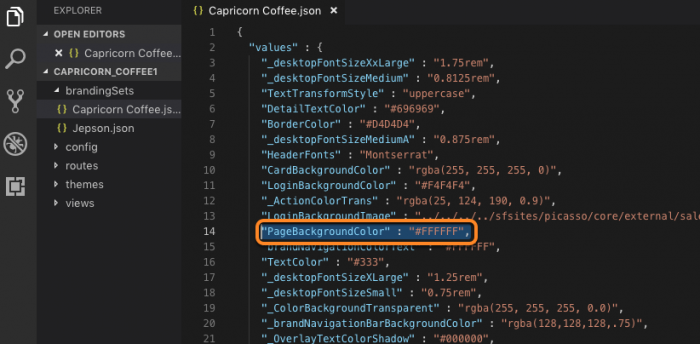
And when we think about making similar changes on a larger scale, such as updating the branding properties of several communities all at once, that’s where ExperienceBundle really shines. This is because you can now quickly locate and update properties using search and replace, rather than manually configuring each property in Experience Builder.
As soon as your changes are done, you can run:
This command pushes the updates to your scratch org, where you can immediately view your changes to make sure everything looks as it should.
Step 4: Deploy, publish, and activate your community
When you’re happy with the changes, you can then deploy your Lightning community to a sandbox or production org, in the same way that you deploy any other metadata type.
To publish the community after you test your updates, run:
The first time you publish a Lightning community, you make the community’s URL live and enable login access for community members.
Additionally, to send a welcome email to all community members, you can activate the Lightning community using the Metadata API. Activation is also required to successfully set up SEO for Lightning communities.
To activate a community, retrieve the Network type and change the status field from UnderConstruction to Live.
(Pssst…you can also go to Administration | Settings in Community Workspaces, and click Activate. But why would you want to leave your cozy developer environment for that?)
Things to keep in mind
- Before you update the .json files of a Lightning community, make sure that your community metadata is in version control or otherwise make a copy of the community’s folder as a backup.
- To facilitate parallel development when working with multiple developers on the same community, we recommend creating a base community first. Then each developer uses a copy of the community to work from. Because ExperienceBundle maintains relationships between components by using IDs in several .json files, this practice helps avoid any breakage-causing changes to these references. Remember to check that these references are intact when merging files.
- When deploying your community using Metadata API, make sure you include all dependencies in the package. In addition to the Network, CustomSite, and ExperienceBundle components, include all other components required by your community, such as custom objects, custom fields, custom Lightning components and Apex classes.
- If you use change sets to deploy your community, the list of dependencies includes two items of type Site.com—MyCommunityName and MyCommunityName1. MyCommunityName1 now represents ExperienceBundle instead of SiteDotCom.
- If you create a custom component with an attribute that references a Salesforce object, use the object’s developer name as the attribute value and not the object’s ID.
Additional resources
- ExperienceBundle (Metadata API Guide)
- Salesforce CLI Command Reference
- Get Started with Salesforce DX (blog series)
- Salesforce DX Setup Guide
- Salesforce DX Developer Guide
- App Development with Salesforce DX (Trailhead module
About the author(s)
Caragh Smyth & the CEI Team
Caragh Smyth is a Lead Technical Writer on the Community Cloud doc team at Salesforce. In writing this blog post, she collaborated with the developers on the CEI team responsible for adding these exciting features to Lightning communities.