Introducing Salesforce OAuth Flows for API authentication
In the Summer ’20 Release, Pardot added a more modern, consistent, and secure method for authenticating to the Pardot API. The newly supported authentication method allows customers to leverage the familiar Salesforce OAuth flows using your Salesforce users, no longer requiring a one-off Pardot only user.
If you have current API integrations, please pay close attention since we are asking you to migrate to this new authentication by the Spring ’21 release as part of the Pardot User Migration initiative. The initiative’s overall goal is to increase security to protect your data and enable your admins to manage all users from one location – no longer needing to hop around to effectively manage your user base.
In the following sections, we’ll show you everything you need in order to leverage this new authentication method:
- Setup a connected app for your integration
- Details to gather to implement the integration
- Implementing an OAuth Flow
- Modifying your Pardot requests to leverage Salesforce OAuth
- Tips and best practices
Setting up a connected app
A connected app is a framework that enables an external application to integrate with Salesforce using APIs and standard protocols like OAuth. Connected apps use these protocols to authenticate, authorize, and provide single sign-on (SSO) for external apps. To put it simply, a connected app is a representation of an external application integration.
To set up a connected app, you will need to have Salesforce admin access to follow these steps:
- Go to the Gear Icon > Setup.
- Type in “App Manager” in the settings search bar and select “App Manager”.
- Select “New Connected App”.

- Enter the name for your connected app (i.e. integration name).
- Enter contact details for the owner of the connected app.
- Check the “Enable OAuth Flows” box in the API section.
- Enter a Callback URL. The callback URL is used to redirect users after authentication in browser-based flows. If you are using a browser-based flow (such as Web Server Flow or User Agent Flow), the URL must match the URL you will pass as a callback to OAuth endpoints. If you are not using a browser-based flow, the URL entered will not be used.
- The label for “Access Pardot Services” has changed to “Manage Pardot Services (pardot_api)”. Be sure to include the API name including the parenthesis.

- Click “Save”.
Congratulations! You just configured your connected app. The above setup just scratches the surface of connected apps. If you’d like to learn more, like how to restrict access to certain users, then we recommend reviewing the following resources:
Details to gather to implement the integration
Now that you have a connected app, let’s gather the details that will be needed for integration.
The primary details are:
- Connected App Consumer Key – A unique identifier for your connected app.
- Connected App Consumer Secret – Essentially a password for the connected app.
- Business Unit (BU) IDs – Since a Salesforce Org may have multiple Pardot Business Units, the Business Unit ID routes the API request to the correct Pardot Business Unit for your use case.
- Salesforce User Credentials with Pardot login rights – A user will be required for testing and it would be awesome of you to have that ready to go from the start.
Since the above information is sensitive, particularly the Connected App’s Consumer Secret and Salesforce User Credentials, please consider how to securely share these details with other team members. They should not be shared outside of your organization or published to a public source code repository.
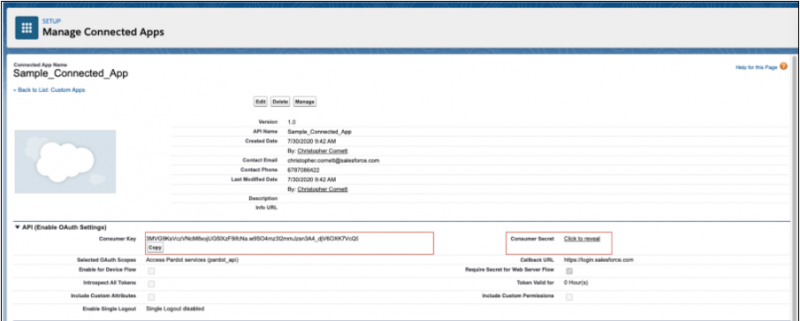
To find the Consumer Key & Secret, follow these steps:
Note: If you just completed the “Setup a Connected App” section, then you can just click “Continue” on the post-save screen and skip to step four.
- Go to the Gear Icon > Setup.
- Type in “App Manager” in the settings search bar & select “App Manager”.
- Go to your connected app and select “View”.
- Copy your consumer key.
- Click “Click to reveal” to show your consumer secret and copy it.
To find the Pardot Business Unit, follow these steps:
- Go to the Gear Icon > Setup.
- Type in “Pardot Account Setup” in the settings search bar and select “Pardot Account Setup”.
- Record the business unit ID(s) for the Pardot instance you plan to integrate via the API.

For the integration user, we recommend creating a unique user for each specific app integration.
Implementing an OAuth Flow in your integration
Salesforce provides many different OAuth flows to meet your specific security and integration needs. We’re going to show you an example leveraging the Web Server OAuth flow. This flow is appropriate when you want the end-user to enter credentials to authorize the integration and you don’t want to store the credentials on your system since it could be a security risk. To learn more about the options and find the best flow for your integration, please refer to Salesforce OAuth Help Documentation.
In order to use Web Server OAuth flow:
- Have your website direct the user to Salesforce’s OAuth authorize endpoint (client_id is your connected app consumer key):
1https://login.salesforce.com/services/oauth2/authorize?response_type=code&client_id=3MVG9IHf89I1t8hrvswazsWedXWY0i1qK20PSFaInvUgLFB6vrcb9bbWFTSIHpO8G2jxBLJA6uZGyPFC5Aejq&redirect_uri=https://my.example.com/myapp&scope=pardot_api- If the user is not logged into Salesforce, the user is asked for credentials.
- If the user has not allowed this app previously, the user is informed that the app will be able to access Pardot data and the user has the choice to allow the app to do so.
- Once the user has logged in and allowed the app, Salesforce redirects the user’s browser to the redirect_uri passed in to the authorize endpoint:
1https://my.example.com/myapp?code=aPrx4sgoM2Nd1zWeFVlOWveD0HhYmiDiLmlLnXEBgX01tpVOQMWVSUuafFPHu3kCSjzk4CUTZg==- Your server side code should exchange this code for an access token by making a POST request to the Salesforce OAuth token endpoint (client_secret is your connected app consumer secret):
1POST /services/oauth2/token HTTP/1.1
2Host: login.salesforce.com
3Content-type: application/x-www-form-urlencoded
4
5grant_type=authorization_code&
6code=aPrxhgZ2MIpkSy0aOdn07LjKFvsFOis6RGcWXz7p8JQCjcqfed5NQLe7sxWwMY_JQFuLwHRaRA==&
7client_id=3MVG9IHf89I1t8hrvswazsWedXWY0iqK20PSFaInvUgLFB6vrcb9bbWFTSIHpO8G2jxBLJA6uZGyPFC5Aejq&
8client_secret=*******************&
9redirect_uri=https://my.example.com/myapp- After Salesforce validates the connected app credentials and authorization code, the endpoint responds with an access token:
1{
2  "Access_token": "00DB0000000TfcR!AQQAQFhoK8vTMg_rKA.esrJ2bCs.OOIjJgl.9Cx6O7KqjZmHMLOyVb.U61BU9tm4xRusf7d3fD1P9oefzqS6i9sJMPWj48IK",
3  "signature": "d/SxeYBxH0GSVko0HMgcUxuZy0PA2cDDz1u7g7JtDHw=",
4  "scope": "pardot_api",
5  "instance_url": "https://example.salesforce.com",
6  "id": "https://login.salesforce.com/id/00DB0000000TfcRMAS/005B0000005Bk90IAC",
7  "token_type": "Bearer",
8  "issued_at": "1558553873237"
9}- The access token can now be used to make calls to the Pardot API as described below. Note that because the code was exchanged for the access token on the server side and not from the user’s browser, there’s no opportunity for malicious Javascript code to steal the access token.
Modify your Pardot requests to leverage Salesforce OAuth
Once a user follows your authentication flow, your application should have an access token. To update your Pardot request there are just two small header changes to make:
- Change your authorization header to have the value “Bearer <insert_bearer_token>”, inserting the bearer token value you received from your token request.
- Include the “Pardot-Business-Unit-Id” header and set the value to the business unit you want to access.
1GET 'https://pi.pardot.com/api/prospect/version/4/do/query?format=json'
2Host: pi.pardot.com
3Authorization: Bearer 00DB0000000TfcR!AQQAQFhoK8vTMg_rKA.esrJ2bCs.OOIjJgl.9Cx6O7KqjZmHMLOyVb.U61BU9tm4xRusf7d3fD1P9oefzqS6i9sJMPWj48IK
4Pardot-Business-Unit-Id: 0UvB0000000TN1tKAG
Once you have made those changes and done some regression testing you have completed the process of migrating your application’s use of the Pardot API to leverage Salesforce OAuth. Well done!
Tips and best practices
Below are some helpful tips and best practices to help make your integration go smoothly.
- Review the different Salesforce OAuth flows to determine which one is the best fit for your integration. The OAuth flow to select depends on the specific requirements of your product.
- If you are leveraging a third-party integration to Pardot, then please reach out to the provider to confirm their migration plans. Depending on the provider, they may provide a connected app for you to install or may expect you to set up the connected app.
- If accessing pi.demo.pardot.com instead of pi.pardot.com and authenticating with a Salesforce sandbox org, you should use test.salesforce.com instead of login.salesforce.com when accessing the OAuth endpoints.
- If you have integrations that span Pardot and Sales Cloud, then consider just using one connected app to help reduce complexity. The connected app framework allows you to add multiple scopes enabling access to both Pardot and Sales Cloud endpoints using the same access token.
- For ease of traceability, consider leveraging a unique user per integration. Having a different user per integration makes it easier to see what traffic is being created by which integration.
- Review the supplemental help documentation to see what other features the connected app framework provides. A few items you may want to consider: restricting the users who can access a connected app, restricting the IPs that can authenticate to an app, and learning how to remove access in case an integration becomes a problem.
Summary
Hopefully, you now feel confident in updating your Pardot API integrations to leverage Salesforce OAuth flows and creating new integrations that use them as well. More importantly, you now have more knowledge to help prepare for the Pardot User Migration due by the Spring ’21 release. I also recommend learning more about all the great Connected App capabilities and Salesforce OAuth options as there is a lot we couldn’t cover in this blog post.
About the authors
Noshir Patel is a Pardot Lead Software Engineer. He focuses on developing Pardot’s API framework and lead the Salesforce OAuth integration. You can follow him on LinkedIn.
Christopher Cornett is a Pardot Senior Product Manager. He focuses on API & Web Tracking capabilities. You can follow him on LinkedIn.