Every day, consumers generate billions of events when they interact with companies via online channels. Making use of this wealth of data is key for every marketer. With Customer 360 Audiences, marketers and others not only have a data warehouse at their fingertips, but they can also query and digest the data beyond the built-in functionality. This blog post will give you an overview of Customer 360 Audiences, how to use the Query API provided, and how to query and visualize data using Tableau.
What is Customer 360 Audiences?
In a nutshell, Customer 360 Audiences is a customer data platform (CDP). As part of Marketing Cloud, it’s designed for marketers who want to drive a personalized experience for their customers by creating a unified profile of each customer. Some of the key features are:
- Data ingestion from web, mobile, and other sources at big data scale
- Data modeling, cleansing, and unification of user profiles from disconnected systems
- Segmentation of customers into unique audience segments
For a more detailed overview, check out the Trailhead module Customer 360 Audiences Basics. This module not only gives you information about key capabilities, but it also gives you an introduction to the Cloud Information Model (CIM). CIM is a new standardized data model that aims to provide a common model for various data modeling use cases across enterprise systems. It is supported by companies like Salesforce, Google, Twilio, and AWS.
Why is CIM important? When you work within CDP, you are working with data models. Many of them are already pre-defined for you, based on CIM definitions. This is relevant to know when thinking about not only unifying your data, but also extracting and visualizing it.
How to authenticate to CDP
CDP works with data at B2C scale and we’re operating it exclusively on our Hyperforce platform. This may not be relevant from a functional point of view, but it is relevant for app development.
CDP runs on a different infrastructure than a Salesforce org, so you will need to follow a specific authentication flow. The pre-condition for this authentication flow is that you will first set up a connected app in your Salesforce org. The connected app needs to be set up for server-to-server authentication, which means (in Salesforce terms) that you need to use the JSON Web Token bearer flow. Note that CDP will need two custom scopes, cdpprofile and cdpquery, as described in the documentation.
The following diagram shows the authentication flow. This flow involves two API calls against the Salesforce REST API to get the CDP token. First, log in into your Salesforce org to get an access token from the org’s /services/oauth2/token endpoint. This is no different from getting access tokens for other use cases. The JSON response of this API call contains a user-specific access token. Next, grab this access token and post it against the /services/a360/token endpoint of your org’s instance. This will return the CDP access token, as well as the instance URL of your CDP environment.
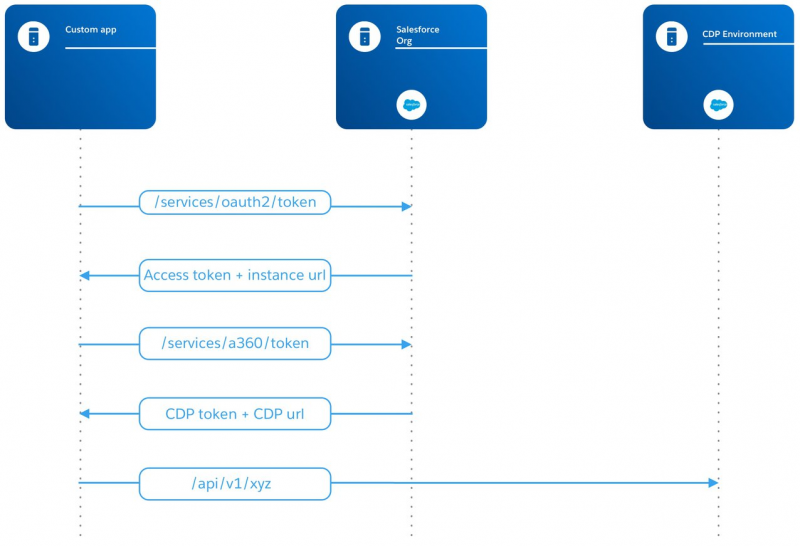
This flow is not a one-time action. For security reasons, the CDP access token has an expiration time (see the documentation). This means that you will have to put in place the authentication flow as a standard element of your implementation. Once you have your CDP access token, you can work with any of the CDP APIs, including the Query API.
How to query CDP using the Query API
Having data is one thing, but being able to extract it is another. Released in Winter ‘21, the new CDP Query API helps you address the latter use case. This REST-based API allows you to query any data from your CDP data lake using a SQL (yes, SQL, not SOQL) syntax.
Let’s say you want to query the birth date and the last name of an individual customer data set. The SQL query would look like this:
While the column names look like standard Salesforce custom field names (identifiable by the __c ending), it is still a SQL and not a SOQL query. The data table that we’re querying in this case is Individual__dlm, where __dlm stands for “Data Lake Model.”
Actual queries are run by sending a POST request to the /api/v1/query endpoint. Within the body of your POST call, you send a simple JSON object with a single sql key. The value of that key should contain the SQL query that you want to run against the data lake.
The API response contains some general information like the row count or start/end times of the query. The actual data that you requested is stored within the data key of that response. Note that the value of that key is always an array.
Now, the API is great for querying individual data. But what if you don’t want to handcraft your SQL queries with all the joins, limits, and offsets? And what do you do when you eventually want to visualize the data for your users, so that they can more easily drill down into their data? That’s where the new Tableau connector for CDP will help you.
How to query CDP using Tableau
Tableau released a new CDP connector as part of its 2021.1 release. This connector allows for direct integration of all CDP data directly into Tableau. It also gives you the same powerful access to CDP data as you would have with the API.
To make use of the new connector, you first have to set up a new connected app within your Customer 360 Audiences org.
- Log in to your Customer 360 Audiences org as an Admin.
- Navigate to Setup → OAuth Custom Scopes.
- Create two custom scopes named cdpquery and cdpprofile.
- Paste this URL in the web browser:
https://login.salesforce.com/services/oauth2/authorize?response_type=token&client_id=3MVG9VeAQy5y3BQVJqaUbFmV5jd8imcck2K5idmrTTGocSu9qZZ6qkbuEkxECKVYwmzm3WgvxkujqsxZDcBpL&redirect_uri=http://localhost:55555/Callback - Click Allow.
- Navigate to Salesforce Org Setup.
- Find the Connected Apps OAuth Usage tab.
- Click Install next to the Customer 360 Audiences Tableau Connection.
- Click Install to confirm.
- After the connected app is installed, navigate to Setup → App Manager → Customer 360 Audiences → Manage OAuth Custom Scopes. Add your previously created custom scopes.
Once you have completed these steps, you can install the new CDP extension within Tableau. The pre-condition for this is to have Tableau Desktop installed.
- Navigate to Tableau’s Extension Gallery.
- Search for and click Customer 360 Audiences.
- Click Download.
- Navigate to Tableau Desktop.
- Under Connect to a Server, click More.
- Find and click Customer 360 Audiences under Additional Connectors.
- Click Sign In.
- In the window that opens, sign in to Salesforce with your username and password.
- Click Allow.
That’s it. Once you have configured this, you can access not only single data model objects, but you can also browse and query all CDP data.

The integration doesn’t stop in Tableau itself. Last year, we launched a custom Tableau Lightning Web Component in collaboration with the Tableau team. This component can be directly installed from the AppExchange into your Salesforce org. And with that, you can bring CDP data seamlessly to the users of your Salesforce org.
Summary
Customer 360 Audiences is a new product that enables you to unify and segment your individual customers. It operates at big data scale, and it provides several APIs to inject or extract data. If you want to go beyond querying data using the provided APIs, you can use the new Tableau connector for CDP.
If you want to learn more about CDP, check out the Explore Customer 360 Audiences trail on Trailhead.
About the author(s)
René Winkelmeyer works as an Architect, Developer Relations, at Salesforce. He focuses on enterprise integrations, JavaScript, node, and all the other cool stuff that you can do with Salesforce technologies. You can follow him on Twitter @muenzpraeger or on GitHub @muenzpraeger.
Mark Rabins works as a Product Manager on Customer 360 Audiences. He concentrates on analytics and data egress. He can be found on Twitter @mrabins or on Github @mrabins.