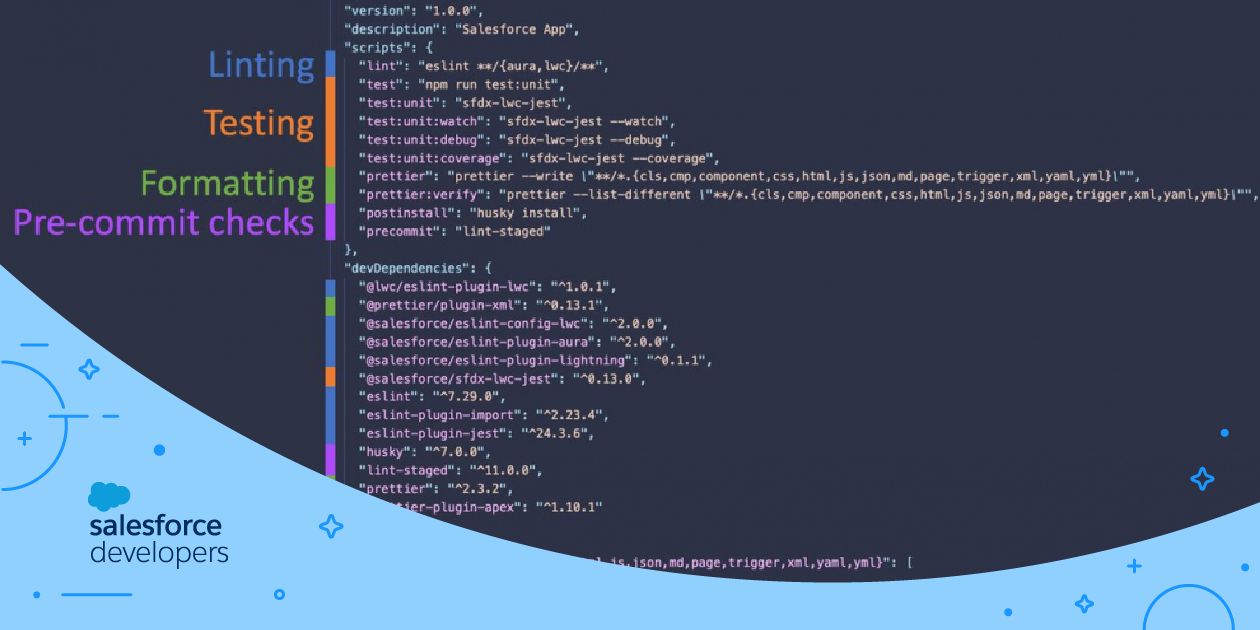
When you create a new project with the Salesforce CLI’s force:project:create command or with VS Code’s command palette, the default project state provides you with some useful tools. One key tool is a set of Node.js scripts and utilities that enhance your developer experience. In this post, we’re going to tour the key aspects of Node.js in a Salesforce project; you’ll learn how you can use it to format, lint, run LWC tests, and execute pre-commit checks. Let’s take a look at the scripts and dependencies that support those actions.
Node.js and the Salesforce project
You may find yourself asking: “Why would I need to know about Node.js if I’m working on a Salesforce project?” The answer is that you can do without it, but you’ll miss out in terms of developer experience and code quality.
You won’t be shipping a Node server application, but the power of Node also resides in the fact that it can be used as a OS-agnostic scripting engine. You can use it for a variety of tasks in your local development environment and CI. We typically use it for formatting, linting, and testing, but you can get creative and do much more. For example, we’re shipping a Node script in the eCars sample application that deploys the Salesforce project to an org, then configures and deploys a couple of related Heroku apps.
The Node project descriptor at a glance
The package.json file holds key information about the Node project. For the sake of brevity, we won’t dive into all of the properties, but we’ll take a look at the most important ones. For reference, here is the documentation on the package.json structure.
The package.json file contains the list of dependencies that a Node project depends upon. Dependencies are split between runtime and development-time-only packages. In Salesforce projects, we only have the latter since we’re only using Node at development time (we’re not shipping a Node executable). You can see the list of development dependencies under the devDependencies property. We’ll take a closer look at these in the sections below.
Another important aspect of a Node project is the set of scripts that it provides in a scripts dictionary property. Scripts let you run custom actions from your terminal. However, before you can do anything with them, you first need to install the Node project with npm, the package manager that’s installed with Node.
You can install the Node project with this command from your terminal: npm install. This creates a copy of the installed packages under the node_modules directory at the root of the project. The first time you install, you will also get a new package-lock.json file that describe the resolved package dependency tree.
Once the project is installed, you can execute scripts with the npm run SCRIPT_ALIAS command where SCRIPT_ALIAS is the key listed in the scripts dictionary.
Now that we’ve covered the important bits of the Node project descriptor, let’s take a look at the tasks that are provided with the Node project and their related scripts and development dependencies.
Formatting with Prettier
When working in a team, it’s important to adhere to common style rules (indentation type, brace positions, line overflow, etc.) so that the entire code base looks consistent no matter who wrote it. To address this need, the default Salesforce Node project includes Prettier (a code formatter) with a set of plugins that help you automatically reformat your code.
We ship the following development dependencies for Prettier:
- prettier — the core library that formats JS, CSS, HTML, JSON, Markdown, and a few other file types
- @prettier/plugin-xml — a plugin that formats XML metadata files
- prettier-plugin-apex — a plugin that formats Apex classes and triggers
You can trigger a reformat by running the prettier custom script that’s defined in the scripts dictionary in package.json:
1npm run prettierThis modifies your source code based on the rules configured in the .prettierrc file (see documentation) while ignoring files and folders listed in .prettierignore (see documentation).
We also provide a prettier:verify script that scans your code base for compliance with your style rules. This script doesn’t modify your files, but it reports an error as soon as it encounters a non-compliant file. This is generally used in CI workflows.
Linting with ESLint
Linting (a form of static code analysis) is another important developer experience improvement that you get by using the built-in Node project. This lets you detect potential errors and bad practices in your code base, such as unused variables/functions or tests with no assertions.
The Node project includes ESLint (a JavaScript linter) with a set of plugins that cover Aura components and LWC.
The list of dependencies that we ship for ESLint is a bit lengthy, but fortunately their use is extremely simple:
- eslint — the core library that lints vanilla JS.
- @lwc/eslint-plugin-lwc — a plugin containing linting rules for LWC code. This adds support for decorators and other framework-specific classes and rules.
- @salesforce/eslint-config-lwc — a module that holds a set of ESLint configurations (a set of linting rules) for LWC. When configuring linting, you can pick from different levels of validation. The default
recommendedconfiguration is generally good enough for all project (see the project page for other options). - @salesforce/eslint-plugin-lightning — additional rules that are specific to the Lightning Platform. This is packaged in a separate module so that you can work without it if you build with LWC OSS rather than on Platform.
- @salesforce/eslint-plugin-aura — a plugin with a set of linting rules for Aura code. This brings support to Aura specific syntax and features.
- eslint-plugin-import — a plugin for working with the ES6+ import/export syntax and that validates paths.
- eslint-plugin-jest — a plugin that brings rules for working with Jest (the library we use for testing LWC).
In order to lint your Aura components and LWC, simply execute npm run lint.
ESLint scans all of the JS files that are not excluded by .eslintignore files (see documentation). ESLint gets its settings (plugins, configurations, rule overrides, etc.) from eslintrc.json files (see documentation). You’ll find example of those configuration files in the force-app/default/main/aura and force-app/default/main/lwc folders.
Testing LWC code with Jest
Unlike with Apex code, testing your LWC code is performed on your local machine thanks to the @salesforce/sfdx-lwc-jest dependency. This dependency wraps together the core Jest library and a plugin that’s specific for LWC.
We provide a handful of scripts for testing:
test:unitruns unit tests for LWCtestsimply callstest:unit. This duplicate alias is provided if you want to chain other types of tests or actions to the command. Note thattestis the default command to run tests, and unlike the other scripts, it can be called without therunargument asnpm test.test:unit:watchruns LWC tests in watch mode. In watch mode, your code is continuously scanned for changes, and tests impacted by your changes are executed. This is extremely convenient as it saves you valuable time when writing tests.test:unit:debugruns LWC tests in debug mode (see these videos for an introduction to LWC test debugging)test:unit:coverageruns LWC unit tests and generates a code coverage report. This lets you track code that is not covered by tests and use features like LWC code coverage highlighting.
Running pre-commit checks with Husky and lint-staged
Beyond the manual scripts that you run on your project, the Node project ships with some interesting automation capabilities that improve code quality. We use husky and lint-staged to setup a pre-commit hook that formats and lints code staged in Git before it can be committed. If any of these checks fail, the commit operation is aborted. This mechanism helps you keep your repository clean.
Pre-commit checks supplement, but do not replace, Continuous Integration
You don’t have anything to do besides using Git and installing the Node project to benefit from the pre-commit checks, but read further if you are interested in learning more about how this works.
When you install the Node project, the postinstall script is automatically executed as this is one of the standard Node.js lifecycle scripts. The postinstall script installs Husky. Husky finds your Git installation and registers some hooks based on the configuration provided in the .husky folder.
By default, we ship the project with a .husky/pre-commit file that triggers the precommit script defined in package.json. The precommit script executes lint-staged with the rules defined in the lint-staged property of package.json.
lint-staged runs scripts on individual files that are staged in Git. In the default project configuration, we run Prettier and ESLint on all of the staged files. To the difference of the prettier and lint scripts, files that are about to be committed (staged files) are ignored.
Tip 1: You can run LWC tests on modified components by adding this lint-staged rule to the existing rules:
1"**/lwc/**": [
2      "sfdx-lwc-jest -- --bail --findRelatedTests"
3]
Tip 2: If you need to skip pre-commit checks for a commit, add a —no-verify flag to your commit command:
1git commit -m "Some changes" --no-verifyWrapping it up
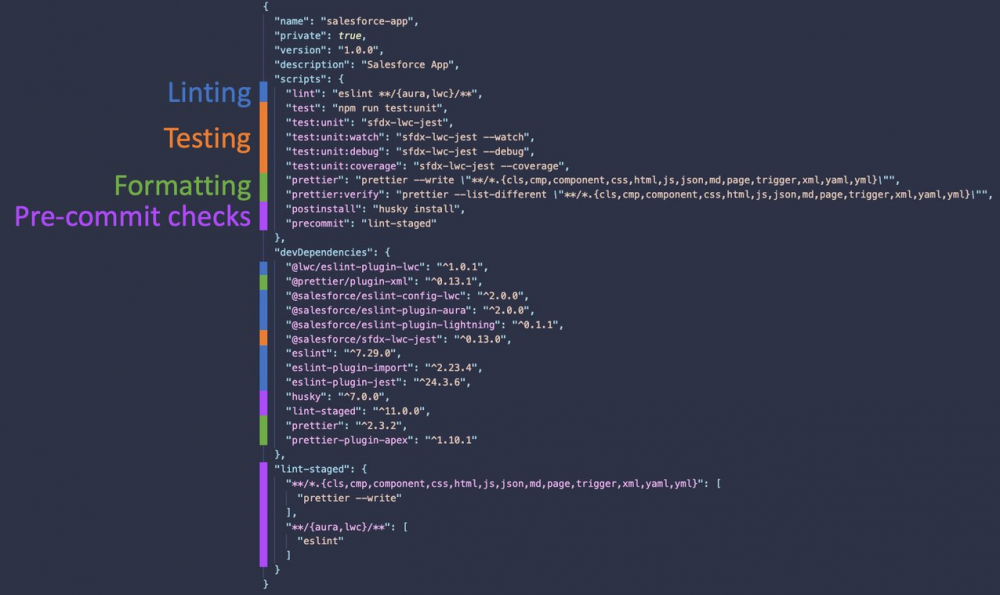
We covered a lot of information, but you should now have a greater sense of the usefulness of the built-in Node.js project shipped in Salesforce projects. You’ve learned about how you can use it to format, lint, test, and run pre-commit checks. Remember that this is just the beginning and that you can extend this project descriptor to make the most of your developer experience and improve your CI workflows.
We’ll leave you with a recap of the default Node descriptor with the actions that we covered in this post:
About the author
Philippe Ozil is a Principal Developer Advocate at Salesforce where he focuses on the Salesforce Platform. He writes technical content and speaks frequently at conferences. He is a full stack developer and enjoys working on DevOps, robotics, and VR projects. Follow him on Twitter @PhilippeOzil or check his GitHub projects @pozil.