Salesforce Flow allows developers and admins to automate complex business processes. Developers can build business process automation via flows using no code, pro code, or a combination of the two. Offloading more straightforward tasks to the standard elements of your flows allows you to focus on writing code for complex business processes, saving you time and resources. Screen Flow, part of Salesforce Flow, is a fantastic innovation that lets developers and administrators create user interfaces and tie them to Salesforce data.
Screen Flow allows developers to use Lightning Web Components (LWC) as flow elements. The Winter ’23 release gave developers the ability to also do the opposite: embed flows within their Lightning web components. Developers can now combine Flows and LWC to create innovative solutions much quicker than building everything from scratch.
In this blog, we will take a use case and show how you can embed Salesforce Flows within Lightning Web Components to create user interfaces that are adaptable to changing requirements.
Use case: Create a record in a Salesforce object
To embed a Screen Flow in a Lightning Web Component (LWC), we need to use the lightning-flow base component (see docs) within your LWC component. To learn how to pass data and manage states between a LWC and a flow, let’s look at the use case of building a simple component that allows users to create a record in a desired Salesforce object quickly. We’ll refer to this component as “Quick Record Create” (quickRecordCreate) going forward.
The end state of the component screen is shown in the screenshot below.

What does the component do?
- Users can click on one of the object names shown on the left (1).
- Upon clicking, the component shows the respective object form, allowing users to fill in data (2).
- Users can click the Save button (3) to insert the record into the selected object in Salesforce.
- Finally, the flow navigates the user to the newly created record.
For more information, see the source code for the component.
Component composition
The component shown in the diagram in the previous section can be completely built using Lightning Web Components. There are multiple ways to build the form component with the various base components, such as lightning-record-form (see docs) or lightning-record-edit form (see docs). However, let’s use Screen Flows to build the form so that we can understand how to embed flows within the Lightning web component, as well as the advantages of using this approach. The diagram below shows how we compose the component using the Lightning web component and the flow.

Building screen flows
The first step we took in designing the quickRecordCreate component is to build the screen flows. To keep the design simple, we built one flow for every object that the quickRecordCreate component supports.
The diagram below shows an example flow for the Account object. We have named this flow “Create_Account.”

The flow is comprised of:
- A Screen element that allows users to input the data. It consists of fields from the Account object.
- A Data element to insert a record into the Salesforce object. In this case, it is the Account object.
- An Assignment element to assign the output variables. Output variables from the flow can be captured from the Lightning web component.
Create Account screen
Let’s look at how the Create Account screen (the first element on the above screenshot) is built. It uses a new Screen Flow feature that allows developers to place record fields directly on the flow screens. This feature is also referred to as “Dynamic Forms” in Flows (see the screenshot below), and it allows the binding of the multiple fields of an object directly to a record variable.
Since this use case was simpler, we made use of the dynamic forms in Flows. For more complex use cases that might involve more interactions, we recommend using the traditional screen flow components. These offer rich features, such as overriding the field labels, adding conditional visibility, and making it required on the layout. Some of these features are on the roadmap to be supported by dynamic forms in Flows as well. Traditional screen flow components will also support reactive screens as an upcoming feature in the Spring ‘23 release.

Insert account
We use the standard Create Records element for the record insertion. The configuration is shown in the screenshot below.

Output variable from flow
In the final step of the flow, we assign the ID of the inserted account to an output variable, recordId. This variable is marked as an output variable as shown in the diagram below. Output variables are available outside the flow.

The assignment for the recordId variable in the flow is shown in the screenshot below.

When the flow finishes, we will pass this output variable to the Lightning web component.
We have built flows for other objects, like contact and opportunity, on similar lines (see the GitHub repo).
Building the quickRecordCreate component
Base components provide reusable building blocks that allow for rapid development. We chose the lightning-tabset component (see docs) as it was most suitable.
Iteration 1 – Getting the boilerplate code working
The boilerplate code that we started with is as follows.
1<template>
2    <lightning-tabset variant="vertical">
3        <lightning-tab label="Account">
4            Account flow
5        </lightning-tab>
6        <lightning-tab label="Contact">
7            Contact flow
8        </lightning-tab>
9        <lightning-tab label="Opportunity">
10            Opportunity flow
11        </lightning-tab>
12   </lightning-tabset>
13</template
Notice that we set the variant as vertical, so the tabs are vertically aligned.
The JavaScript code is a boilerplate as well at this point.
1import { LightningElement, track } from "lwc";
2
3export default class QuickRecordCreate extends LightningElement {
4
5    connectedCallback() {
6
7    }
8}
Iteration 2 – Making the component markup dynamic
We made the code more dynamic in the next iteration by replacing hard-coded HTML markups. We achieved this by using the for:each directive and iterating over a JavaScript array that holds a map of the object label and its corresponding flow.
The component markup is shown below.
1<template>
2    <lightning-card title="Quick Record Create" icon-name="custom:custom1">
3        <lightning-tabset variant="vertical">
4            <template for:each={sObjectToFlowMap} for:item="obj">
5                <lightning-tab
6                    label={obj.sObject}
7                    key={obj.sObject}
8                    value={obj.sObject}
9                >
10                    Flow {obj.sObject}
11                </lightning-tab>
12            </template>
13        </lightning-tabset>
14    </lightning-card>
15</template>
And here is the JavaScript file:
1import { LightningElement, track } from "lwc";
2
3export default class QuickRecordCreate extends LightningElement {
4    sObjectToFlowMap;
5
6    connectedCallback() {
7        this.sObjectToFlowMap = [
8            {
9                sObject: "Account",
10                flowName: "Create_Account"
11            },
12            {
13                sObject: "Contact",
14                flowName: "Create_Contact"
15            },
16            {
17                sObject: "Opportunity",
18                flowName: "Create_Opportunity"
19            }
20        ];
21    }
22}
Code highlights
- We introduced a variable
sObjectToFlowMapthat holds the object name and its corresponding flow names. - We iterated over the
sObjectToFlowMapvariable to create a tab for each object.
Iteration 3 – Embedding flows within the LWC
In this iteration, we embed the flows using the lightning-flow base component (see docs). For more information, see the full code for this component.
The template code with lightning-flow embedded is modified as below.
1<template>
2    .......
3                <lightning-tab
4                    label={obj.sObject}
5                    key={obj.sObject}
6                    value={obj.sObject}
7                    onactive={handleTabActive}
8                >
9                <b>
10                    <lightning-flow
11                        flow-api-name={obj.flowName}
12                        onstatuschange={handleAccountStatusChange}
13                        flow-input-variables={inputVariables}
14                    >
15                    </lightning-flow>
16                </b>
17                </lightning-tab>
18            .....
19</template>
The JavaScript code for the component is changed as below.
1import { LightningElement, track } from "lwc";
2import { NavigationMixin } from "lightning/navigation";
3
4export default class QuickRecordCreate extends NavigationMixin(LightningElement) {
5 ...
6 @track
7 inputVariables = [];
8
9 ....
10 handleTabActive(event) {
11 this.inputVariables = [
12 {
13 name: "ObjectName",
14 type: "String",
15 value: event.target.value
16 }
17 ];
18 }
19
20 handleAccountStatusChange(event) {
21 if (event.detail.status === "FINISHED") {
22 // handle navigation after reading the output variables
23 }
24 }
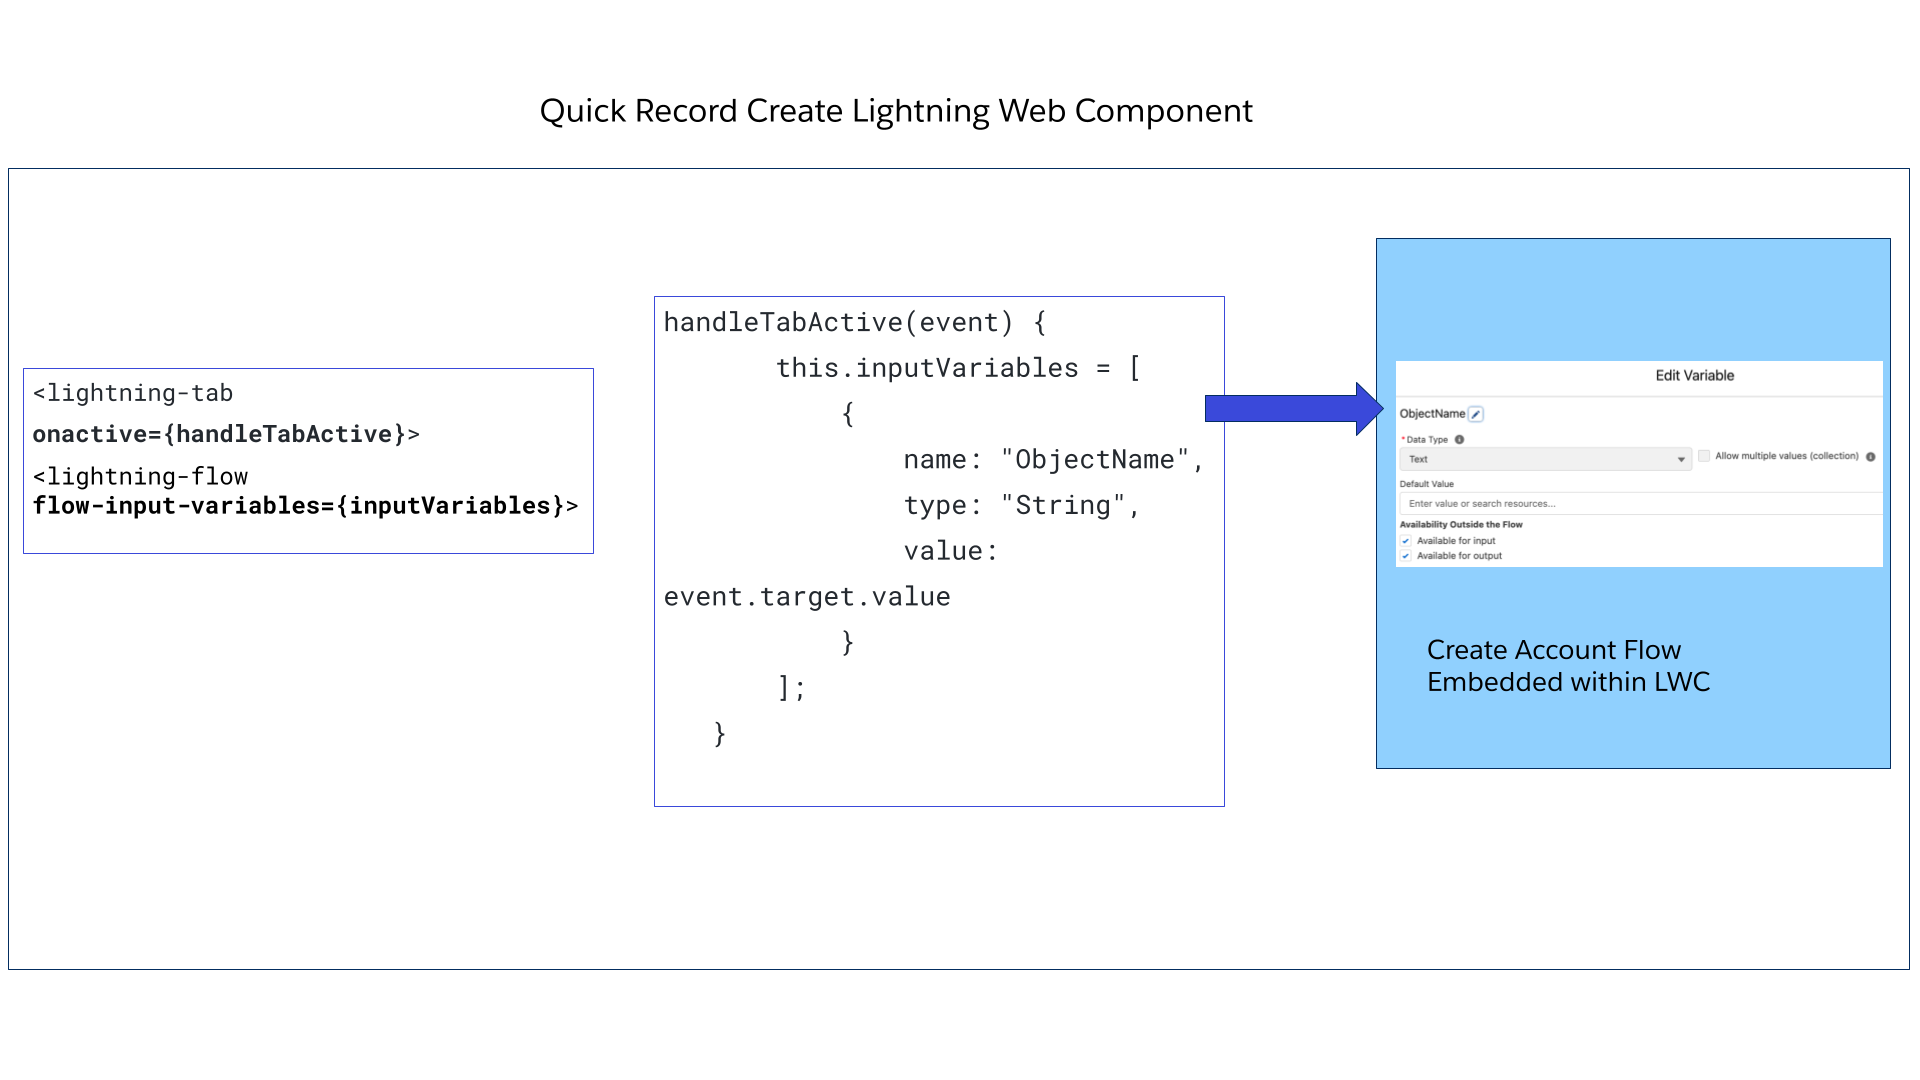
25}Here is a diagram to help you visualize how we can pass input variables from LWC to the embedded flow:
And here is a diagram to help you visualize how we can pass output variables and state changes from the embedded flow to the Lightning web component:

Code Highlights
- To tell the LWC component which flows to launch, use the attribute
flow-api-nameon thelightning-flowbase component. Note that the flow needs to be active before it can render in your LWC. - The
flow-api-nameattribute can read values from the JavaScript file. You do not have to hard-code the flow name into the component markup. The ability to dynamically inject a flow into the LWC enables you to create a loosely coupled component architecture. - To pass input variables from LWC to Flow, you will need to create a property with the name
inputVariablesin your LWC. Check thehandleTabActivefunction (see docs) to see how we pass values to the flow input variables from the LWC component. - You can handle flow status change events by binding a handler function to the
onstatuschangeattribute on thelightning-flowbase component. Check the functionhandleAccountStatusChange(see docs) to see how to check for status changes and read values from the flow output variables within the LWC.
For the last iteration, I challenge you to make the design of the quickRecordCreate component (see docs) more dynamic and table-driven. Use Apex and custom metadata magic to refactor the code for this component that allows administrators to configure the mappings between the objects and the flows. If you are stuck, please reach out to me via the Trailblazer community.
Considerations
- If your flow has custom Lightning web components or Aura components, you can’t use
lightning-flowon Experience Cloud sites that use the Lightning Web Runtime. - The record fields that we used in the screen flow have considerations. Be sure to refer to the documentation to learn more.
- Screen flows currently do not allow us to write unit tests, unlike LWC. Make sure that you use UI automation tools to write end-to-end tests.
Conclusion
Using LWC and Salesforce Flows together allows our component design to be more flexible to adapt to future enhancements. Let’s assume that if the requirements for the quickRecordCreate component is changed to add fields or remove fields from the UI, or even customize screen behavior in the future, the flow used in the LWC component can be enhanced without making the changes to the Lightning web component.
Further Resources
lightning-flow— component referencelighnting-flow— developer documentation
About the author

Mohith Shrivastava is a Developer Advocate at Salesforce with a decade of experience building enterprise-scale products on the Salesforce Platform. He is presently focusing on the Salesforce Developer Tools, Flow, Apex, and Lightning Web Components at Salesforce. Mohith is currently among the lead contributors on Salesforce Stackexchange, a developer forum where Salesforce Developers can ask questions and share knowledge. You can follow him via his Twitter @msrivastav13.