Integrating an external API with your Salesforce org can be a straightforward task that doesn’t require code if you use Named Credentials and External Services. You’ll need to create a named credential that points to the API and set up an external service in the Setup UI. The key here is to provide an OpenAPI specification for the API. If the API doesn’t have one, you can design it yourself manually using YAML or JSON, use the MuleSoft Anypoint Platform, or leverage open-source tools and code.
In this post, we’ll introduce you to the OpenAPI specification and Swagger, discuss the main elements of the specification, and guide you through designing and implementing an API with code. We’ll be using Node.js and Swagger within the Fastify framework for this task. Finally, we’ll integrate this API with Salesforce.
OpenAPI and Swagger
OpenAPI is a specification for designing and building APIs. It provides a standardized way of defining your API to others, providing a structured way that includes endpoints, request/response types, schema definitions, authentication methods, and more. OpenAPI specifications are written in either YAML or JSON formats, both of which are easy to read and write. This specification is widely adopted and supported by a range of tools, making it a popular choice for designing and documenting APIs. In fact, if you want to import an API into Salesforce using External Services, it will need to be specified with OpenAPI. Also, Salesforce is a member of the OpenAPI Initiative.
Note: As of the date of this post, the current version of the OpenAPI specification is 3.1.0.
Swagger, on the other hand, is a set of tools (most of them open source) for implementing the OpenAPI specification. It includes the Swagger UI, which provides a graphical interface for understanding and testing APIs, and Swagger Codegen, which generates client SDK code and server stubs from an OpenAPI specification.
The OpenAPI specification v2 is also known as Swagger, but its name changed when it became part of the OpenAPI initiative in 2016.
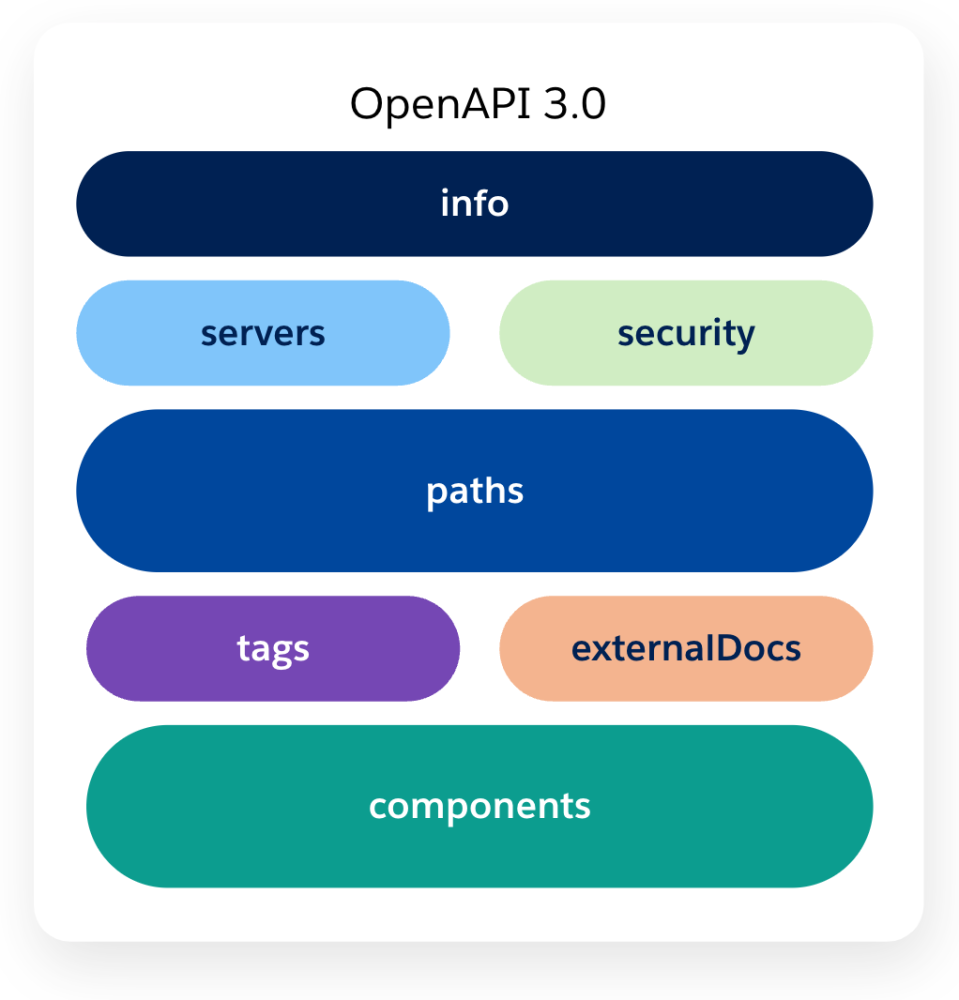
OpenAPI specification basic structure
The OpenAPI specification is organized into the following key sections:
| OpenAPI | Defines the root document, and it combines the resource listing and API declaration. Required |
| Info | Provides metadata about the API, such as the title, description, terms of service, contact information, etc. Required |
| Servers | Specifies one or more base URLs for your API, such as production or staging. |
| Security | Defines a security scheme that can be used by the API operations. |
| Paths | Describes the available paths and operations for the API. Each path has an HTTP method with the details of the operation. |
| Tags | Adds metadata to a single tag that is used by the operation object. |
| External Docs | Provides a description and URL to external documentation. |
| Components | Defines a set of reusable objects for different aspects of the API. This can include schemas, responses, parameters, examples, request bodies, headers, security schemas, etc. |
For a more detailed explanation of each section and its corresponding object definitions, refer to the official OpenAPI specification documentation.
For demonstration purposes, we’ll be creating an API to manage a bookstore. This API will feature two HTTP methods: one for listing the available books, and another for adding new books. Below, you’ll find a basic definition of this API, focusing on the method for listing books (GET /books) and its response objects.
Take note that we are using three main sections here: Info, Paths, and Components. As previously mentioned, we will be describing this API as we implement it using code. For this purpose, we will be using Fastify and Fastify Swagger.
Fastify and Fastify Swagger
Fastify is a highly efficient and flexible web framework for Node.js. It’s designed for ease of use and delivering maximum speed without compromising customization. Fastify provides a solid foundation for web applications and APIs, boasting features such as schema-based request and response validation, hooks, plugins, and automatic logging. One of its main advantages lies in its ecosystem, which includes numerous core and community-maintained plugins.
One of these plugins is fastify-swagger. This plugin allows us to serve both Swagger (OpenAPI v2) or OpenAPI v3 definitions, which are automatically generated from your route schemas or from an existing Swagger/OpenAPI definition. Additionally, you will use fastify-swagger-ui, a plugin that serves an instance of Swagger UI within your application.
Note: The following demo requires Node.js LTS installed, and as of the date of this blog post, the latest version is v18.16.0.
Let’s start creating your bookstore API by installing the Fastify CLI and generating a new project by running:
Then, let’s go to the project folder and install the fastify-swagger and the fastify-swagger-ui dependencies.
Note: In this demo, you will focus on three main aspects: adding Swagger support to Fastify, defining API routes, and outlining schemas and response types. We won’t be explaining how to integrate the API with a database. If you’re interested in exploring the complete project source, it’s available in the codeLive examples repository.
Let’s add Swagger support to Fastify by editing the app.js file, then import both Swagger and SwaggerUI and register them as plugins.
app.js
In the Swagger plugin configuration, you have the option to pass the whole OpenAPI specification definition, or you can leverage the dynamic approach offered by the plugin. For this demo, you will use the dynamic approach. Since the only required field is the info, you will define your API’s metadata there, also, the refResolver section takes care of naming the schema definition references.
And for SwaggerUI, you just specify the route where the documentation site will be hosted.
Now let’s create a schemas folder. This is where you will define your API’s schemas. For this demo, you will define a book schema, and an error schema.
schemas/index.js
The schemas represent the structure of the objects you will be dealing with, for both request and response bodies. For the OpenAPI specification, these objects will be automatically added by the Swagger plugin under the components field.
Finally, let’s define the API routes for GET /books and POST /books using Fastify. First, you will need to register the schemas within Fastify. Then you will specify the response and request objects for each route referencing those schemas.
routes/root.js
Let’s break down the POST /books route:
- The
fastify.postfunction defines the HTTP method. - The first argument specifies the route:
/books. - The second argument specifies the
schema, which includes thebody— the payload object that the API expects. (Note that it is a reference to thebookschema). It also includes multipleresponseobjects for that route, mapping to the corresponding HTTP status codes201and500. - The third argument is the route implementation. In this case, you are inserting the object into the database and returning the new object. If this process fails, you will return an error object. It’s important to note that you are using the same schemas you defined earlier.
Note: You also have the option to exclude certain routes from the documentation by passing hide: true in the schema object of that specific route, as demonstrated in the GET / route.
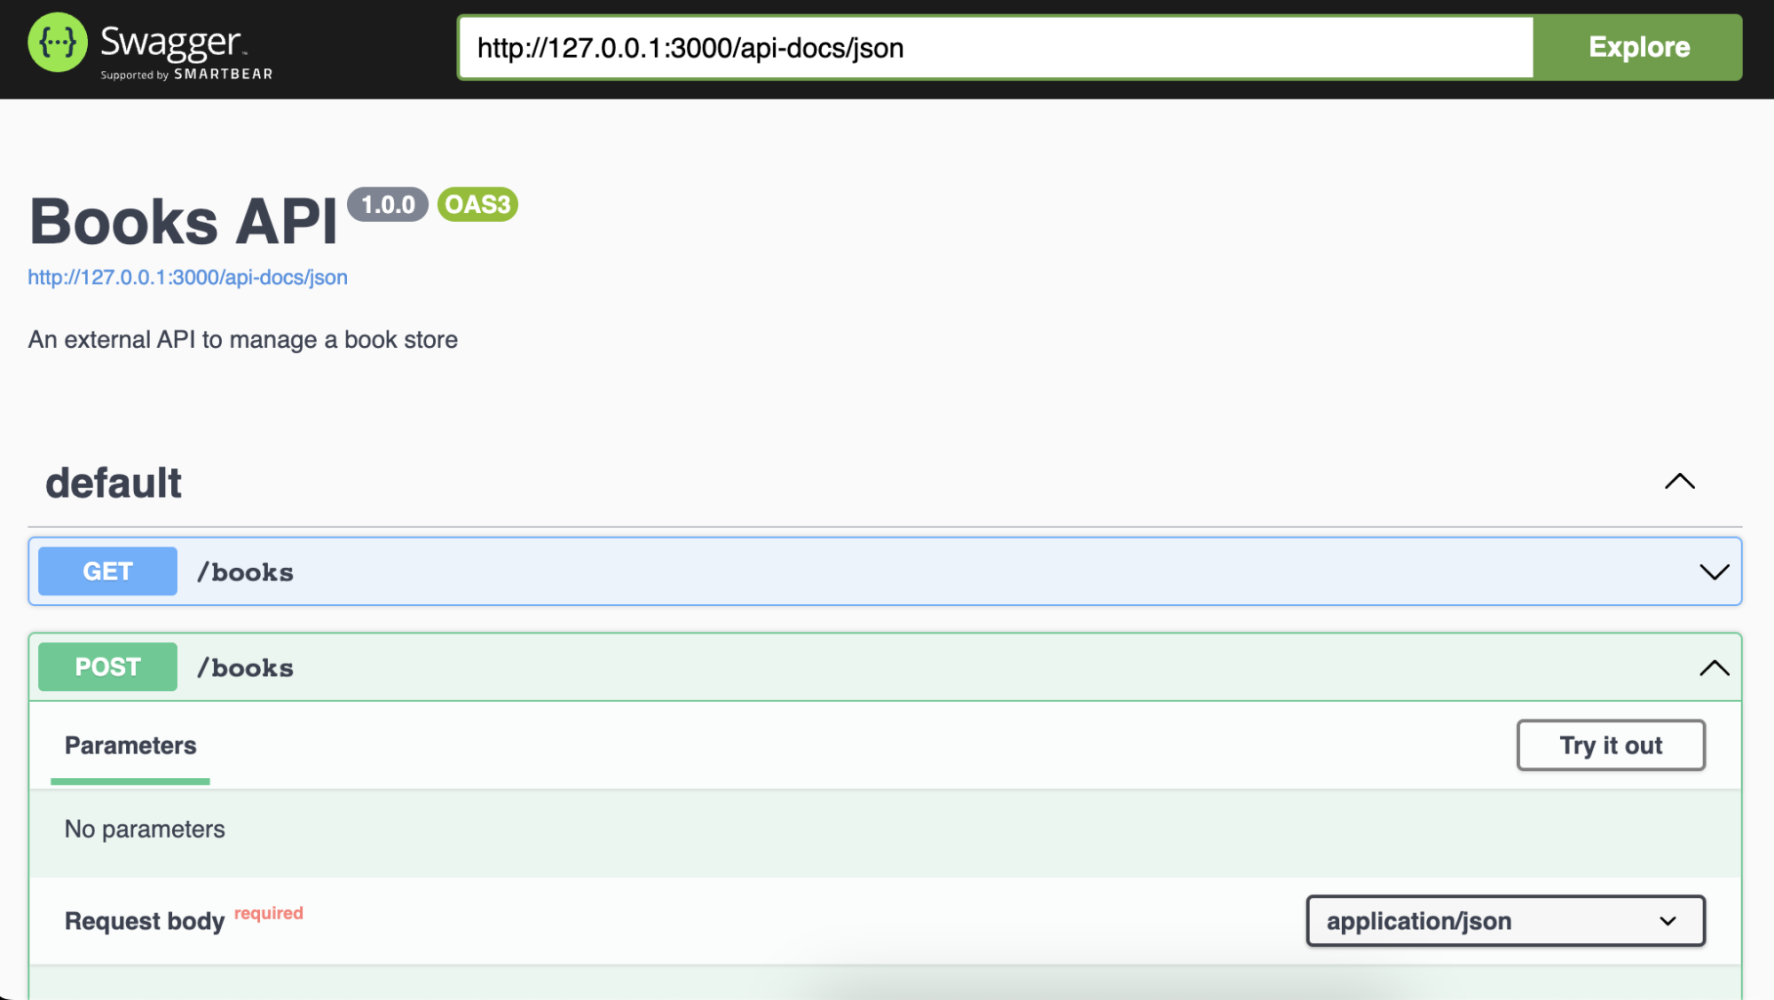
Your API is ready, so let’s run it locally to take a look at the SwaggerUI interface by running:
And navigate to http://localhost:3000/api-docs to take a look at the different routes, its documentation, and to have a way to test them directly from the interface.
If you want to give it a spin and deploy it to Heroku, make sure to update the start script in the package.json file with the following.
Also, make sure you have access to a Heroku PostgreSQL database, and create the database schema by running:
Note: The database.sql file is available in the codeLive examples repository.
Then you can deploy it by running:
If you want to take a look at how it looks deployed, see my version running on Heroku.
Integrating an external API with Salesforce
Now that you have a publicly accessible API, let’s integrate it with Salesforce as an external service.
First, you’ll need to create a named credential for this API. In the Setup UI, navigate to Security > Named Credentials and create an external credential with a custom authentication protocol and a principal.

Make sure that the external credential has a principal that you’ve assigned permissions to it under External Credential Principal Access in your permission set.

Then, create a named credential that references the external credential with the URL pointing to the public API.

Next, navigate to Integrations > External Services and add a new external service from an API specification, select the named credential, and set up the relative path to the OpenAPI specification route. In your demo, this will be /api-docs/json.

After that, save your changes and select the operations that you want to import into Salesforce, review the operations, and finish.

As you can see, the operations you selected have been imported correctly, specifying both the input and output parameters.

Now, you will be able to invoke this external service from Flow, Apex, Einstein Bots, and OmniStudio.

Conclusion
OpenAPI and Salesforce’s External Services provide a powerful combination for integrating external APIs into your Salesforce organization. By leveraging OpenAPI’s standardized approach to defining APIs and Salesforce’s ability to easily consume these definitions and invoke them from low-code and pro-code solutions, developers like you can streamline the process of connecting to external services and enhance the capabilities of your Salesforce applications.
If you’re interested in learning more about External Services, you can find a list of learning resources below, including videos that demonstrate how to invoke them from Flow and Apex.
Learning resources
- Access Business Processes with External Services | Trailhead
- External Services | Salesforce Documentation
- External Services OpenAPI 3.0 Schema | Salesforce Documentation
- External Services in Flow | codeLive
- External Services in Apex | codeLive
- OpenAPI Specification Official Website
- Swagger Official Website
- Fastify Official Website
- Fastify-Swagger Plugin on GitHub
About the author

Julián Duque is a Principal Developer Advocate at Salesforce where he focuses on Node.js, JavaScript, and Backend Development. He is passionate about education and sharing knowledge and has been involved in organizing developer and tech communities since 2001.
Follow him on Twitter @julian_duque, @julianduque.co on Bluesky social, or LinkedIn.