

Salesforce Data Cloud offers various pre-defined connectors for data import. These allow you to connect another Salesforce organization, a Marketing Cloud instance, data storages like Amazon S3, or any other source supported by the MuleSoft Salesforce Data Cloud Connector. To connect to a third-party system, you can utilize the Ingestion API.
The Ingestion API is a RESTful interface that facilitates programmatic data loading into Data Cloud. It supports both streaming and bulk interaction patterns. The streaming pattern uses JSON as its format, loading data in micro-batches through the REST API. The bulk pattern, on the other hand, employs the CSV format and loads data using jobs.
In this blog post, we will discuss how to set up the Ingestion API connector and start to load data programmatically using both the Streaming and Bulk patterns.
When to use Streaming vs Bulk ingestion
| Streaming Ingestion | Bulk Ingestion |
| When updating small micro-batches of records in near real-time | When moving large volumes of data on a daily, weekly, or monthly schedule |
| When using data source systems that are built on modern streaming architectures | When using legacy systems, where you can only export data during off-peak hours |
| When creating Change Data Capture events | When using a new Data Cloud org that you want to backfill with 30, 60, or 90+ days of data |
| When consuming data from webhooks |
To set up the Ingestion API, you’ll need to follow four pre-requisite steps:
- Create an Ingestion API connector
- Create and deploy a data stream
- Create a connected app
- Request a Data Cloud access token
Let’s walk through the process of creating and setting up an ingestion connector to begin loading data into Data Cloud.
Creating an Ingestion API connector
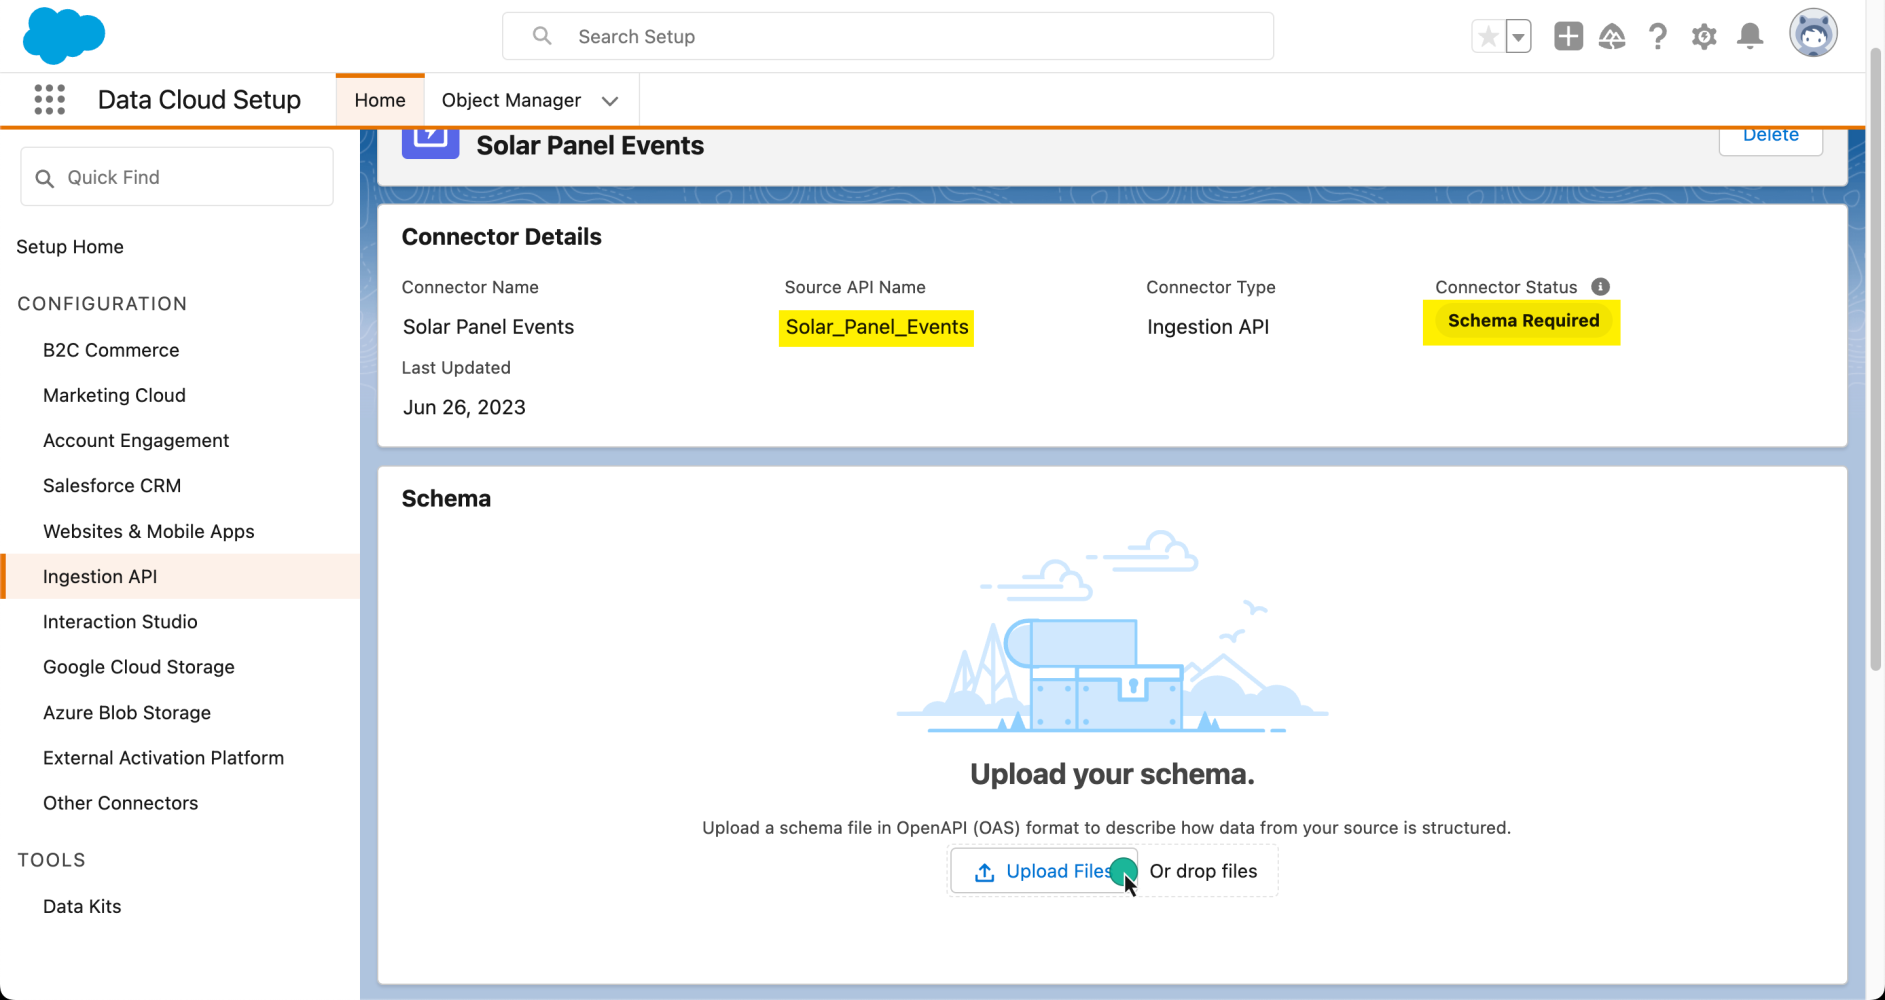
Let’s assume that you have access to Data Cloud. To connect a new Ingestion API source using the Ingestion API connector, navigate to Data Cloud Setup and select Ingestion API.
Here, you will find all the available connectors in your organization. To create a new one, click Connect and provide a name. For our sample application, we will be working with a fictitious solar energy company. We are interested in receiving metrics events related to their solar panels’ energy performance.

Once the connector has been created, we will need to tell Data Cloud what type of data we are expecting. For this, we will need to load a schema file using the OpenAPI specification. This schema file has specific requirements, so make sure to check the documentation for more information.
Below is an example of the schema file we will upload, which represents a solar_panel_event. Key fields to note include event_id, which will be unique for each event and will later be mapped in Data Cloud as a primary key. Another is customer_id, which will be useful to map the event with a customer in our organization. Finally, date_time represents the time of the event.
solar_panel_event.yaml
1openapi: 3.0.3
2components:
3  schemas:
4    solar_panel_event:
5      type: object
6      properties:
7        event_id:
8          type: string
9        customer_id:
10          type: string
11        battery:
12          type: number
13        dc_current:
14          type: number
15        dc_voltage:
16          type: number
17        mpp_energy:
18          type: number
19        ac_voltage:
20          type: number
21        ac_current:
22          type: number
23        date_time:
24          type: string
25          format: date-time
Once we upload the schema, we will be able to preview its fields and data types, and then save it to our connector.

Now that our connector has a schema, we can say that it’s created. However, it’s not yet ready to start receiving data. We need to create a data stream for this purpose.
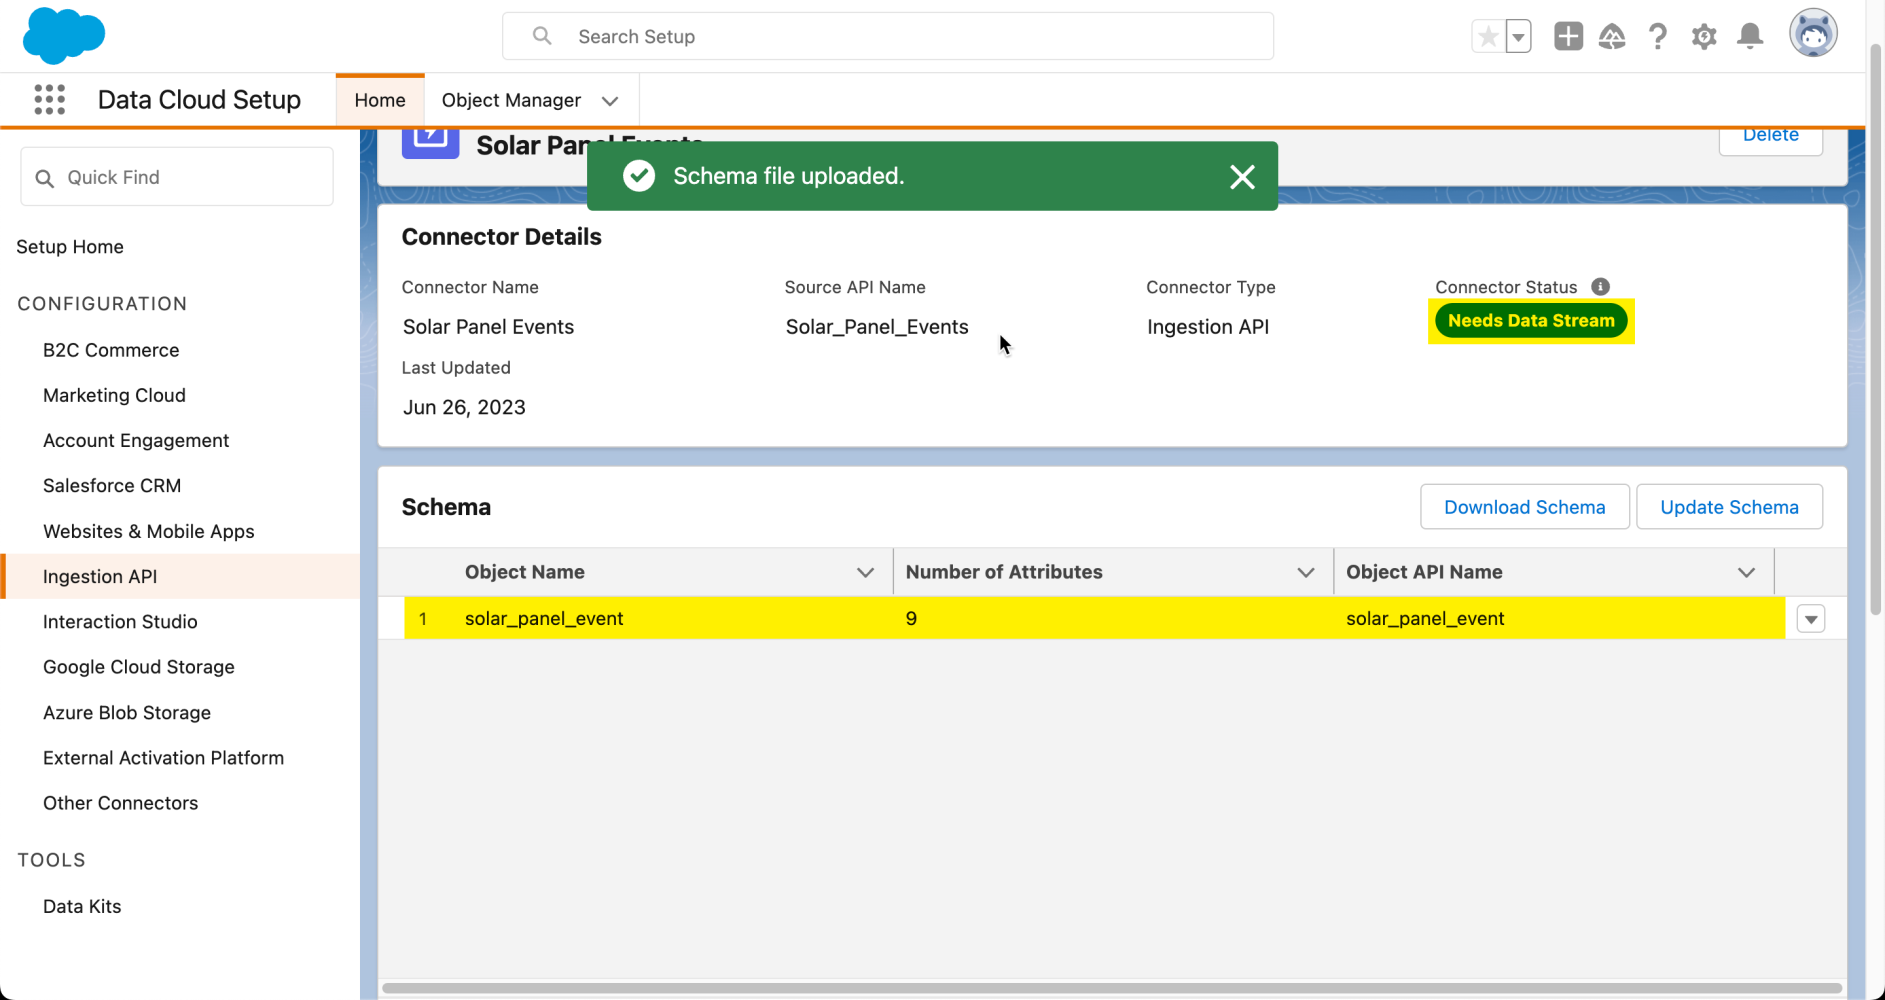
Note: Since schemas can evolve over time, you can also use the Ingestion API connector interface to update the schema, adding new fields to your data object as necessary.
Creating and deploying a data stream
We have our Ingestion API connector ready. Now, it’s time to establish a connection to start importing data. For that, we need to create a Data Stream. Once the data stream is active, we can start ingesting data into Data Cloud and store it as a Data Lake object.
To create a new data stream, navigate to its tab in the Data Cloud application, click on New, select Ingestion API, and then click on Next.

Note: The Ingestion API option is disabled if you don’t have any ingestion sources connected.
Next, you will see the different objects that are associated with your schema. In our case, select the solar_panel_event object and click Next.
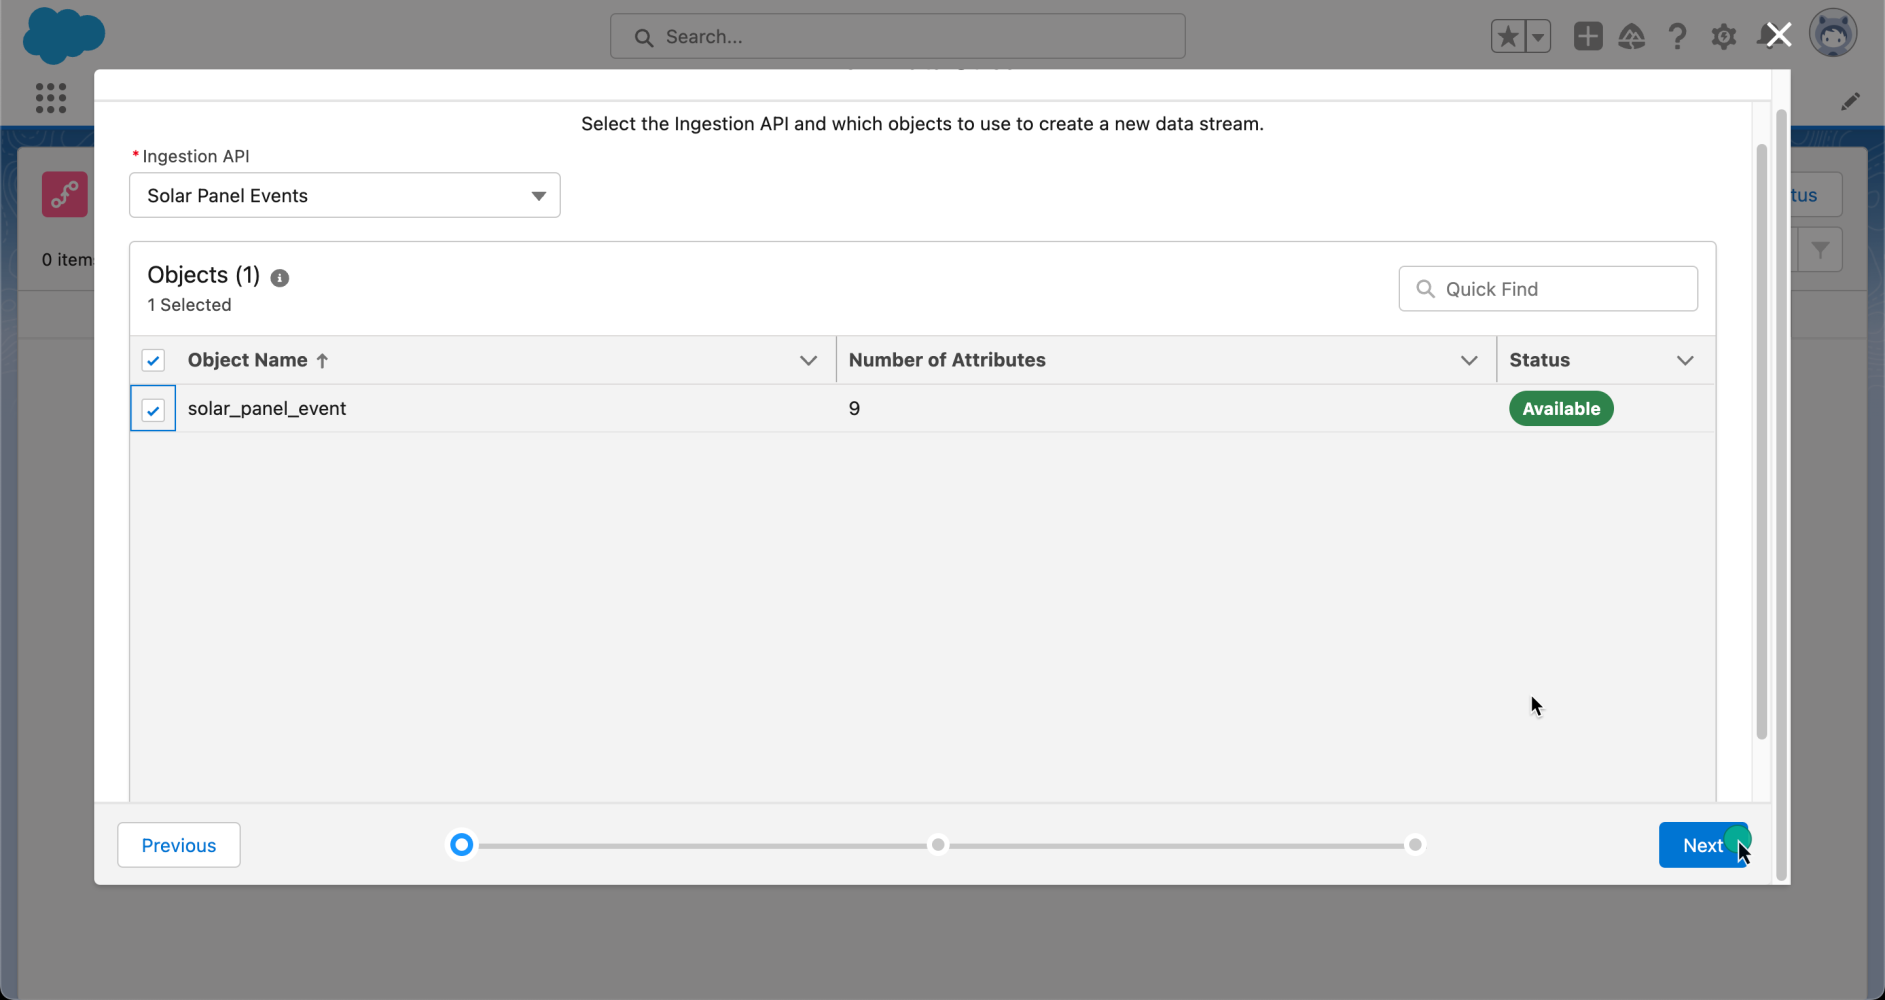
When creating a data stream, you will need to select a category or type of data in that data stream. There are three categories: Engagement, Profile, and Other.
| Engagement | A dataset that represents a time-series based engagement, such as an event, customer interaction, web interaction, etc.
When selected, the Event Time Field dropdown appears in the UI. |
| Profile | A dataset that represents:
– A list of consumers with identifiers, such as consumer IDs, email addresses, or phone numbers – A list of businesses or accounts with account IDs – A list of employees or any other population that you wish to segment by, or use as the segment’s starting population |
| Other | A dataset that isn’t an engagement or a profile, such as product or store information. |
For our example, since we are planning to receive events, we will select Engagement. We will map the event_id as the primary key, and the date_time as the event time field.

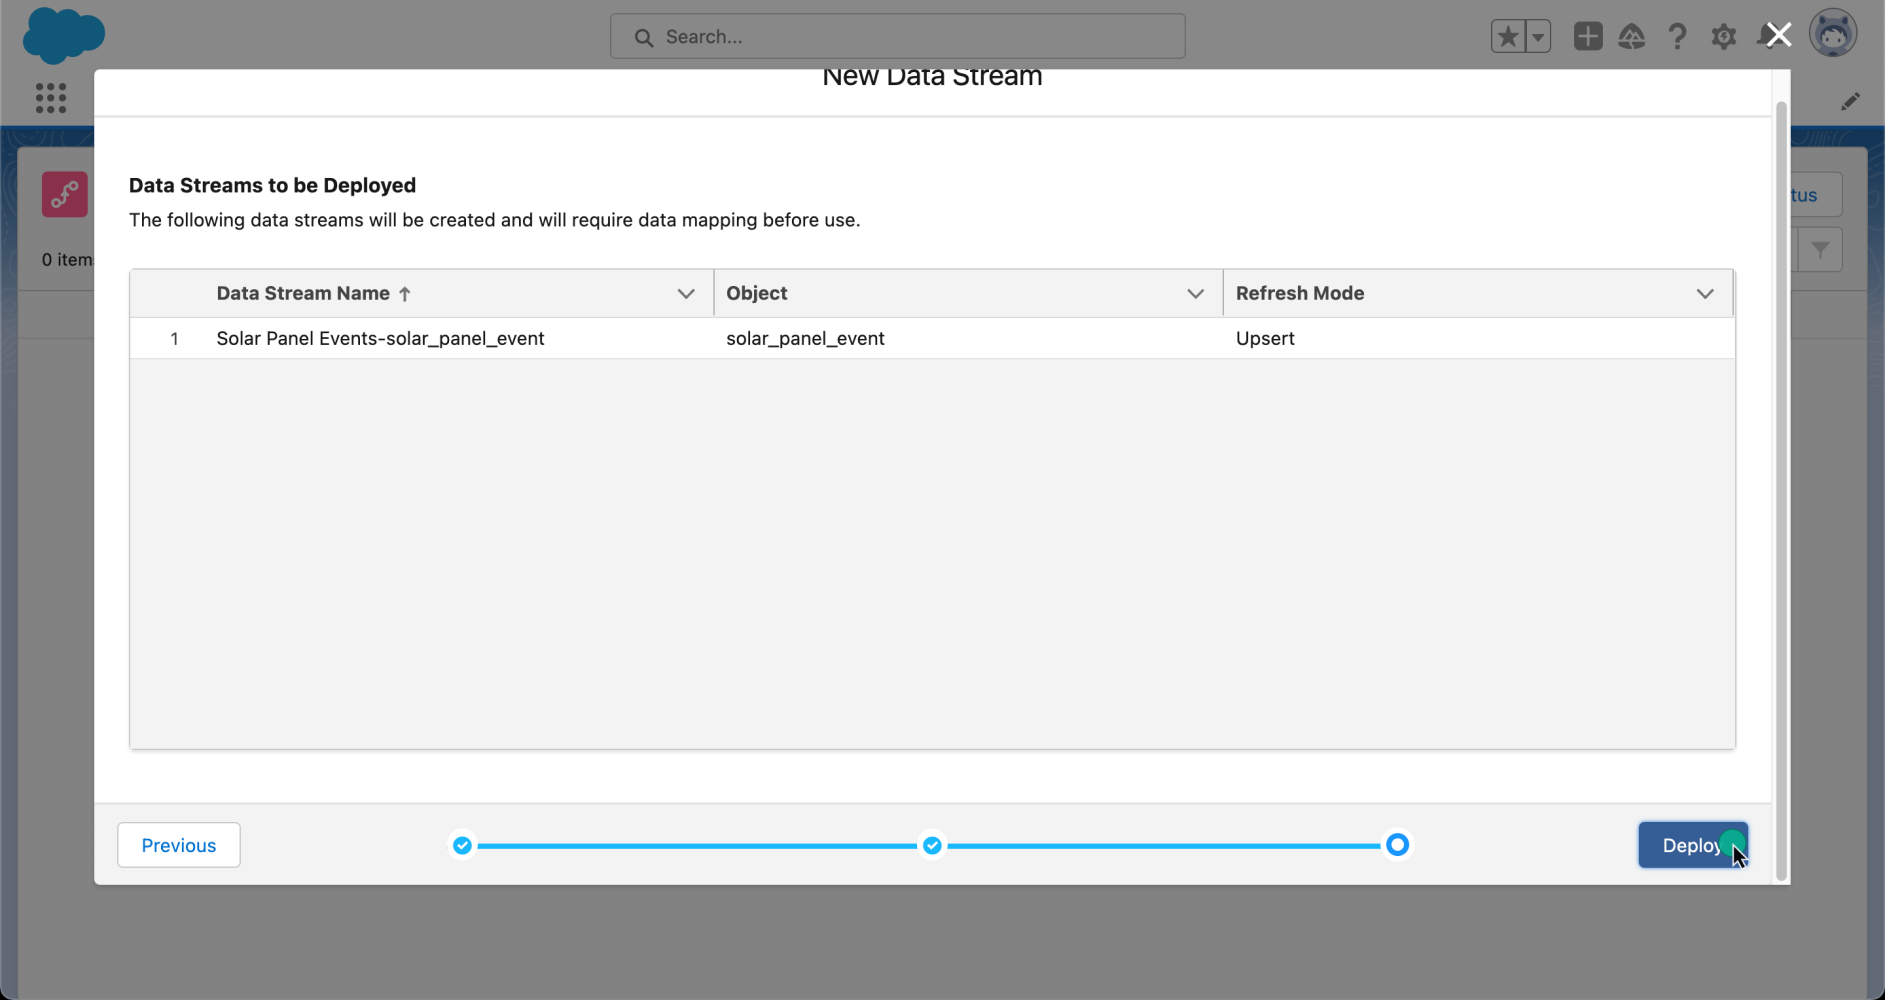
Now that our data is configured, it is time to deploy it. After reviewing the data streams that are going to be created, let’s click on Deploy to activate them.
Now, let’s take a look at the data stream detail page. Here, we can see the Data Lake object that has been created in Data Cloud. You can identify a Data Lake object by its __dll suffix. From this same interface, you can start mapping your data to objects in your organization to create Data Model objects (part of Data Cloud’s harmonization process). However, we won’t cover that topic in this blog post, but we have a great video with Danielle Larregui that shows you how to do this.

Our Ingestion API connector is ready to start receiving data from third-party systems. To confirm, let’s return to the Ingestion API setup interface, where you can see that the connector status is In Use.

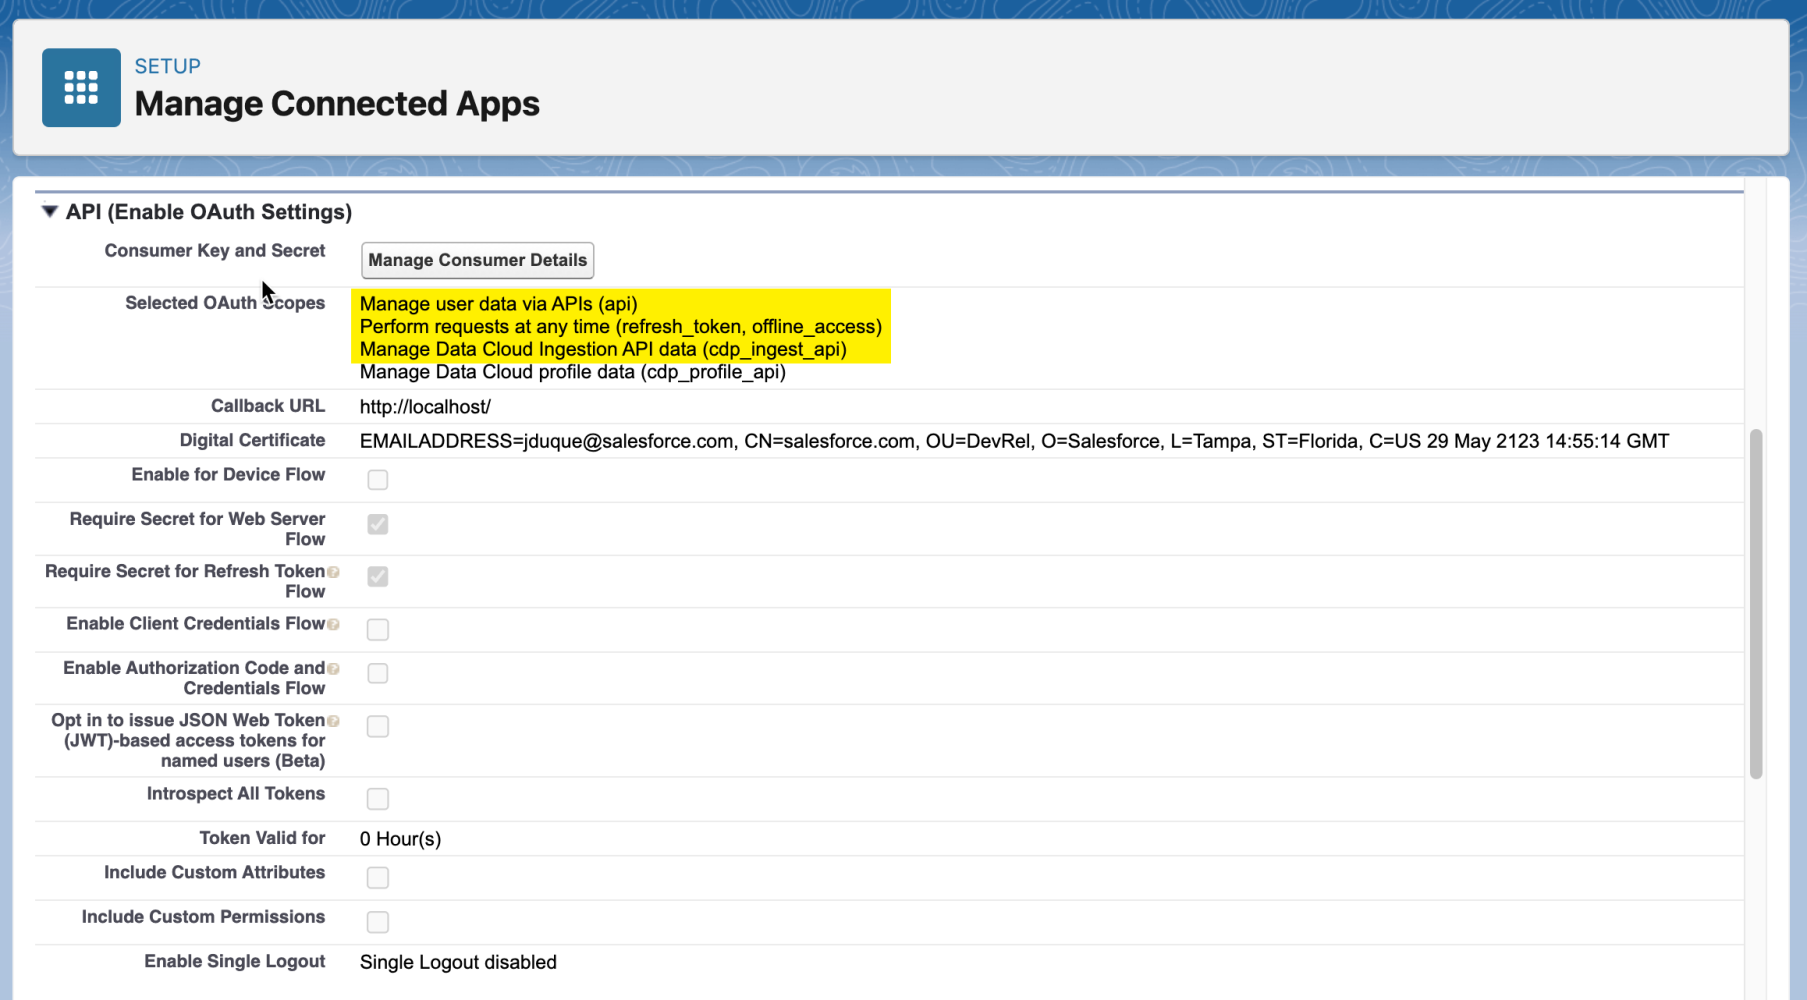
Creating a connected app
The Ingestion API supports all OAuth 2.0 flows supported by other Salesforce REST APIs. To load data using the Ingestion API, your connected app requires the following scopes:
Required OAuth scopes
| cdp_ingest_api | Access and manage your Data Cloud Ingestion API data |
| api | Access and manage your data |
| refresh_token, offline_access | Perform requests on your behalf at any time |
Also, our connected app will require a digital certificate. To create one, you can run the following command using the openssl command:
1openssl req -x509 -sha256 -nodes -days 36500 -newkey rsa:2048 -keyout salesforce.key -out salesforce.crtThis command will create two files, salesforce.key which is the private key, and salesforce.crt, which is the public key.
Note: If you don’t have the openssl command installed, you can install it from the OpenSSL website.
To learn how to create a connected app, please refer to the official documentation.
Requesting a data cloud access token
For this example, we will use the OAuth 2.0 JWT bearer flow. First, we will need to create a JWT (JSON Web Token) to request an access token.
To create a JWT, you will set the header to use the RSA256 algorithm.
JWT header
1{
2  "alg": "RS256",
3  "typ": "JWT"
4}
Then, set up the following claims, keeping some important claims in mind:
- iss: The OAuth consumer key / client ID from your connected app
- sub: Your Data Cloud org username
- exp: The token expiration time, expressed as an epoch timestamp
JWT claims
1{
2  "iss": "",
3  "sub": "",
4  "aud": "https://login.salesforce.com",
5  "exp": ""
6}Note: The Unix epoch (or Unix time or POSIX time or Unix timestamp) is the number of seconds that have elapsed since January 1, 1970 (midnight UTC/GMT).
Next, you will need to use the JWT algorithm to obtain the complete and verified token.
1base64(header) + "." + base64(claims) + "." +
2RSASHA256(base64(header) + "." + base64(claims), publicKey, privateKey)
But let’s be honest, we don’t want to create a JWT manually. For this, we will use the JWT.io website to simplify the process. Make sure that the Signature Verified message appears below, indicating that our JWT is valid.

Or you can create it programmatically using the programming language of your choice. Later in this article, I’ll share a handy Node.js script to generate the Data Cloud access token.
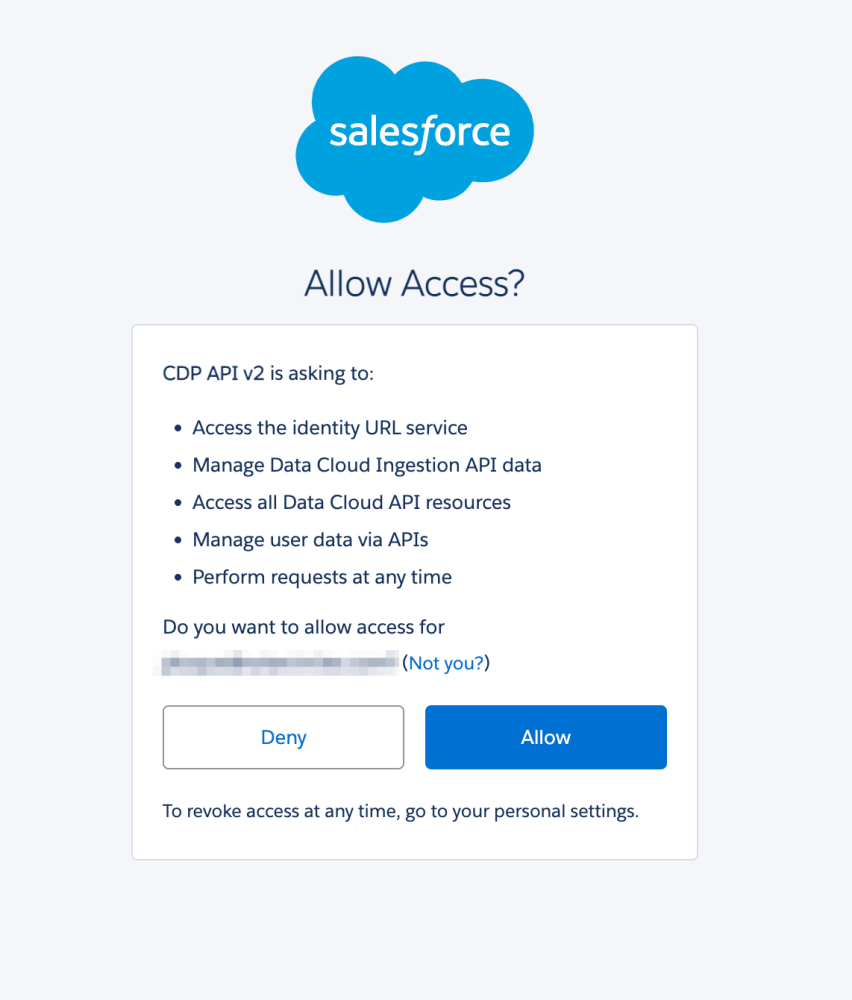
Before we can authenticate using the JWT we generated, we need to approve this consumer. You can do so by opening the following URL in your browser.
1https://login.salesforce.com/services/oauth2/authorize?response_type=token&client_id=<your_client_id>&redirect_uri=<your_redirect_uri>And then, log in and allow access:
Now that we have approved our JWT, we need to authenticate. This is a two-step process. First, we need to obtain an access token using the JWT. To do this, let’s perform a POST HTTP request with the following information.
1POST https://login.salesforce.com/services/oauth2/token
2Content-Type : x-www-form-urlencoded
3grant_type=urn:ietf:params:oauth:grant-type:jwt-bearer
4&assertion=<JWT>
Note: Make sure to replace <JWT> with the token we created previously.
This request will give us a core access token and the Data Cloud instance URL, using our connected app. As shown in the scope, we are granted the cdp_ingest_api and api scopes.
1{
2  access_token: '',
3  scope: 'cdp_ingest_api api',
4  instance_url: 'https://.my.salesforce.com',
5  id: 'https://login.salesforce.com/id/00D8Z00000XXXXXXXX/0058Z00000XXXXXXXX',
6  token_type: 'Bearer'
7}
Next, we need to exchange the core access token for a Data Cloud token. To do that, let’s perform the following POST request.
1POST <DATA_CLOUD_INSTANCE_URL>/services/a360/token
2Content-Type : x-www-form-urlencoded
3grant_type=urn:salesforce:grant-type:external:cdp
4&subject_token=<CORE_ACCESS_TOKEN>
5&subject_token_type=urn:ietf:params:oauth:token-type:access_token
Now, we are authenticated. The resulting Data Cloud access token is what we will use to perform requests to the Ingestion API.
1{
2  access_token: '',
3  instance_url: .c360a.salesforce.com',
4  token_type: 'Bearer',
5  issued_token_type: 'urn:ietf:params:oauth:token-type:jwt',
6  expires_in: 28799
7}
To simplify the process, I’ve created a Node.js script. It creates the JWT and performs the two-step authentication. To use it, you will need the private key you created earlier, as well as a configuration file that looks like the following.
config.js
1export const config = {
2    consumerKey: '',
3    username: ''
4};
Also, install the jsonwebtoken dependency from npm by running:
1npm install jsonwebtokencredentials.js
1import jwt from 'jsonwebtoken';
2import { readFile } from 'node:fs/promises';
3import { config } from './config.js';
4
5async function generateAccessToken() {
6    const privateKey = await readFile('./salesforce.key', 'utf8');
7
8    // Generate JWT and sign it with Private Key
9    const token = jwt.sign({}, privateKey, {
10        algorithm: 'RS256',
11        expiresIn: '2h',
12        subject: config.username,
13        issuer: config.consumerKey,
14        audience: 'https://login.salesforce.com'
15    });
16
17    // Get Salesforce Auth Token
18    const responseSf = await fetch(
19        'https://login.salesforce.com/services/oauth2/token',
20        {
21            method: 'POST',
22            headers: {
23                'content-type': 'application/x-www-form-urlencoded'
24            },
25            body: `grant_type=urn:ietf:params:oauth:grant-type:jwt-bearer&assertion=${token}`
26        }
27    );
28
29    if (!responseSf.ok) {
30        console.error(responseSf.statusText);
31        process.exit(1);
32    }
33
34    const authSf = await responseSf.json();
35
36    if (authSf.error) {
37        throw new Error(authSf.error_description);
38    }
39
40    // Get Data Cloud Auth Token
41    const responseDc = await fetch(
42        `${authSf.instance_url}/services/a360/token`,
43        {
44            method: 'POST',
45            headers: {
46                'content-type': 'application/x-www-form-urlencoded'
47            },
48            body: `grant_type=urn:salesforce:grant-type:external:cdp&subject_token=${authSf.access_token}&subject_token_type=urn:ietf:params:oauth:token-type:access_token`
49        }
50    );
51
52    if (!responseDc.ok) {
53        console.error(responseDc.statusText);
54        process.exit(1);
55    }
56
57    const authDc = await responseDc.json();
58
59    if (authDc.error) {
60        throw new Error(authSf.error_description);
61    }
62
63    // If everything is OK, we return the response object
64    return authDc;
65}
66
67generateAccessToken()
68    .then((auth) => console.log(auth))
69    .catch((err) => console.error(err));
The generateAccessToken method will return the Authentication object from Data Cloud, including the access_token and the instance_url required to start ingesting data into Data Cloud.
Ingesting data
We have all the information needed to start ingesting data into the Data Cloud. This can be accomplished using either the Streaming or Bulk patterns.
Streaming
To start streaming data into the Data Cloud Ingestion connector, first obtain the connector name and the object name from the Ingestion API connector setup. To do this, you can perform a POST request like the following.
1POST https://<instance_url>/api/v1/ingest/sources/Solar_Panel_Events/solar_panel_event
2Authorization: Bearer <data cloud access token>
3Content-Type: application/json
4{
5  "data": [
6 {"event_id": "f47ac10b-58cc-4372-a567-0e02b2c3d479","customer_id": "003R00000123456789","battery": 75.2,"dc_current": 9.8,"dc_voltage": 35.6,"mpp_energy": 120.5,"ac_voltage": 220.1,"ac_current": 5.3,"date_time": "2023-07-07T10:15:30.05Z"} ] }Note: Be sure to replace <data cloud access token> and <instance url> with the respective values that you obtained from the authentication process.
If everything goes well, you will receive the following response:
1{ "accepted": true }This indicates that our data has been successfully accepted.
Note: You can also validate the data against the schema before sending it by appending /actions/test to the API endpoint.
Bulk
Bulk ingestion involves multiple steps, adding a level of complexity to the process:
- Create a job: This step involves creating a job to specify the object type of the data being processed and the operation to be performed, which can be either upsert or delete.
- Upload the data in CSV: After creating the job, the next step is to upload the data in CSV format. The CSV file should contain the data to be processed, with each row representing a record and the columns containing the field values.
- Signal data readiness: Once the data is uploaded, you’ll need to signal that the data is ready to be processed.
- Close or abort the job: After the data is processed, you can either close the job to mark it as completed, or abort the job if needed.
For more information on how to use the Bulk endpoints, you can refer to the official documentation.
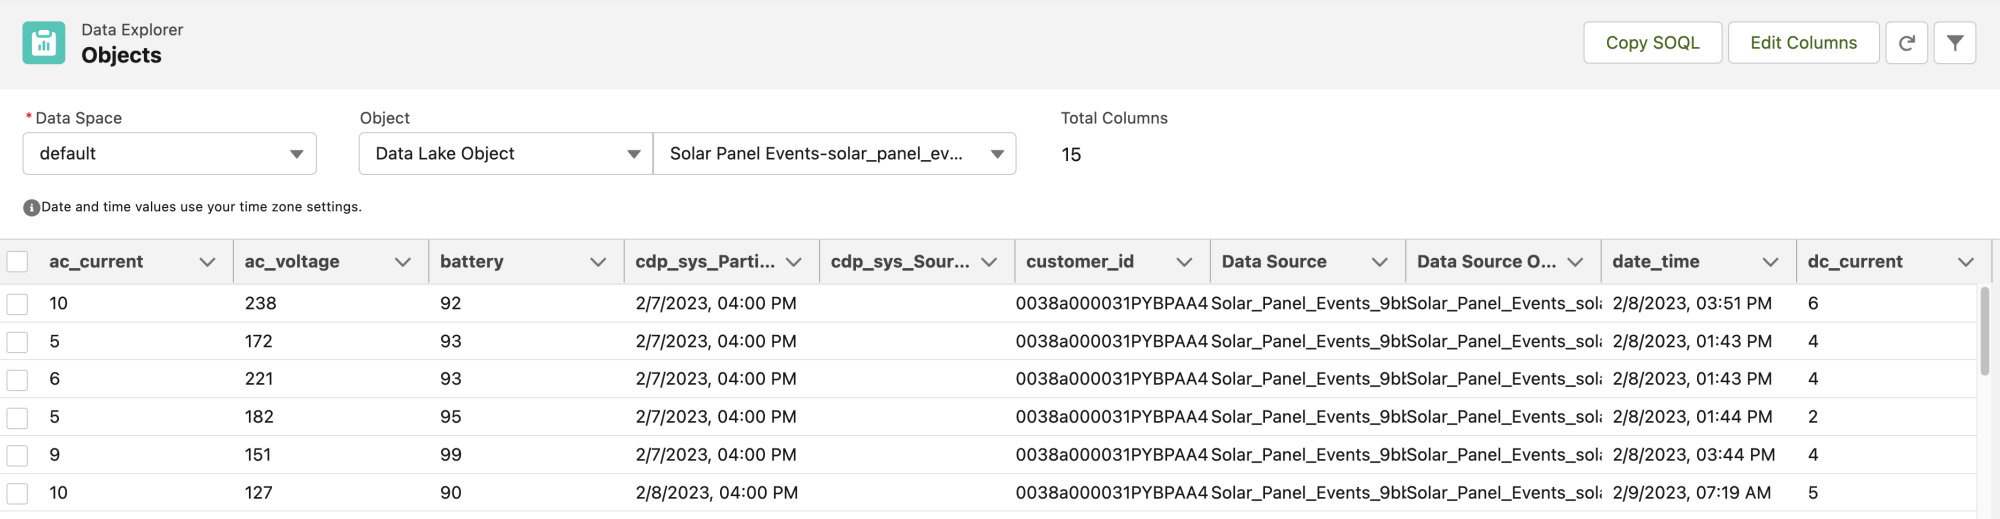
You can query the incoming data using the Data Explorer in Data Cloud. There, you’ll select the Data Lake object corresponding to the ingestion connector that you created previously.
If you want to test it yourself, you can always use our Salesforce Developers Postman Collection, which includes the Salesforce Data Cloud APIs.
Conclusion
Now, you are ready to start loading data programmatically into Data Cloud using the Ingestion API. By following the previous steps, you can seamlessly connect to various data sources and import data in real-time or in bulk, and start harnessing the power and magic of Salesforce Data Cloud.
Also, if you prefer learning from a video, my colleague Aditya has created a handy video explaining what we’ve covered in this blog post. Be sure to also watch the other great videos in the Data Cloud Decoded series.
Resources
- Using Ingestion API to Load Data Into Data Cloud | Data Cloud Decoded
- Data Cloud Decoded Series
- Data Cloud Developer Guide | Getting Started
- Get Started with Ingestion API
- Requirements for Ingestion API Schema File
- Salesforce Platform APIs | Postman Collection
- Create a Connected App
About the authors

Julián Duque is a Principal Developer Advocate at Salesforce where he focuses on Node.js, JavaScript, and Backend Development. He is passionate about education and sharing knowledge and has been involved in organizing developer and tech communities since 2001.
Follow him @julianduque on Threads, @julian_duque on Twitter, @julianduque.co on Bluesky social, or LinkedIn.

Aditya Naag Topalli is a 14x Certified Lead Developer Advocate at Salesforce. He empowers and inspires developers in and outside the Salesforce ecosystem through his videos, webinars, blog posts, and open-source contributions, and he also frequently speaks at conferences and events all around the world. Follow him on Twitter or LinkedIn and check out his contributions on GitHub.