

MuleSoft AI Chain (MAC) allows developers to easily configure and manage AI agents directly within Anypoint Studio or Anypoint Code Builder, streamlining the development process. It offers a suite of connectors that enable seamless interaction with LLMs, vector databases, APIs, and token management. This open-source project supports the entire agent lifecycle – from building and configuring to deploying agents.
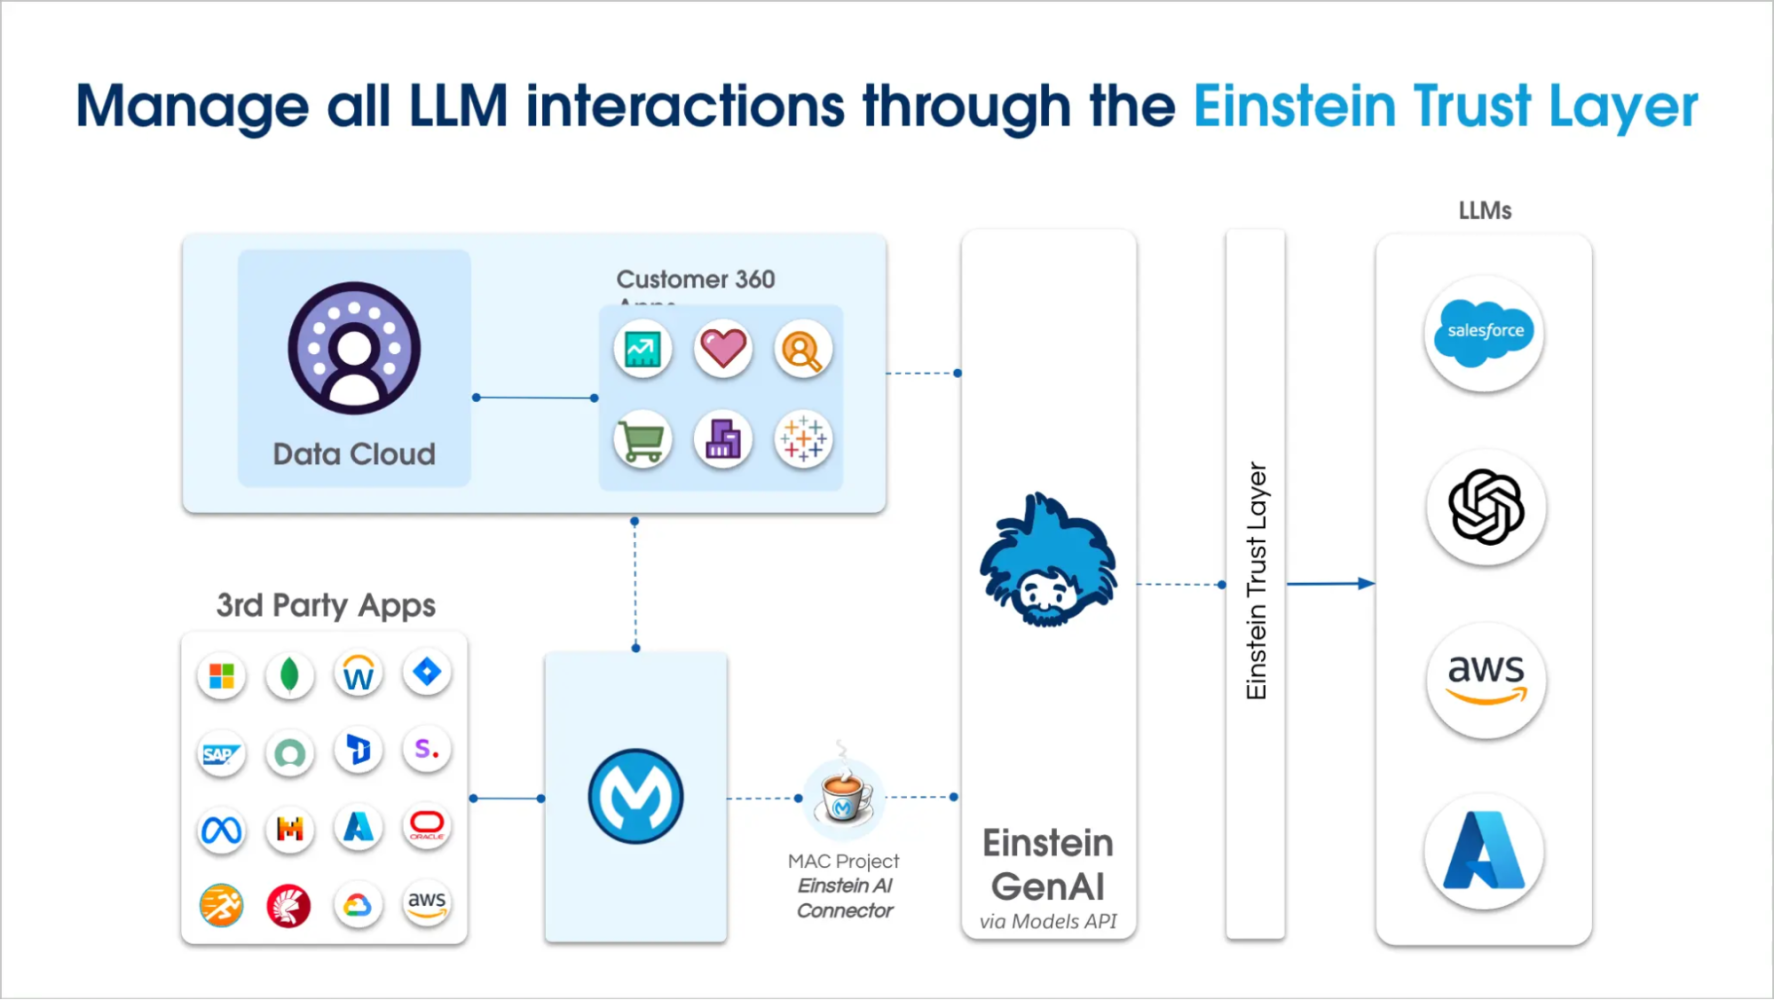
In this blog post, we’ll explore how to connect a MuleSoft application with Salesforce’s Einstein AI using the MAC project. This integration enables your MuleSoft application to leverage the power of large language models (LLMs) such as OpenAI, Azure OpenAI, and others via the Einstein Trust Layer.
We’ll be using the Agent Define Prompt Template connector in MuleSoft to facilitate this connection and streamline AI interactions within your integration flows.
Set up a connected app in Salesforce
To get started, you’ll first need to set up a connected app in your Salesforce org. Navigate to the App Manager within your Salesforce org and configure a connected app. Important configuration steps include:
Open Salesforce setup:
- Log in to your Salesforce org
- In the Setup menu, use Quick Find to search for App Manager
Create the connected app:
- Click New Connected App
- Select Create a Connected App
- Set a Connected App Name, such as
mac_project - Enter your contact email (must be valid, as you’ll receive a verification code here later)
Enable OAuth settings:
- ✅ Check Enable OAuth Settings
- Callback URL:
https://login.salesforce.com
Select OAuth scopes (Only these — adding more may cause a scope error):
- Access chatbot services (
chatbot_api) - Access the Salesforce API Platform (
sfap_api) - Manage user data via APIs (
api) - Perform requests at any time (
refresh_token,offline_access)
Adjust additional settings:
- ✅ Require Proof Key for Code Exchange (PKCE)
- ◻️ Require Secret for Web Server flow
- ✅ Require Secret for Refresh Token flow
- ✅ Enable Client Credentials flow
- ◻️ Enable Authorization Code and Credentials flow
- ◻️ Enable Token Exchange flow
- ◻️ Enable refresh token rotation
- ✅ Issue JSON web token (JWT)-based access tokens for named users
- ◻️ Introspect all tokens
Save the connected app and click Continue.
Configure app policies:
- In Manage Connected Apps, click Manage next to your app
- Click Edit Policies
- Permitted Users: Select All users may self-authorize
- ◻️ Enable Single Logout
- Run As: Choose your user (e.g., Alex Martinez)
- ✅ Ensure Issue JSON Web Token (JWT)-based access tokens is checked
- Token Timeout: Set to 30 Minutes
Retrieve credentials:
- Go back to the connected app and click Manage Consumer Details
- Enter the verification code sent to your email
- Click Generate, then Apply
- Copy the Consumer Key and Consumer Secret — you’ll need them in your MuleSoft configuration
Configure your MuleSoft application
Now we’re ready to configure our MuleSoft application. First, open or create a MuleSoft project. In the demo video below, a simple HTTP listener is configured to respond to /einstein. This Mule flow includes:
- Agent Define Prompt Template Connector – where the actual prompt, instructions, and data set are configured
<flow name="flow1">
<http:listener config-ref="Listener-config" doc:id="xnfbyi" doc:name="/einstein" path="einstein"></http:listener>
<ms-einstein-ai:agent-define-prompt-template doc:id="hdoigo" doc:name="Agent define prompt template" config-ref="EinsteinAI-Config">
<ms-einstein-ai:template>#[payload.template]</ms-einstein-ai:template>
<ms-einstein-ai:instructions>#[payload.instructions]</ms-einstein-ai:instructions>
<ms-einstein-ai:dataset>#[payload.dataset]</ms-einstein-ai:dataset>
</ms-einstein-ai:agent-define-prompt-template>
</flow>
- Einstein AI configuration – including the Salesforce credentials
<ms-einstein-ai:config name="EinsteinAI-Config">
<ms-einstein-ai:oauth-client-credentials-connection>
<ms-einstein-ai:oauth-client-credentials clientSecret="your-consumer-secret" tokenUrl="https://your-domain/services/oauth2/token" clientId="your-consumer-key"></ms-einstein-ai:oauth-client-credentials>
</ms-einstein-ai:oauth-client-credentials-connection>
</ms-einstein-ai:config>
Deploy and test
Once deployed, your MuleSoft application is ready to send requests to Einstein AI. Here’s how it handles two examples:
Example 1: Positive feedback
{
"template": "You are a customer satisfaction agent, who analyzes customer feedback in the dataset. Answer via JSON output and add a type for the result only with positive or negative as well as the complete answer",
"instructions": "If the customer feedback in the dataset is negative, open a service satisfaction case and apologize to the customer. If the customer feedback in the dataset is positive, thank the customer and wish them a nice day. Don't repeat the feedback and be more direct starting the conversation with formal greetings",
"dataset": "The training was great!! I would really recommend this to everyone!"
}
Response:
{
"response": "{\n \"type\": \"positive\",\n \"result\": \"Thank you for your positive feedback! We are glad to hear that you enjoyed the training. Have a nice day!\"\n}"
}
Example 2: Negative feedback
{
"template": "You are a customer satisfaction agent, who analyzes customer feedback in the dataset. Answer via JSON output and add a type for the result only with positive or negative as well as the complete answer",
"instructions": "If the customer feedback in the dataset is negative, open a service satisfaction case and apologize to the customer. If the customer feedback in the dataset is positive, thank the customer and wish them a nice day. Don't repeat the feedback and be more direct starting the conversation with formal greetings",
"dataset": "The training was awful!! No information available and the instructor was unprepared. I'd never recommend it."
}
Response:
{
"response": "{\n \"type\": \"negative\",\n \"response\": \"Dear valued customer, we sincerely apologize for the negative experience you had with our training session. We have opened a service satisfaction case to investigate this matter further and ensure it does not happen again. We appreciate your feedback and will take necessary steps to improve our services. Thank you for bringing this to our attention.\"\n}"
}
Conclusion
This setup demonstrates how MuleSoft can act as a powerful middleware platform to leverage Salesforce Einstein AI for natural language processing. By configuring the MAC project correctly and using the right credentials and endpoints, you can easily build intelligent, responsive APIs that adapt to user feedback and provide automated, context-aware responses.
Stay tuned for more tutorials, and happy integrating!
Resources
- Video: Integrating MuleSoft with Einstein AI and Prompt Templates Using the MAC Project
- Blog post: Introducing the MuleSoft AI Chain Project
- Overview: The MuleSoft AI Chain Project
About the author
Alex Martinez was part of the MuleSoft Community before joining MuleSoft as a Developer Advocate. She founded ProstDev to help other professionals learn more about content creation. In her free time, you’ll find Alex playing Nintendo or PlayStation games and writing reviews about them. Follow Alex on LinkedIn or in the Trailblazer Community.