Connecting Snowflake to Salesforce Data Cloud is now easier and more secure. Thanks to our partnership with Snowflake, we’re happy to announce that enterprises can now connect their Snowflake instance to Salesforce Data Cloud without the need for long-lived credentials (usernames/passwords or private keys). Customers can now leverage Salesforce IDP as an identity provider for secure and seamless connections with their data warehouse. This enhancement simplifies connection setup, eliminates security risks associated with static credentials, and enables organizations to focus on what matters most: extracting insights and driving value from their data.
In this blog post, we’ll review the benefits of using Salesforce as an identity provider and walk through the steps to set up Salesforce IDP in Data Cloud, connect to Snowflake, and set up access permissions.
About Snowflake
Snowflake is designed for high performance and scalability, supporting structured, semi-structured, and unstructured data. It offers a fully managed, multi-cloud platform with features like data sharing, real-time analytics, and automatic scaling. Its architecture separates compute and storage for cost efficiency and flexibility.
Connecting Data Cloud to Snowflake using static credentials
Traditionally, connecting Data Cloud to external systems like Snowflake required a manual process involving static credentials like usernames and private keys. This method created several challenges, including:
- Security risks: Static credentials are inherently vulnerable as they are live for days and weeks, posing a risk of unauthorized access
- Operational complexity: Setting up connections required collaboration between Data Cloud and Snowflake administrators, often leading to delays
- Overhead: Enterprises typically have a policy requiring credential updates every 60 or 90 days, leading to unnecessary operational overhead in updating credentials across all relevant connections
Connecting Data Cloud to Snowflake using Salesforce IDP
The introduction of Salesforce IDP-based authentication addresses some of the most pressing challenges faced by organizations when connecting Salesforce Data Cloud with external Snowflake systems.
- Enhanced security: Static credentials, such as usernames and private keys, have been a long-standing security concern. With IDP-based authentication, customers can eliminate the need to store static credentials and update them whenever changed. Short-lived scoped tokens will ensure just-in-time access, reducing the risk of any phishing attacks.
- Streamlined collaboration: Setting up secure connections previously required significant manual coordination between Data Cloud and Snowflake administrators. The new feature simplifies workflows, where Data Cloud admins can create new connections using the Workload Identity type of user (configured by the Snowflake admin) and leverage Salesforce IDP as a trusted identity provider that aligns with their security frameworks.
- Alignment with compliance and best practices: Organizations, especially those operating in regulated industries like financial services or healthcare, prioritize secure data access. By using IDP-based authentication, they can adhere to industry standards for identity and access management. It also reduces the risk of non-compliance, ensuring secure data operations at every step.
How to set up IDP authentication and Snowflake connection in Data Cloud
Let’s now take a look at the step-by-step process for setting up the Snowflake connector in Data Cloud using a secure connection and leveraging Salesforce IDP.
Step 1: Set up the connection with Snowflake in Data Cloud
- In Data Cloud, go to Data Cloud Setup.
- Select Snowflake under External Integrations on the left-hand side panel.
- Click New.

- Select Snowflake and click Next.

- Enter a connection name and a connection API name of your choice.
- On this page, you’ll see a toggle saying Use Salesforce IDP Auth. Note: we will focus on the flow using this toggle later in this blog post.

- Choose the toggle and you’ll notice a unique External ID (auto-generated) and a Username field. Please note: there are no credentials involved here.
- External ID is a unique ID (also known as a “connection ID”), and it will be used to create a trust relationship with Snowflake.

- Username is a db Snowflake user, which is linked to a Salesforce Data Cloud org (using the domain name).
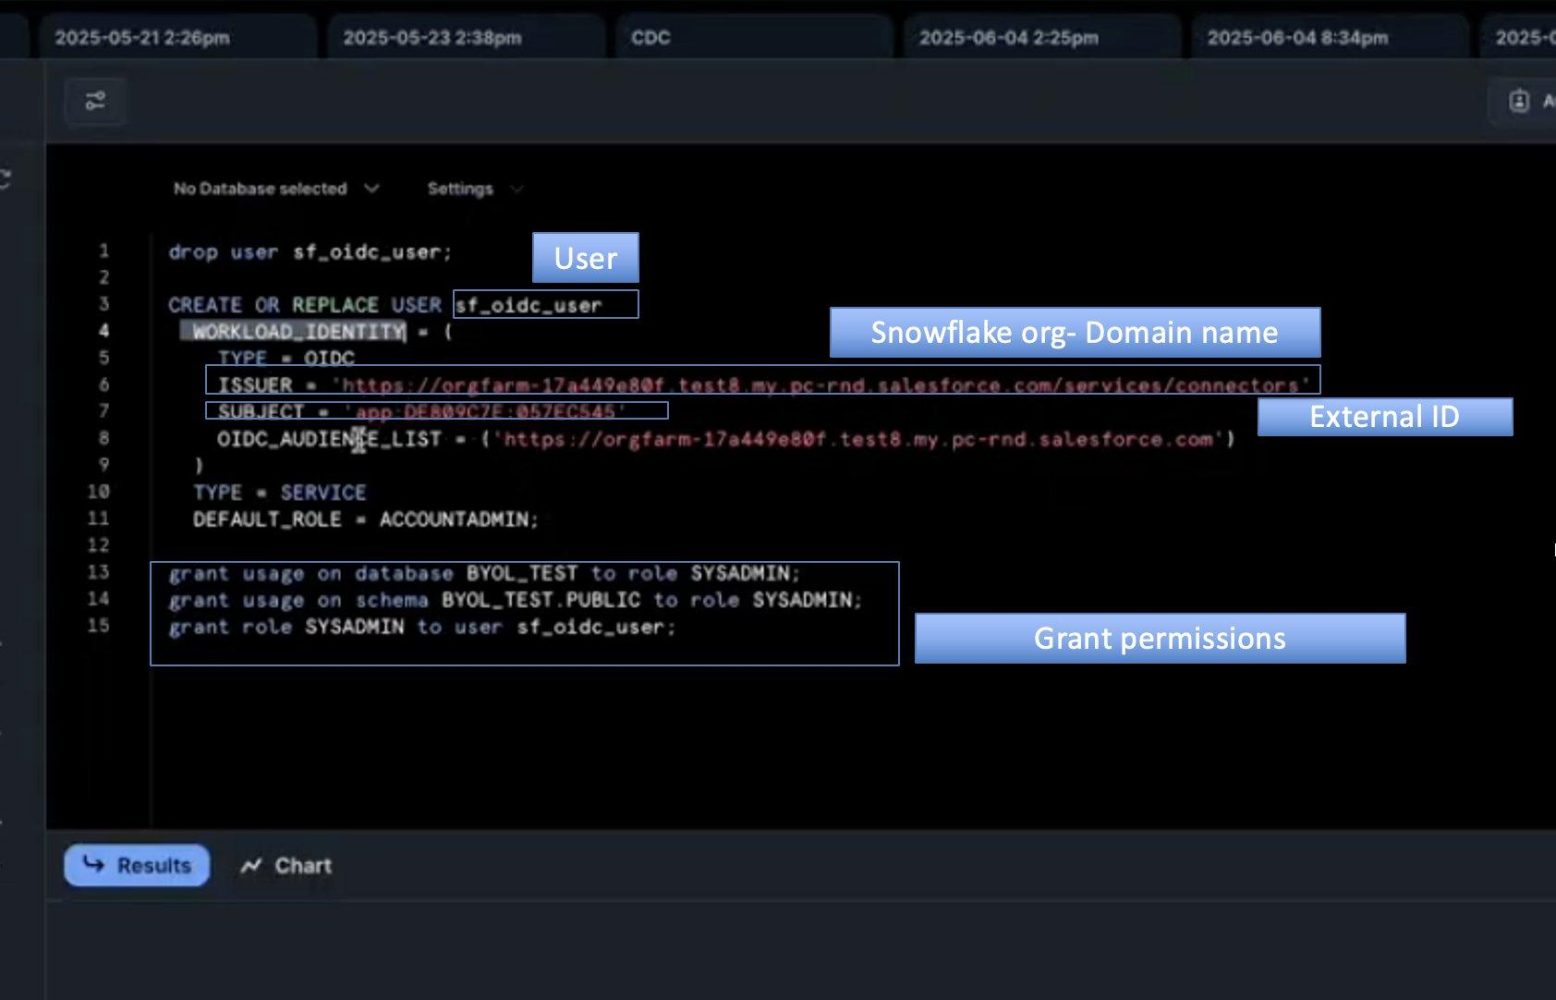
- Copy this External ID and use it as the subject in the Workload_Identity section of the OIDC user on the Snowflake console (refer Step 2 below).
Step 2: Define the Snowflake OIDC user on the Snowflake console
- Create an OIDC user using the following command (see the screenshot below).

- Define the issuer as the URL of the Salesforce org in this format:
- Define the audience as the URL of the Salesforce org in this format:
- Add the Subject in the following format:
- Create this user.
- Once this user is created, grant permissions to allow this user to access the required schema tables.
- Copy the username and go back to the Salesforce connector screen.
Step 3: Configure the Snowflake connector in Data Cloud
- Once you have added the username (created in Step 2) and the account URL of the Snowflake account, click Next.

- Select the warehouse name in the next step, and click Save. Finish configuring the connection name.

The connector is now successfully created, and you can use it to configure data streams.

Improvements on the roadmap
At Salesforce, we believe in empowering organizations to unlock the full potential of their data ecosystems. If your business uses Snowflake and Salesforce Data Cloud, this feature is designed with you in mind. Looking ahead, we’re committed to further enhancing this experience with more features to make this process seamless. Learn more about this feature or reach out to your Salesforce representative for guidance on getting started. Together, let’s build secure, scalable, and impactful data-driven solutions.
Resources
- Documentation: Security in Snowflake
- Documentation: Set Up Snowflake Data Federation Connection
About the author
Gaurav Garg is a Senior Product Manager in the Salesforce Data Cloud product organization. He is part of the Bring your Own Lake – Zero Copy Data Federation product team, and works closely with leading data lake partners. You can follow him on LinkedIn.