In today’s data-driven landscape, seamless and secure platform integration is crucial for business success. Thanks to our partnership with Databricks, we’re happy to announce that companies can now connect their Databricks SQL to Salesforce Data 360 without having to rely on providing a username-password/client-ID (long-lived static credentials) to establish the connection.
Customers can now leverage Salesforce IDP as an identity provider for secure and seamless connections with their data warehouse. This enhancement simplifies connection setup, eliminates security risks associated with static credentials, and enables organizations to focus on what matters most — extracting insights and driving value from their data.
In this blog post, we’ll review the benefits of using Salesforce as an identity provider and walk through the steps to set up Salesforce IDP in Data 360, connect to Databricks SQL, and set up access permissions.
About Databricks
The Databricks Data Intelligence Platform democratizes access to data and AI, making it easier for organizations to harness the power of their data for analytics, machine learning, and AI applications. Built on an open source foundation, the platform enables organizations to drive innovation to increase revenue, lower costs, and reduce risk. Databricks SQL is a serverless data warehouse that runs all SQL at scale with a unified governance model and open formats.
Connecting Data 360 to Databricks using static credentials
Traditionally, connecting Data 360 to external systems like Databricks required a manual process involving static credentials like usernames and private keys. This method created several challenges:
- Security risks: Static credentials are inherently vulnerable as they are live for days and weeks, posing a risk of unauthorized access
- Operational complexity: Setting up connections required collaboration between Data 360 and Databricks administrators, often leading to delays
- Overhead: Enterprises typically have a policy requiring credential updates every 60 or 90 days, leading to unnecessary operational overhead in updating credentials across all relevant connections
Connecting Data 360 to Databricks using Salesforce IDP
The introduction of Salesforce IDP-based authentication addresses some of the most pressing challenges faced by organizations when connecting Salesforce Data 360 with external Databricks systems. Salesforce IDP provides:
- Enhanced security: Static credentials, such as usernames and private keys, have been a longstanding security concern. With IDP-based authentication, customers can eliminate the need to store static credentials and update them whenever changed. Short-lived scoped tokens will ensure just-in-time access, reducing the risk of any phishing attacks.
- Streamlined collaboration: Setting up secure connections previously required significant manual coordination between Data 360 and Databricks administrators. This feature simplifies workflows, where Data 360 admins can create new connections, using Workload identity type user configured by the Databricks admin and leveraging Salesforce IDP as trusted identity provider, that aligns with their security frameworks.
- Aligned with compliance and best practices: Organizations, especially those operating in regulated industries like financial services or healthcare, prioritize secure data access. By using IDP-based authentication, they can adhere to industry standards for identity and access management. It also reduces the risk of non-compliance, ensuring secure data operations at every step.
How to set up IDP authentication and Databricks connection in Data 360
Let’s now take a look at the step-by-step process for setting up the Databricks connector in Data 360 using a secure connection that leverages Salesforce IDP.
Step 1: Set up the connection with Databricks in Data 360
- In Data 360, go to Data 360 Setup.
- Go to Other Connectors.
- Search for Databricks and select the Databricks connector type (see screenshot below).

- Click Next.
- Enter a connection name, and a connection API name of your choice.
- On this page, select the third option under Authentication Method: Identity Provider Based.
Note: We will focus on this flow in the document.

- You’ll notice fields for a unique External ID (auto-generated), a Client ID (of the service principal), a Connection URL (JDBC connection URL) and an HTTP Path (HTTP path of the warehouse).
Please notice there are no-credentials involved here.

- External ID is a unique ID (also known as a connection ID), and it will be used to create a trust relationship with Databricks.

- Make sure that the Data connection window is not closed until you complete the configuration. Copy the generated external ID from this window and head over to the Databricks Admin panel.
Step 2: Configure a service principal and attach a federation policy in Databricks
Configure a service principal
Add a Service Principal identity in the Databricks Admin panel.
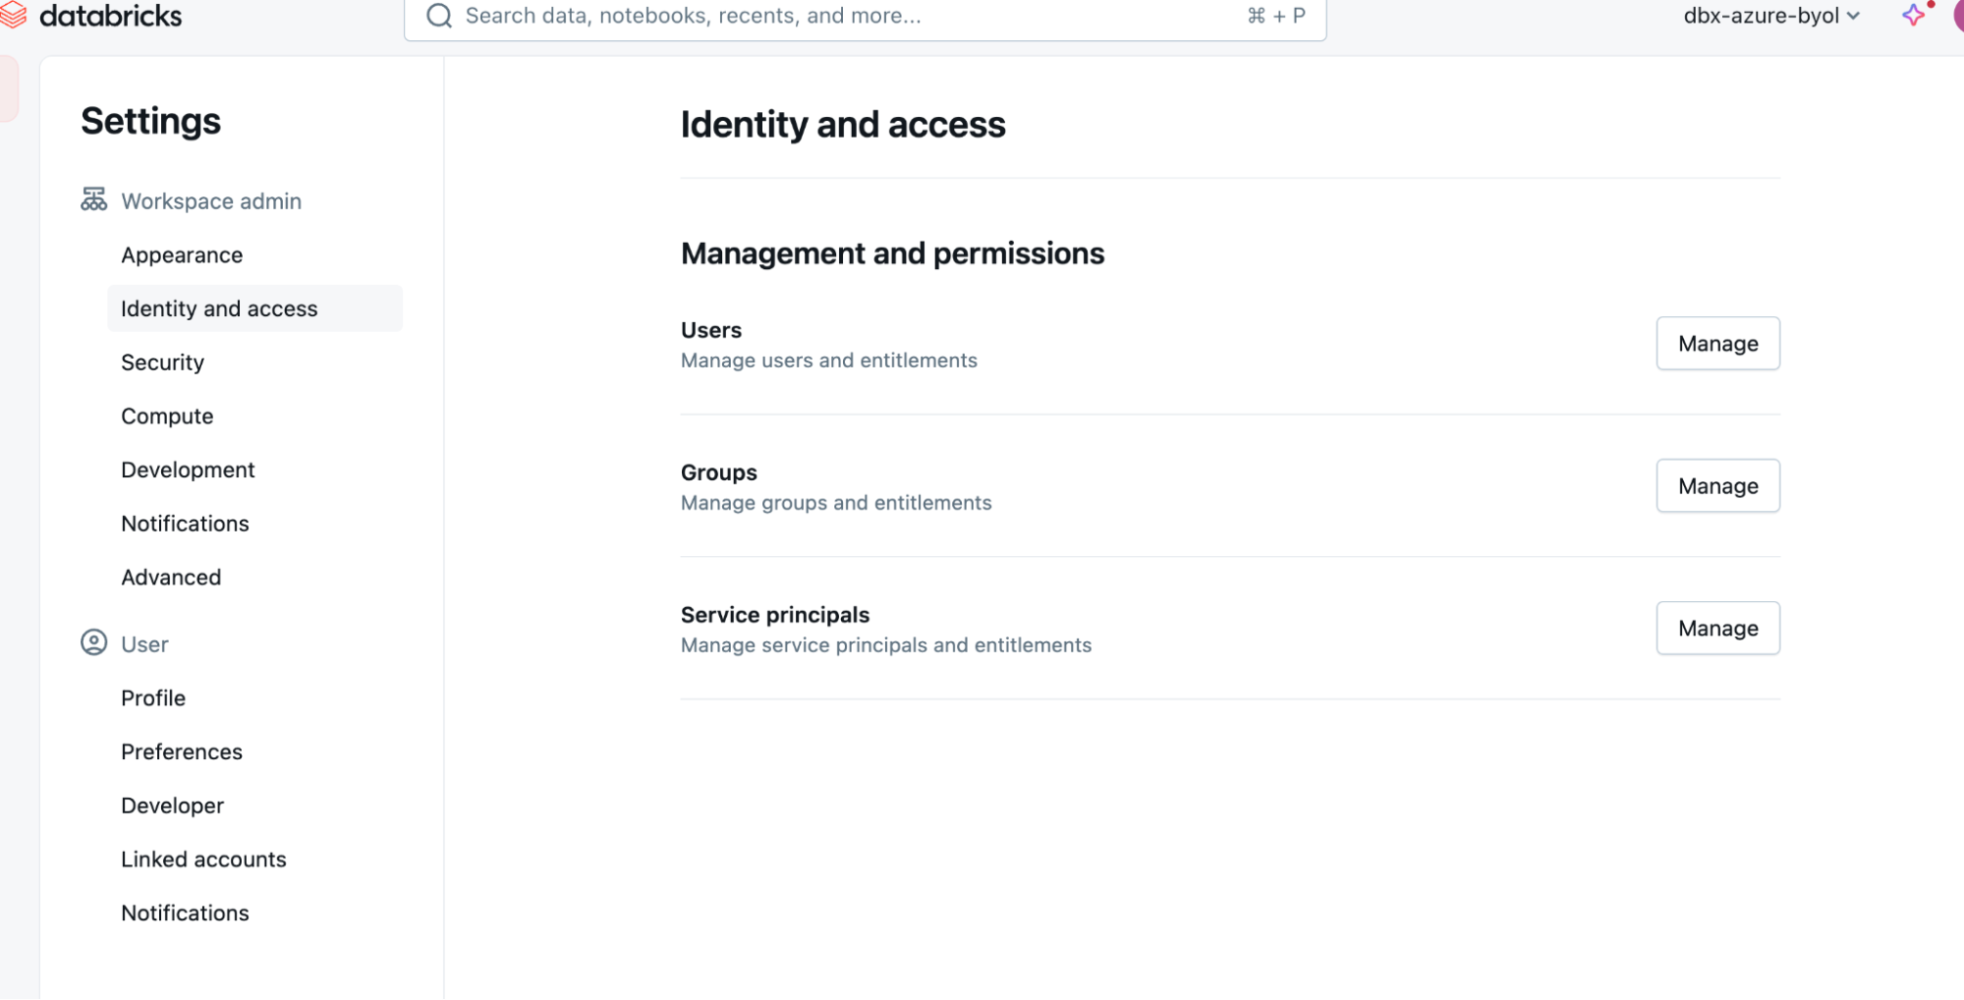
- In your DataBricks workspace, click your user icon on the top right and then click Settings.

- In the Settings sidebar, under Workspace admin, click Identity and access.

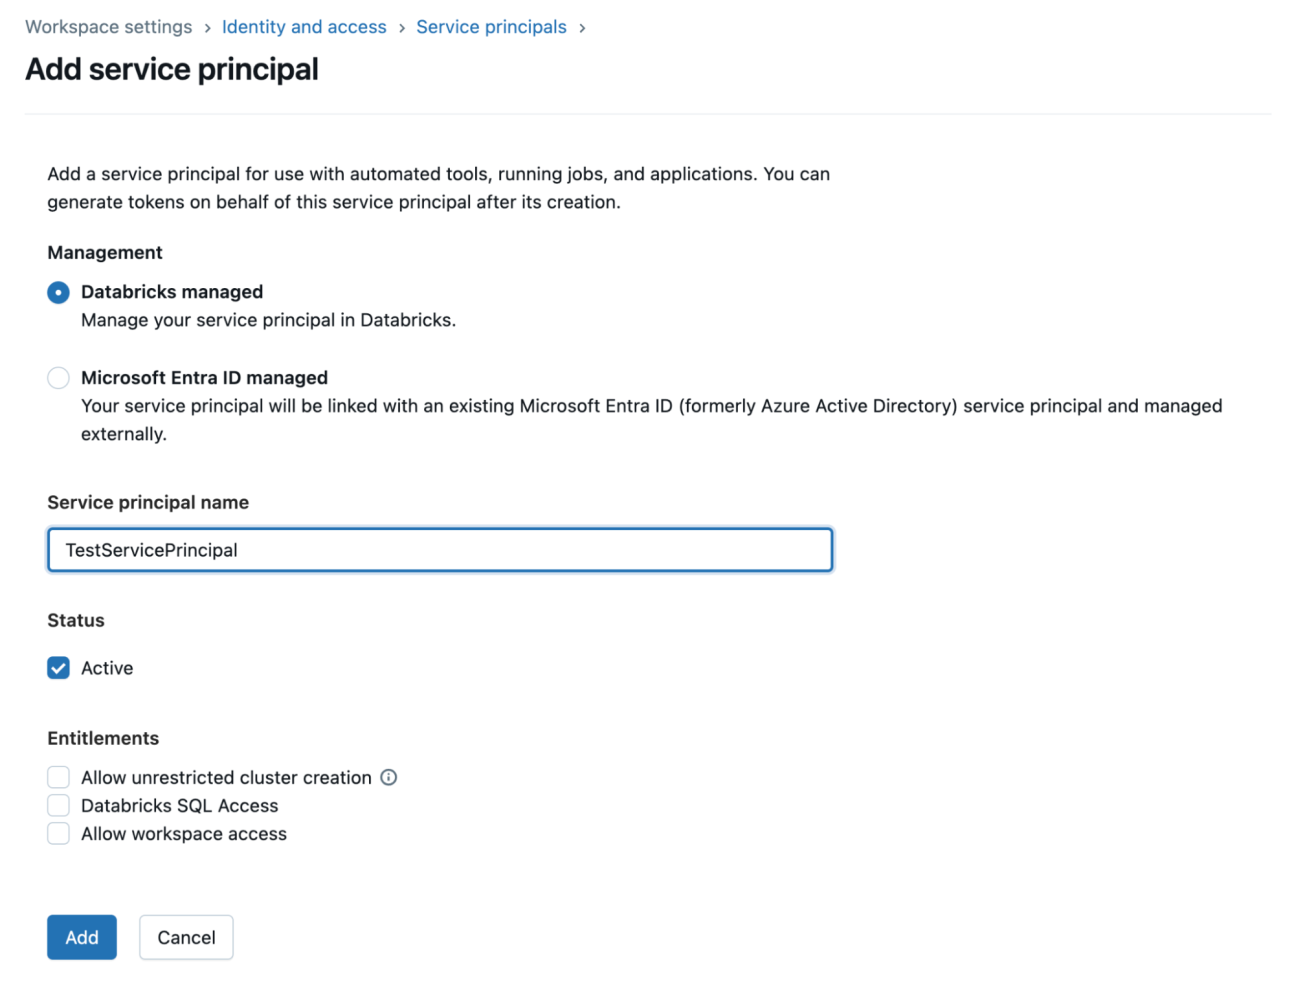
- Under the Service principals option, click Manage and then click Add service principal. If it is an Azure-managed Databricks instance, then the service principal should be Databricks managed.

- In the Add service principal dialog box, click Add new. Note: The service principal must be managed by Databricks.
- Enter a name for the service principal and click Add.

- Once the service principal is created, you’llsee a service principal with the name you entered and an alphanumeric application ID. We’ll use this application ID as a client ID in the Data 360 connections window.

Attach a federation policy
Create a federation policy and attach it to the service principal created above. You can configure the federation policy using the Databricks UI or using the Databricks CLI. We will cover both the steps here.
Option 1: Using the Databricks UI
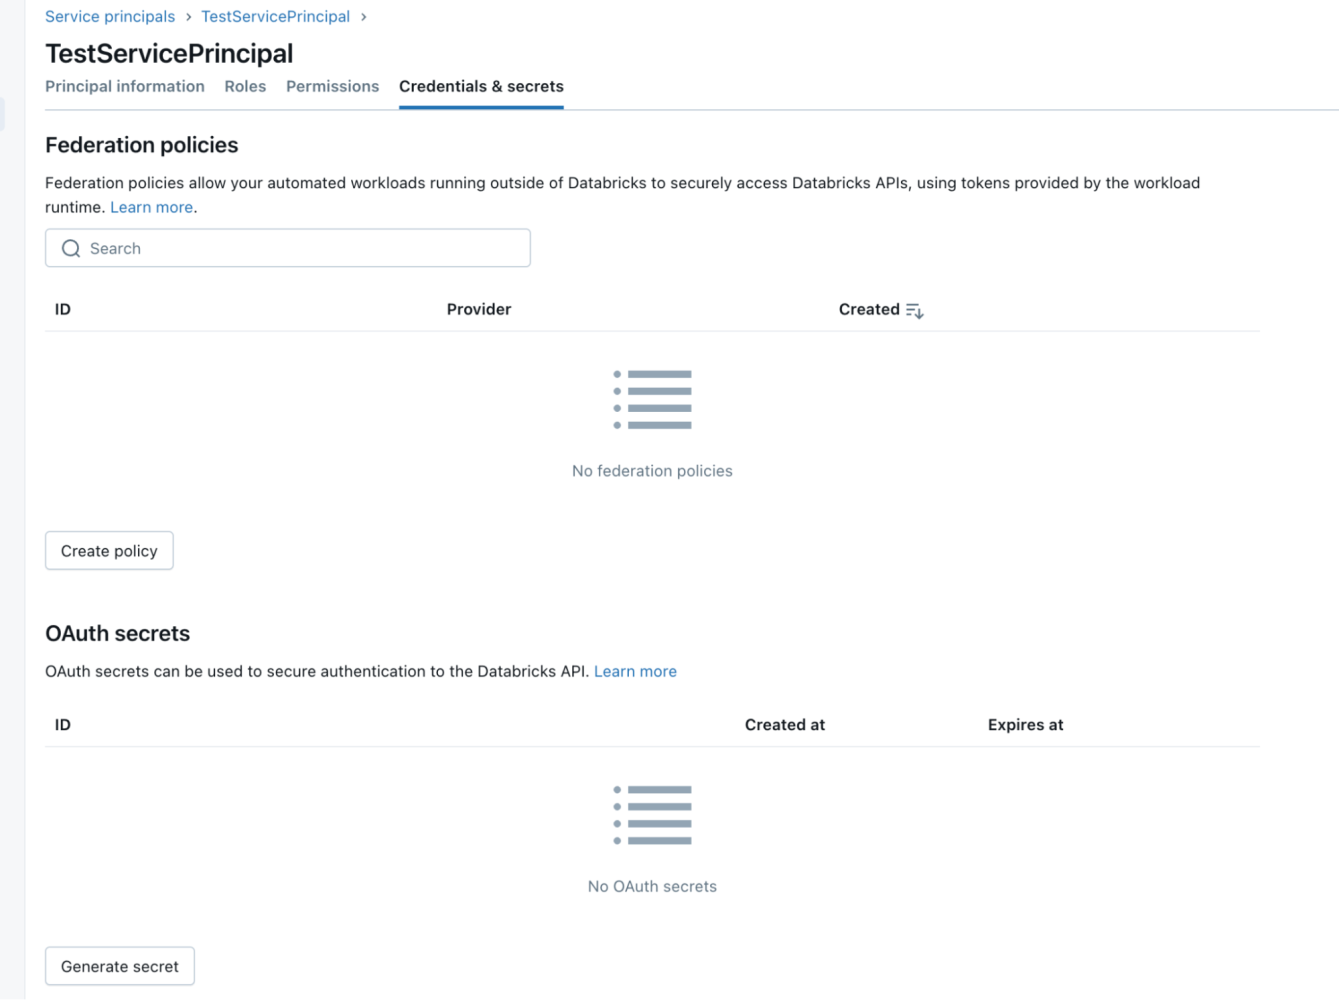
- Go to Manage Account > User Management > Service Principals.
- Search for the service principal created previously.
- Click on the Credentials & Secrets tab.

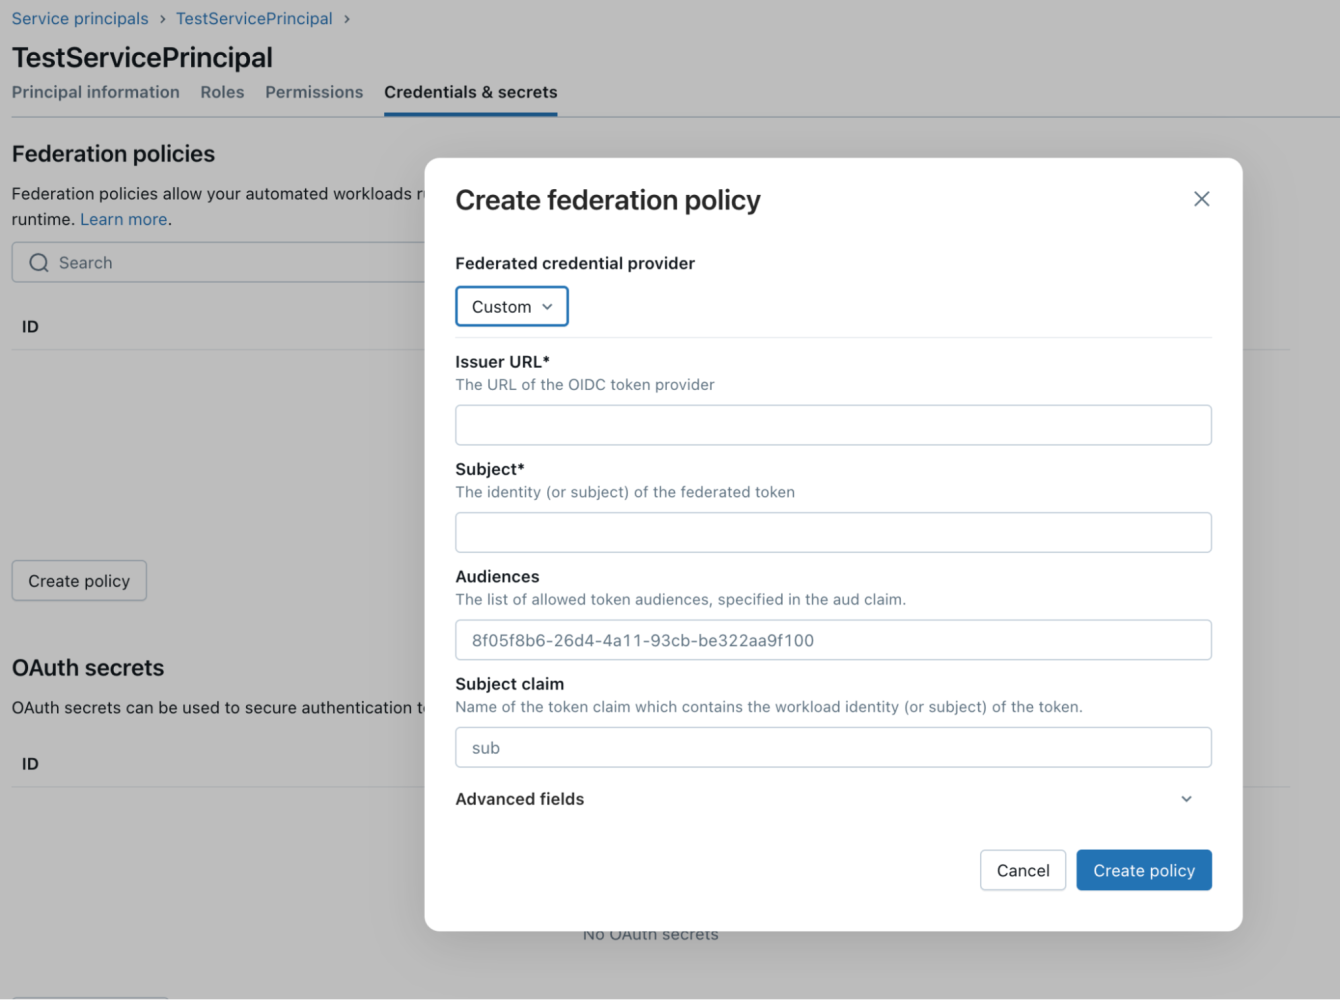
- Click on Create Policy and select Custom.

- Enter details into the Issuer URL , Subject, and Audiences, fields, and keep the Subject claim field as is.
- For the issuer field, enter your org’s My Domain URL (from your Salesforce org) followed by /services/connectors.
For example: https://yourcompany.my.salesforce.com/services/connectors.
To find your My Domain URL:
- Head over to your Data 360 org (ensure you are not closing the connector window opened in the previous step)
- Click Setup Menu option on the top right and select Setup.

- In the Setup window, on the left side navigation panel, search for My Domain.

- You will find the URL under My Domain Settings.

- In the Create federation policy window, for the Audiences field, enter your org’s My Domain URL. For example, https://yourcompany.my.salesforce.com
- For the Subject field, enter the external ID copied from the New Connection dialog box in Data 360.
- Click on Create Policy and federation policy is created.
Option 2: Using the Databricks CLI (Console)
Here is the format of the federation policy using the CLI:
To open the Databricks CLI, follow these steps.
- Open the terminal in your computer and install Brew by executing the following command.
- Once Brew is installed, install the Databricks CLI by executing following commands.
- Once Step 2 above is successfully executed, type the following command on the same terminal.
- To identify the DBX org URL and account ID, go to your DBX instance and click on the downward arrow button beside your workspace name (top right corner). Click the Manage account option (available as the last option after all workspaces name). Check the URL of this page; it must be following this format:
<HOST URL>/?autoLogin=true&account_id=<alphanumeric_accountID> - Copy both the Host URL and alphanumeric_account ID from this and update the command in the previous step.
- Execute the command given in Step 3 on the terminal.
- Now you can proceed with listing all service principals and create federation policy for your service principals using this CLI.
- Enter the issuer URL , subject and audiences as explained in Option 1 above.
- To get the service ID of the service principal, execute this command on the admin console (CLI).
- Copy the service ID of your service principal (which you created previously in this post).

- To attach the federation policy to the service principal, run this command against the created service principal.

- Once the federation policy is attached to the service principal, we can use this service principal to set up the connector in Data 360.
Step 3: Grant permissions
We have to give permissions to this service principal to access the catalog and warehouse resources. To do this follow these steps:
- Click on SQL Warehouse in the left navigation panel of DBX instance.

- Click on the third tab — SQL warehouses — on this page, and select any of the available warehouses that you have access to.
- Click on the Permissions button on the top right.

- Enter the service principal created previously in the Type to add multiple users or groups.

- The service principal will pop up; add it with the permission Can use in the dropdown.

-
Close this window.
Grant access to the Databricks catalog - Once the service principal has access to SQL Warehouse, head over to the Catalog menu option in the left navigation panel of the DBX homepage.

- Select the required Catalog from the Catalog Explorer.
- Click on the tab with name Permissions.

- Click on Grant and add the service principal details in the Type to add multiple users or groups field.

- Provide appropriate privileges for this service principal. We’ll need SELECT privileges for accomplishing our task.
- Confirm and complete this step.
Now you can head over to Data 360 to finalize the connector setup.
Finalizing the connector setup in Data 360
- Enter the value for Client Id (Application ID of this service principal) in the Data 360 connection setup page.
- In your Databricks workspace, click your user icon and then click Settings.
- In the Settings sidebar, under Workspace admin, click Identity and access.
- Under Service principals, click Manage.
- Locate the service principal that you created earlier and copy its application ID.
- In the Data 360 connection setup, in the Client Id field, paste the application ID that you copied.

- Enter the connection URL. This is the server hostname of the SQL warehouse, along with the port number. For example: adb-8903155206260665.5.azuredatabricks.net:443.
- Enter the HTTP Path. This is the HTTP path value of the SQL warehouse in Databricks.

- To review your configuration, click Test Connection.
- Click Save.
Improvements on the roadmap
At Salesforce, we believe in empowering organizations to unlock the full potential of their data ecosystems. If your business uses Databricks and Salesforce Data 360, this feature is designed with you in mind. Looking ahead, we’re committed to further enhancing this experience with more features to make this process seamless. Learn more about this feature or reach out to your Salesforce representative for guidance on getting started. Together, let’s build secure, scalable, and impactful data-driven solutions.
Resources
- Documentation: Authentication
- Documentation: Set Up a Databricks Data Federation Connection
About the author
Gaurav Garg is a Senior Product Manager on the Salesforce Data 360 product team. He is part of the Bring your Own Lake – Zero Copy Data Federation product team, and works closely with leading data lake partners. You can follow him on LinkedIn.