Secure API integrations are fundamental in today’s enterprise environment. They maintain data integrity and meet compliance requirements. Hyperforce, Salesforce’s next-generation infrastructure, runs on public cloud platforms. Cloud infrastructure is ephemeral by nature, so IP addresses change regularly. IP allowlisting can be burdensome for customers, making mTLS a robust alternative authentication mechanism.
In this blog post, we’ll outline two integration scenarios that leverage mutual Transport Layer Security (mTLS) authentication:
- Salesforce (client) org to Salesforce (server) org Integration: This involves secure communication between two Salesforce Org.
- MuleSoft (client) to Salesforce (server) org Integration: This covers secure API calls from MuleSoft applications to Salesforce Org.
About mTLS
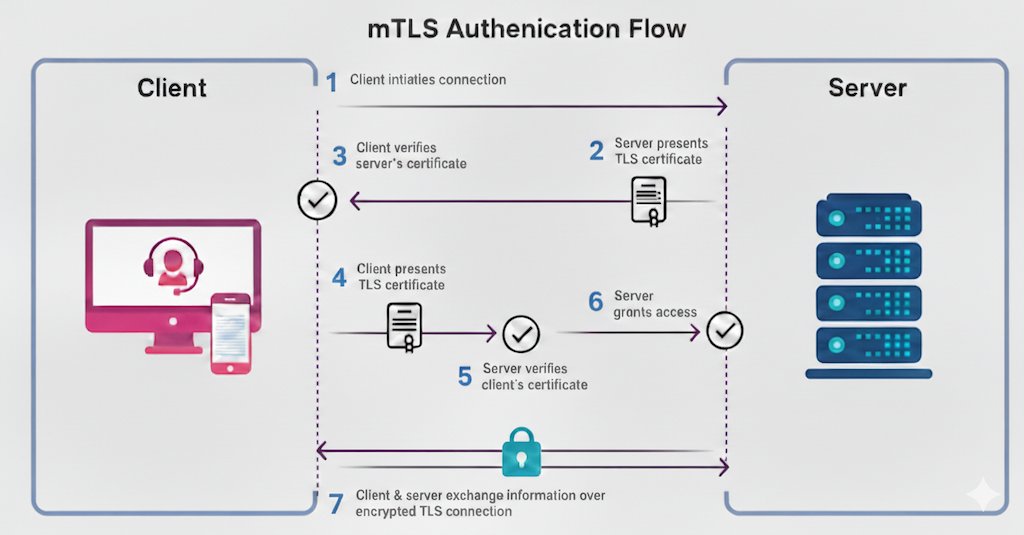
Mutual TLS (mTLS) extends the standard Transport Layer Security (TLS) protocol. Both the client and server must authenticate each other using digital certificates. mTLS also provides an additional layer of security, working in conjunction with existing authentication methods like OAuth2. This enhances the overall security posture, ensuring that only authorized systems with valid certificates can establish connections.
Organizations implementing mTLS benefit from:
- Enhanced security: Bidirectional authentication prevents unauthorized access
- Cloud-native security: It eliminates dependency on static IP addresses in dynamic cloud environments
- Reduced operational overhead: There is no need to maintain and update IP allowlists as Hyperforce infrastructure changes
- Regulatory compliance: It meets stringent security requirements for regulated industries
- Zero-trust architecture: It aligns with modern security frameworks where trust is never assumed
Configuring a Salesforce org as a server
To begin, let’s take a look at how to configure a Salesforce org as a server.
Step 1: Acquire a CA-signed digital certificate
To set up the Salesforce org as a server, you’ll first need to acquire a CA-signed digital certificate. This certificate, issued and signed by a trusted Certificate Authority, is required for mTLS.
Step 2: Required permissions and certificate upload
Next, you’ll set up an integration user (API User), a dedicated user account within Salesforce specifically designed for making API calls. In our case, we use this API user in a JWT bearer flow in the client org as a subject and in the MuleSoft client as a principal parameter. Then, you’ll assign a permission set to this user that includes these two critical system permissions:
- Enforce SSL/TLS Mutual Authentication: This ensures a secure, two-way verification process for the connection
- API Only User: This restricts the user to API-based interactions, preventing them from accessing the user interface (UI)
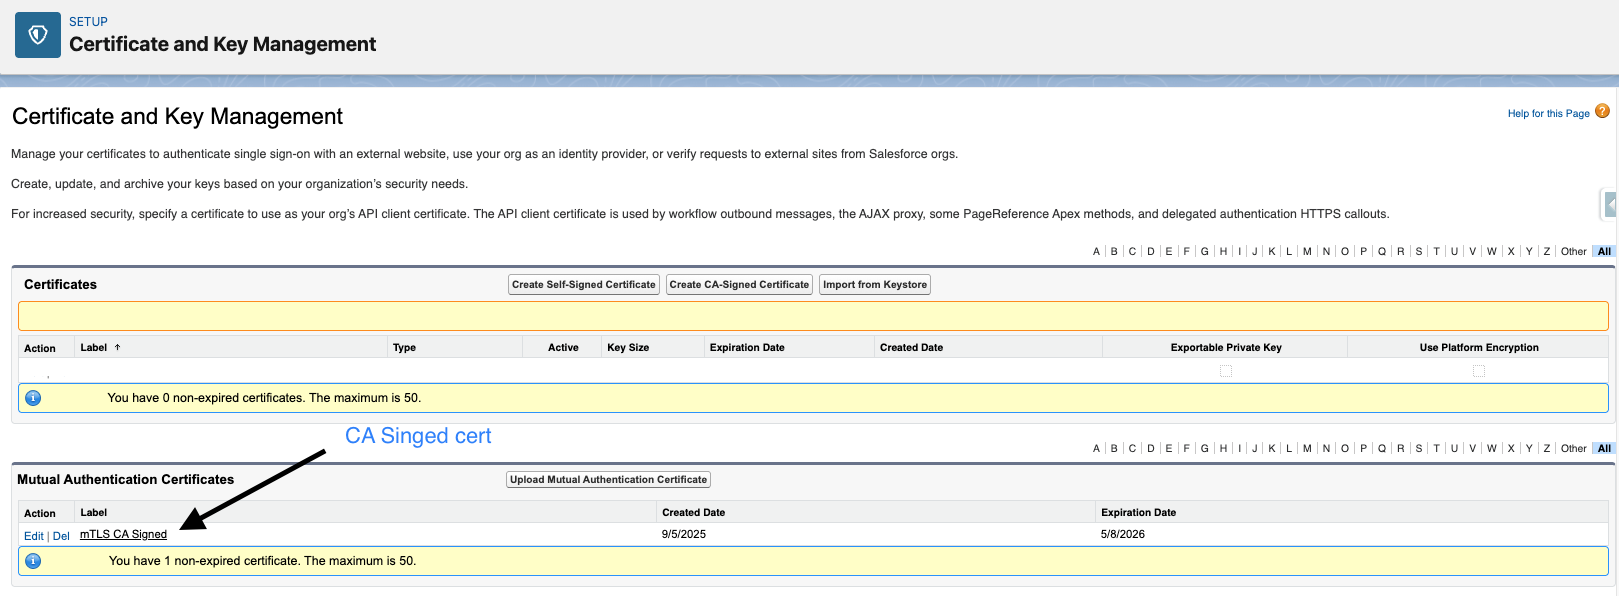
Finally, you’ll upload the Mutual Authentication Certificate, which you acquired in Step 1, in the Mutual Authentication Certificate section within Certificate and Key Management.
Step 3: OAuth configuration for server org
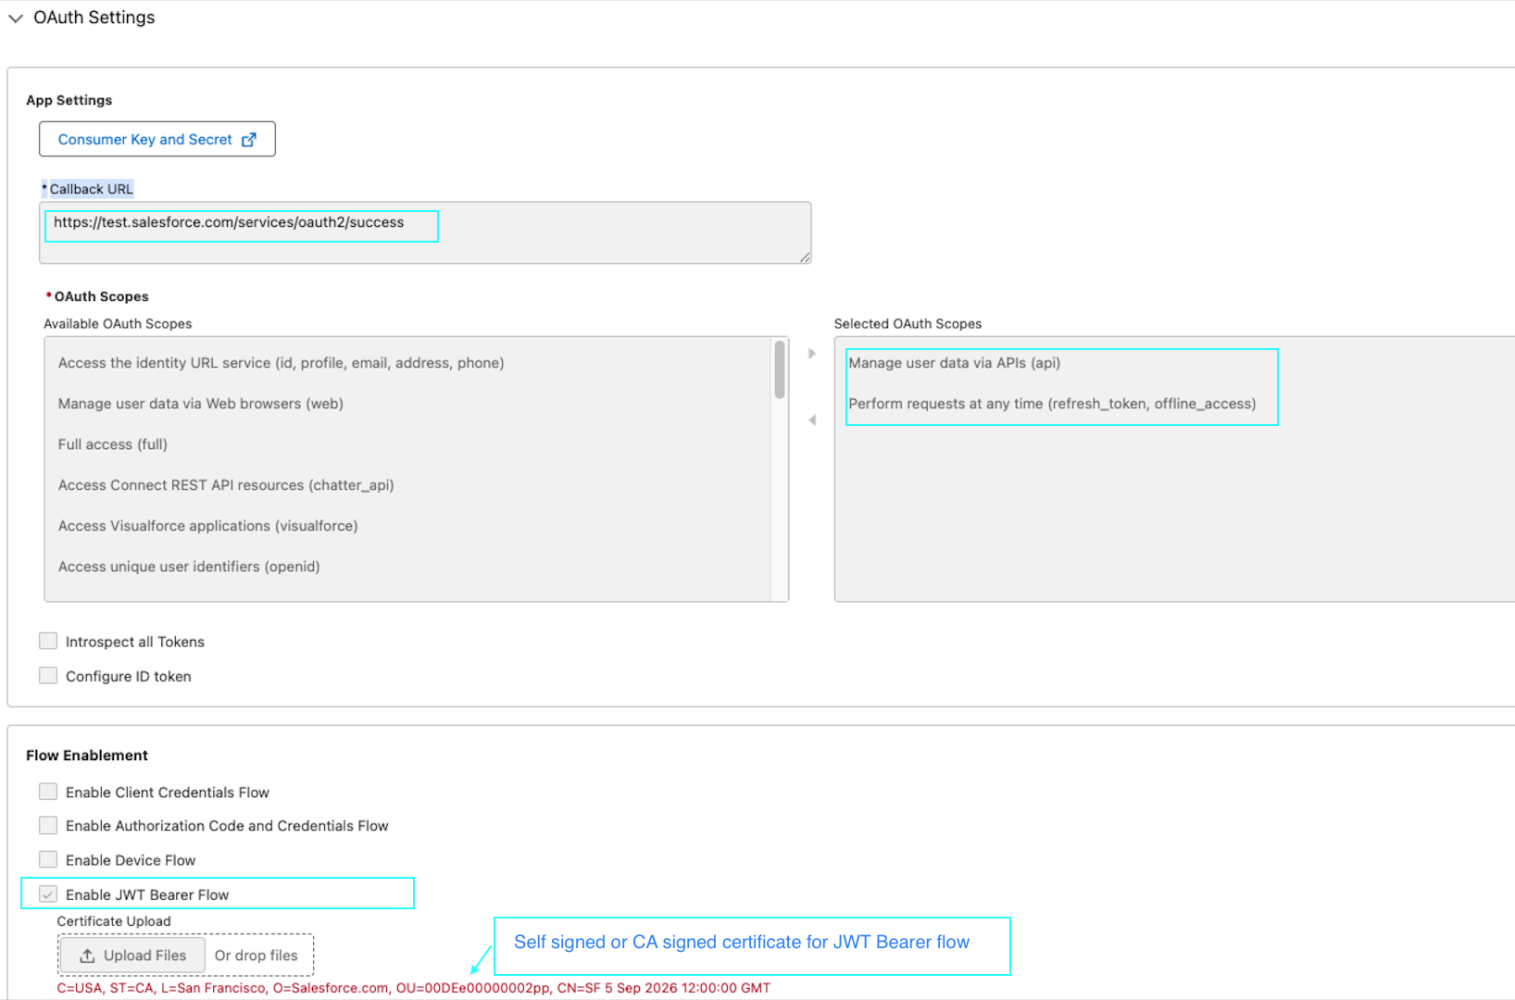
Configure the external client App for JWT bearer flow authentication, which will be initiated from either the client organization or the MuleSoft client.
- In the callback URL for your external client app, use:
https://domain_url_server_org/services/oauth2/callback. - Select the required OAuth scope, for example: Manage user data via APIs (
api) and Perform requests at any time (refresh_token, offline_access). - For Flow Enablement, select Enable JWT Bearer Flow and upload the certificate.
- In the external client app, navigate to Policies and then OAuth Policies. Set Permitted Users to Admin Approved Users that are pre-authorized. Additionally, in the external client app’s Policies section, under Permissions Set, add the permission set assigned to the integration user.
Configuring a Salesforce org as a client
Now that our Salesforce org has been configured as a server, let’s take a look at the steps needed to configure it as a client.
Step 1: Client org certificate management
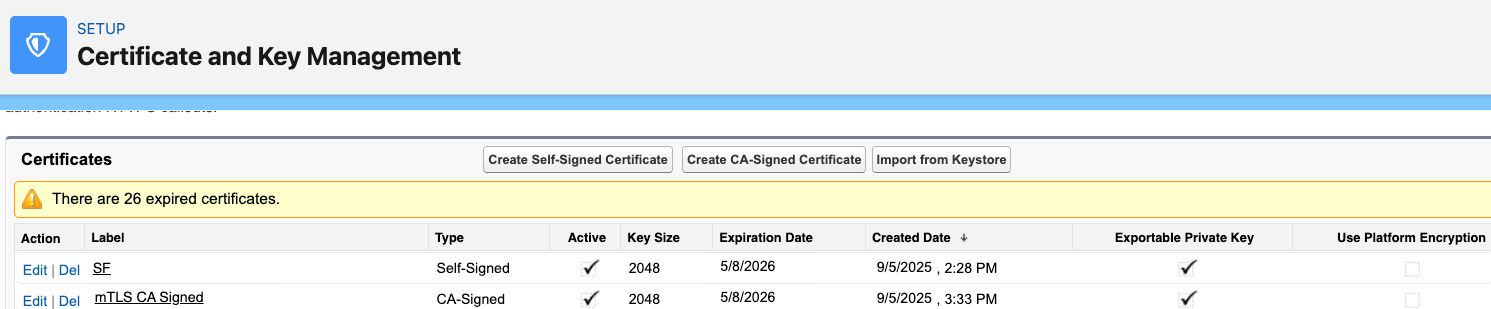
For the client org setup, you’ll need to store both the CA-signed certificate for mTLS and the self-signed or CA-signed certificate for OAuth on the client org’s Certificate and Key Management screen under Setup.
The screenshot below displays both a self-signed certificate and a CA-signed certificate for use in an OAuth flow and mTLS.
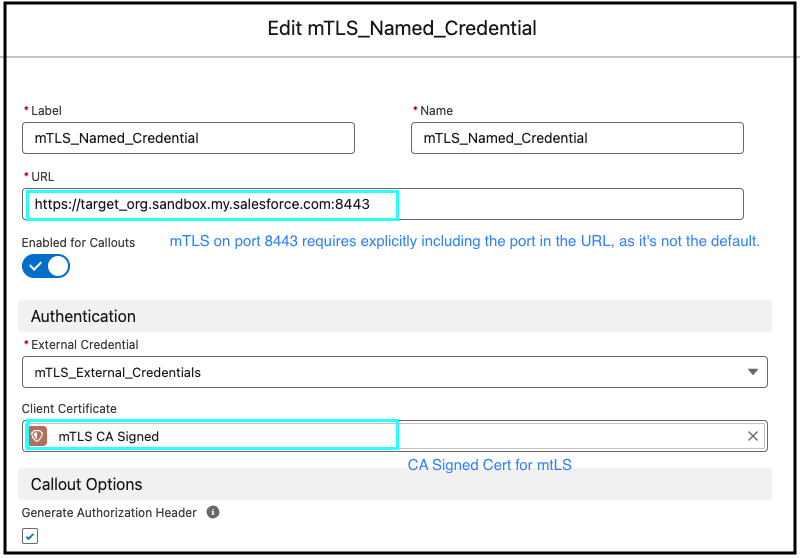
Step 2: Named credential configuration
Configure both the external credential and named credential in Salesforce. This setup is essential for enabling secure callouts from Salesforce to external services using mTLS. It involves associating the certificates uploaded previously with an external credential, and configuring the necessary OAuth 2.0 JWT bearer flow for authentication. It’s really important to get the configuration right, so here are a few key things to keep in mind:
- Explicitly include port number 8443 in the URL of the named credential.
- The OAuth process utilizes the Signing Certificate, which is configured on the External Credentials screen and was previously uploaded during the external client app setup
- For mTLS authentication, the client certificate in the named credential is a CA-signed certificate.
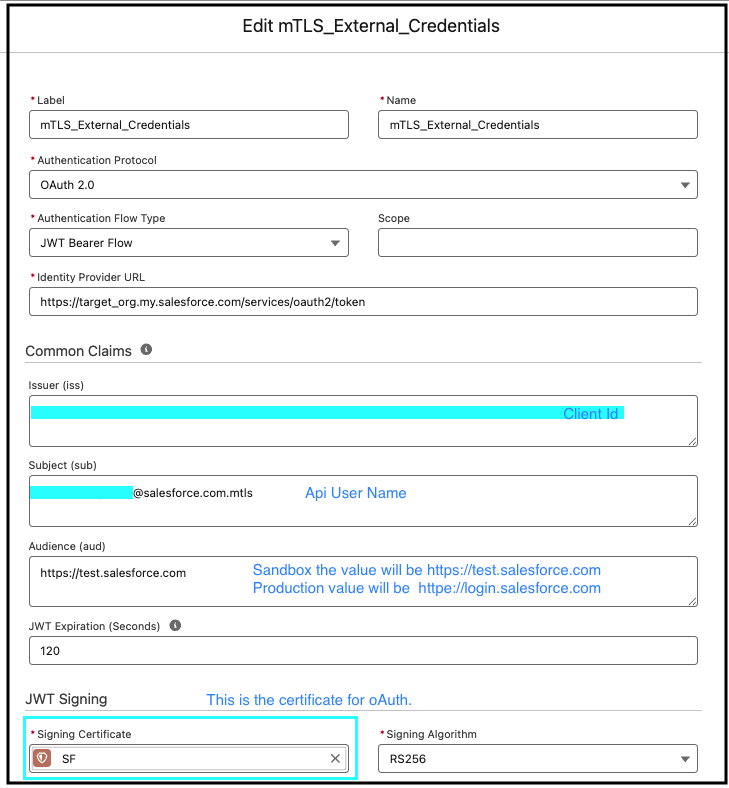
The following screenshot shows the Edit mTLS_External_Credentials configuration page in Salesforce, including the fields and required values for an OAuth 2.0 authentication protocol using the JWT bearer flow.
The screenshot below shows the UI in Salesforce where you’ll configure Named Credential. The form displays fields for Label, Name, URL, and Authentication settings, with an mTLS CA-signed client certificate selected.
Step 3: Test the connection
The following Apex code snippet is designed to test a connection to an external service using a named credential (mTLS_Named_Credential). It executes a GET request to retrieve data, leveraging mutual TLS for secure communication with the external endpoint. This code can be executed in the Salesforce Developer Console as anonymous Apex. A 200 response code in the Developer Console logs indicates a successful connection.
1HttpRequest request = new HttpRequest();
2request.setEndPoint('callout:mTLS\_Named\_Credential/services/data/v61.0/sobjects');
3
4/*uncomment the below line if you are not passing the CA signed cert for
5mutual authentication in Named Credentials -> Client Certificate*/
6
7//request.setClientCertificateName('mTLS CA Signed');
8request.setMethod('GET');
9HttpResponse response = new HTTP().send(request);
10System.debug(response);
Configuring a MuleSoft client
We’ve covered establishing a connection from a Salesforce client org to a Salesforce server org. Next, let’s explore how to configure the integration between a MuleSoft client and a Salesforce server org.
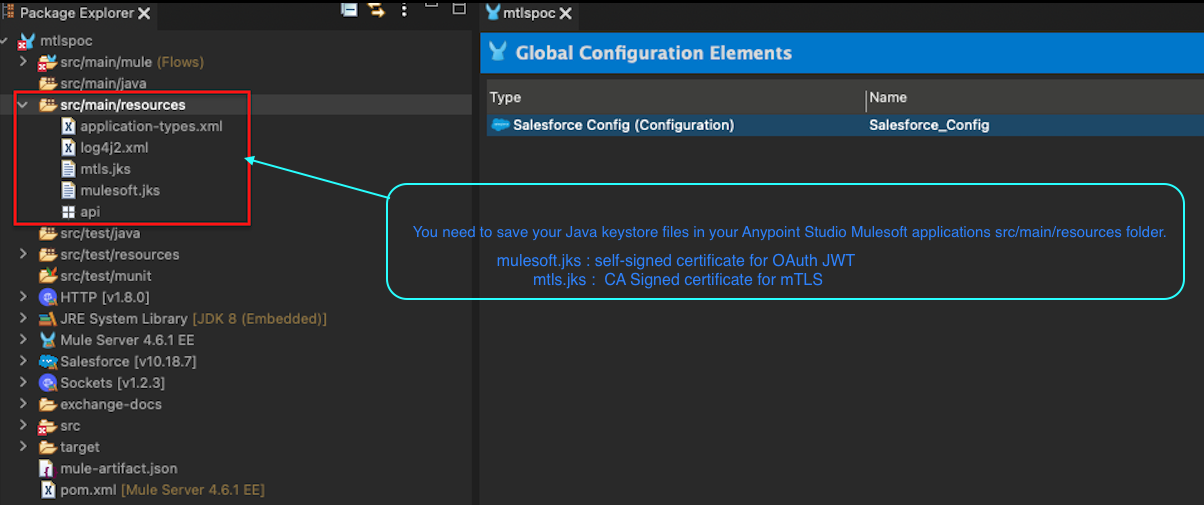
Step 1: Store your certificate
You’ll need to first save your Java keystore (jks) files in your Anypoint Studio Mulesoft application’s src/main/resources folder.
- The
mulesoft.jksfile holds the self-signed certificate, encompassing both the public and private keys. This certificate was generated and utilized during the configuration of the external client app in the server-configured Salesforce org. This certificate is for use in the MuleSoft Salesforce Connector configuration, specifically for OAuth JWT. - The
mtls.jksfile holds a CA-signed certificate, encompassing both public and private keys. This same certificate has been uploaded to the Salesforce server org, within the Certificate and Key Management → Mutual Authentication Certificate section.
The following screenshot shows a directory tree including the files mtls.jks and mulesoft.jks. They’re located in the src/main/resource folder, which is used for mutual authentication and JWT token exchange.
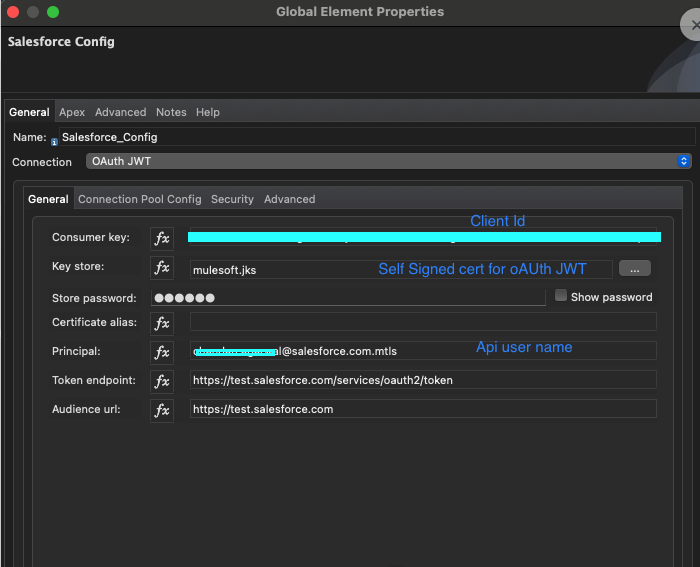
Step 2: Configure the Salesforce Connector in Mule
After configuring both the OAuth JWT and mTLS for the Salesforce Connector, the connection can be tested to validate the successful setup.
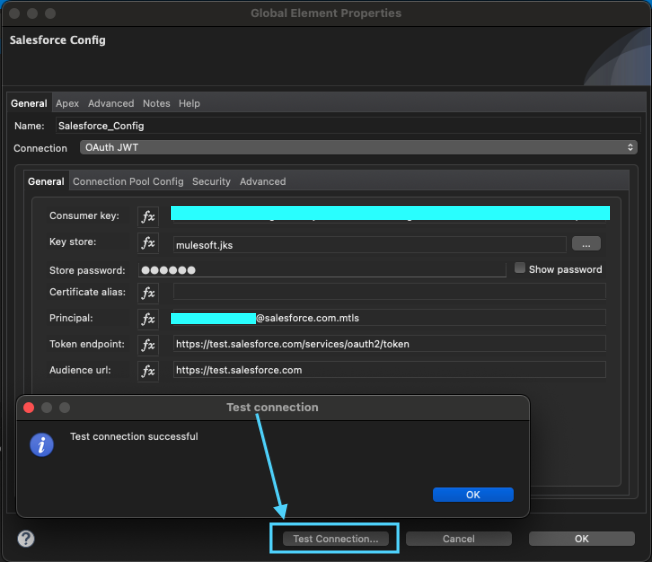
Here is the setup in MuleSoft for a Salesforce Config using an OAuth JWT connection, with fields for key store, password, and token endpoints.
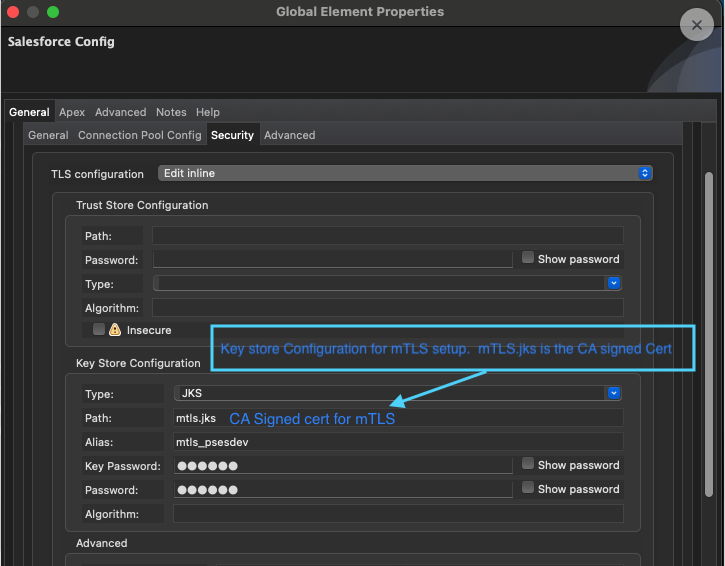
And here is the Security tab of the MuleSoft Salesforce Config component with the Key Store Configuration highlighting the mtls.jks file for mTLS setup.
Step 3: Test the connection
Once the OAuth JWT and Security -> Keystore configurations for mTLS are complete, click the Test Connection button. A “Success” response indicates correct configuration.
This is what a successful test response looks like in the MuleSoft Salesforce Config component, including the OAuth JWT connection details.
Conclusion
Securing enterprise integrations is non-negotiable in the modern cloud landscape. As this post shows, mTLS offers a powerful, cloud-native solution. It authenticates API integrations between Salesforce-to-Salesforce and MuleSoft-to-Salesforce. mTLS moves beyond traditional IP allowlisting, providing a robust, scalable, and operationally efficient security framework. This framework aligns with zero-trust principles and meets stringent compliance standards. Embracing mTLS keeps your data secure while maintaining the agility you need for dynamic cloud environments.
Resources
- Knowledge article: Preferred Alternatives to IP Allowlisting on Hyperforce
- Knowledge article: Enable Mutual Authentication
- Blog post: Salesforce Mutual Authentication
- Documentation: Configure Your API Client to Use Mutual Authentication
- Documentation: Set Up a Mutual Authentication Certificate
- Knowledge article: Salesforce Connector Steps to Set Up Two-Way Mutual Authentication with Mulesoft
- Knowledge article: Certificates in Mutual Authentication for Salesforce
- Documentation: OAuth 2.0 JWT Bearer Flow
About the authors
Chandan Agarwal is a Lead Member of Technical Staff at Salesforce. You can find him on LinkedIn.
Vish Gurrapu is a Senior Engineering Manager – Software at Salesforce. You can find him on LinkedIn.