In today’s fast-paced, data-driven business world, where decisions are powered by insights from vast amounts of information, connecting different tools and platforms securely and effortlessly is more important than ever. It allows teams to collaborate without technical hurdles, focus on analysis rather than setup, and ultimately drive real growth. That’s why we’re thrilled to share a game-changing update from our partnership with Google BigQuery.
Whether you’re a data analyst dipping your toes into integrations or an IT admin streamlining workflows, this blog post is for you. We’ll dive into:
- The key benefits of leveraging Salesforce as your identity provider for data connections
- Step-by-step instructions to configure Salesforce IDP in Data 360, link it to your Google BigQuery warehouse, and set up user permissions
- Real-world tips to get the most out of your setup, including troubleshooting common gotchas
Ready to supercharge your data flow? Let’s get started.
About Google BigQuery and Salesforce Data 360
Google BigQuery is Google’s fully managed, serverless data warehouse, a tool designed for storing and analyzing enormous datasets (think billions of rows) using simple SQL queries. It’s like a supercharged database that scales automatically, handling everything from business reports to machine learning without you managing servers. Head to the Google Cloud Console to spin up a free sandbox and experiment.
Salesforce Data 360, the next evolution of Data Cloud, is part of Salesforce’s ecosystem for customer data platforms (CDPs). It helps unify customer information from various sources, enabling personalized marketing, sales strategies, and more all within the familiar Salesforce environment.
The old way: Connecting Data 360 to Google BigQuery using static credentials
Traditionally, linking your BigQuery data to Salesforce Data 360 meant relying on a manual process with static credentials, things like usernames and private keys that act as permanent passwords. While this got the job done, it came with some real risks that could slow down your team and expose risks.
Security risks
These credentials stay “live” for days, weeks, or even longer, making them prime targets for unauthorized access if they’re leaked or stolen.
Operational complexity
Setting up connections often required back and forth between Data 360 admins and Google BigQuery admins, leading to frustrating delays and miscommunications.
Ongoing overhead
Many enterprises have strict policies mandating credential rotations every 60 or 90 days, which means constantly updating them across multiple connections, a time sink that pulls focus from actual data work.
In essence, the old method worked, but felt clunky, not adhering to the needs of the current market.
The new way: Connecting Data 360 to Google BigQuery using Salesforce IDP
Enter our new Salesforce Identity Provider (IDP) based authentication — a smarter, safer upgrade that tackles those pain points effortlessly. Now, you can connect your BigQuery datasets directly to Data 360 without those pesky static credentials. Instead, Salesforce IDP acts as a trusted “gatekeeper,” verifying users and issuing short-lived, scoped tokens for just-in-time access.
Here’s how it transforms things:
- Enhanced security: Say goodbye to storing and rotating static credentials like usernames and private keys. These temporary tokens minimize exposure to phishing or breaches, ensuring that access is granted only when needed and revoked automatically afterward.
- Streamlined collaboration: No more endless admin handoffs. Data 360 admins can now set up connections using a “Workload Identity” user pre-configured by your BigQuery team, with Salesforce IDP handling the trust layer. It fits right into your existing security setup, cutting setup time from days to minutes.
- Aligned with compliance and best practices: For teams in regulated fields like finance or healthcare, this is a win. It supports industry standards for identity and access management (IAM), reduces non-compliance risks, and keeps your data operations audit-ready from the start.
Think of it as upgrading from a rusty lock to a smart home system: secure, intuitive, and focused on letting you extract value, like blending BigQuery’s analytics with Salesforce’s customer profiles for deeper insights.
In short, this feature bridges two powerhouse tools, making it easier for businesses to blend warehouse-scale data analysis with customer-centric operations — all while keeping things locked down tight.
Setting up federated authentication for Google BigQuery in Salesforce Data 360
Now that we’ve covered the why behind this secure integration, ditching risky static credentials for Salesforce Identity Provider (IDP) based authentication, let’s dive into the how.
If you’re new to this, don’t worry; we’ll walk through every step like you’re setting it up for the first time. This process uses federated authentication (also called “IDP based auth”), where Salesforce acts as a trusted identity broker to securely link your Data 360 setup with Google BigQuery. No manual key juggling required!
Think of it as a digital handshake: Data 360 sends a temporary proof of identity token to BigQuery, which verifies it against Salesforce’s trusted rules. It’s fast, safe, and scales effortlessly. You’ll need admin access to both Data 360 and Google Cloud Console (GCS).
Step 1: Set up the connection with Google BigQuery in Data 360
This is where you kick things off in your Salesforce environment. We’re building the foundation for the secure link.
- Navigate to the Connectors section:
- Log in to your Salesforce Data 360 org.
- From the main dashboard, click Setup in the top-right menu (it looks like a gear icon).
- In the Setup menu, search for Data 360 Setup or navigate directly to it.
- Find and select Google BigQuery:
- Under Other Connectors, use the search bar to type “Google BigQuery”
- Select the Google BigQuery connector type from the results.
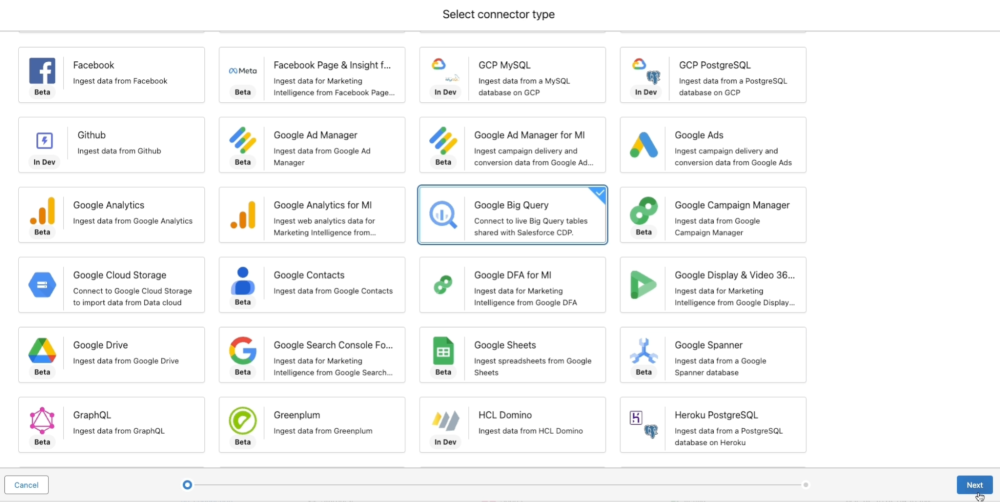
- Proceed to configuration:
- Click Next to advance.
- Give your connection a friendly Connection Name (e.g., “BQ-Salesforce Analytics Link”) and an API Name (for internal referencing).
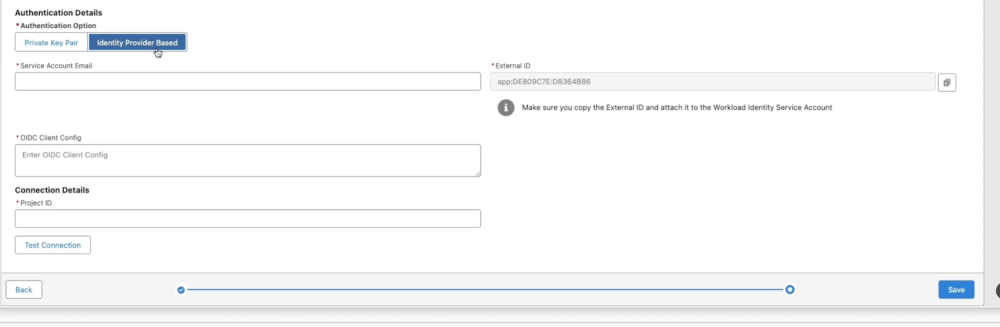
- Choose IDP-based authentication:
- Under the Authentication Method, skip the first option (that’s for basic/static creds) and select the second: Identity Provider Based (this is the focus of our blog post — no static credentials here!).
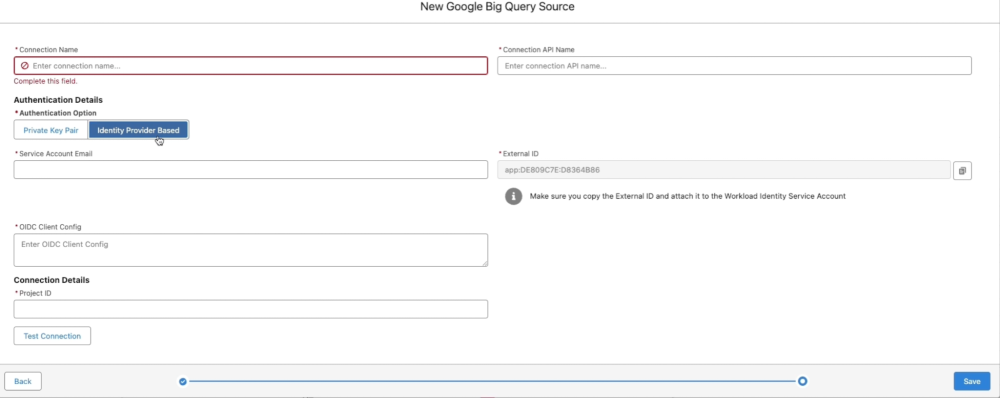
- Fill in the basics (no secrets required):
- External ID: This auto-generates a unique “handshake code” (like a connection fingerprint) that BigQuery will trust later. Copy it immediately; you’ll need it soon.
- Service account Email: Enter the email of a pre-created service account in your Google Cloud project (e.g., “my-service@project.iam.gserviceaccount.com”). If you don’t have one, create it in GCS under IAM > Service Accounts.
- Project ID: Input your Google Cloud Project ID (find it in the GCS console under Project Info; it’s a short string like “my-analytics-project”).
- OIDC Client Config: Leave this blank for now; we’ll grab it in Step 2.
Pro tip: Keep this Data 360 window open — closing it resets the External ID!
At this point, it feels light: no passwords or keys. That’s the beauty of federation, trust is established externally.
Step 2: Set up the workload identity federation in Google Cloud Console
Now, switch to your Google Cloud world. We’re telling BigQuery, “Hey Google, trust logins from this Salesforce org.”
This creates a federation provider that validates tokens from Salesforce.
- Access workload identity federation:
- Open the Google Cloud Console and select your project.
- Go to IAM & Admin > Workload Identity Federation in the left sidebar.
- Create a new provider:
- Click Create Pool (or Create Provider if it’s your first).
- Name your pool something memorable, like “BYOLAuth Pool.”
- Under Configure Provider, select OpenID Connect (OIDC).
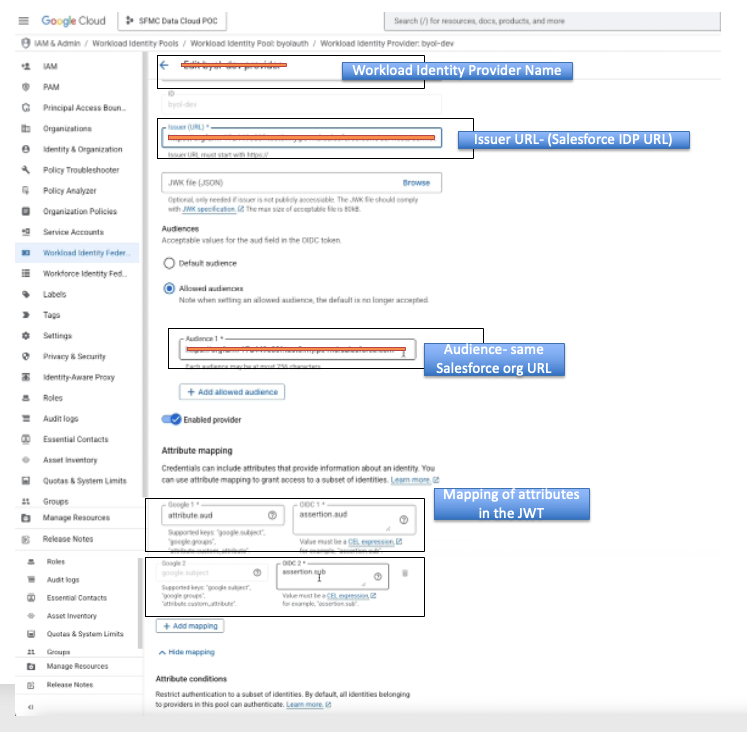
- Define the issuer and audience:
- Issuer URL: This is where the “proof” comes from — your Salesforce org. Use your My Domain URL + /services/connectors.
Example: https://yourcompany.my.salesforce.com/services/connectors.- How to Find Your My Domain URL:
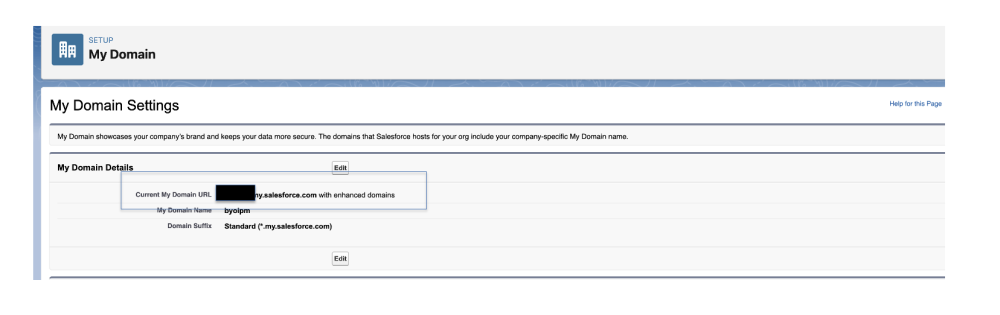
- Back in Data 360 (don’t close that window!), go to Setup (top-right gear).
- In the Quick Find box (left sidebar), search for My Domain.
- Click My Domain Settings; your URL is right there, like https://yourcompany.my.salesforce.com.
- How to Find Your My Domain URL:
- Audience: Same as above, but without the /services/connectors, just https://yourcompany.my.salesforce.com.
- Issuer URL: This is where the “proof” comes from — your Salesforce org. Use your My Domain URL + /services/connectors.
- Set up attribute mapping:
- This maps token details for verification. Add these:
- attribute.aud = assertion.aud (maps the audience claim).
- attribute.sub = assertion.sub (maps the subject/user ID).
- This maps token details for verification. Add these:
- Click Save. Congrats — your provider is live!
Step 3: Grant secure access and finalize the config
We’ve defined the trust; now we need to authorize who gets in. This links back to your External ID and service account.
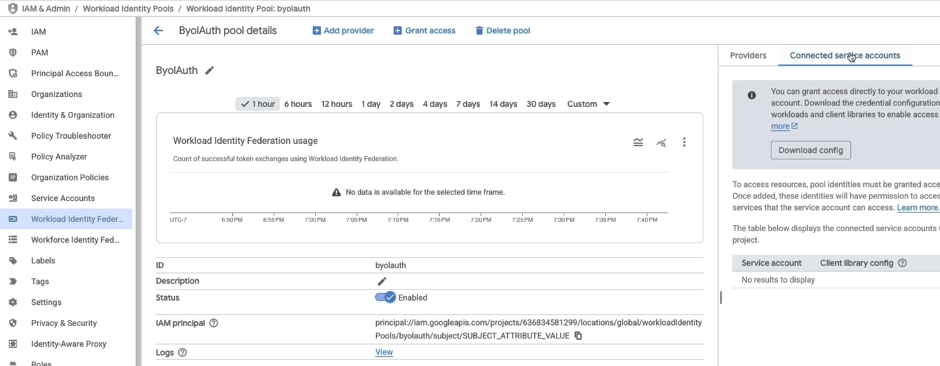
- Head to connected service accounts:
- On the pool details page (e.g., “BYOLAuth Pool”), click Connected service accounts on the right.
- Hit Grant Access.
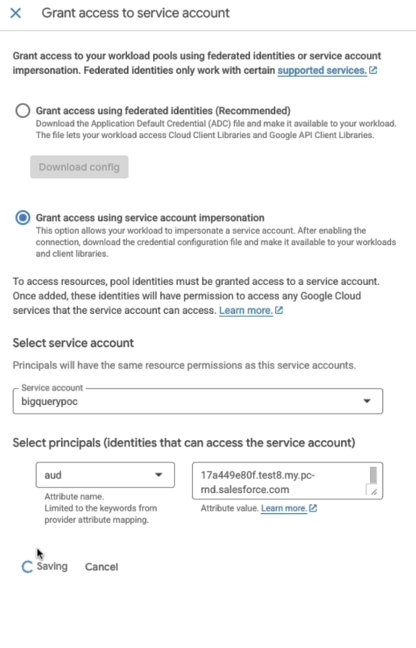
- Impersonate for audience (aud attribute):
- Select Grant access using service account impersonation.
- Choose your Service Account Email from Step 1.
- For Principals, set:
- Attribute: aud
- Value: Your Salesforce My Domain URL
(e.g., https://yourcompany.my.salesforce.com).
- Click Save.
- Impersonate for subject (sub attribute):
- Repeat: Click Grant Access > Grant access using service account impersonation.
- Select the same Service Account.
- For Principals, set:
- Attribute: sub (subject).
- Value: Paste the External ID you copied from Data 360.
- Click Save.

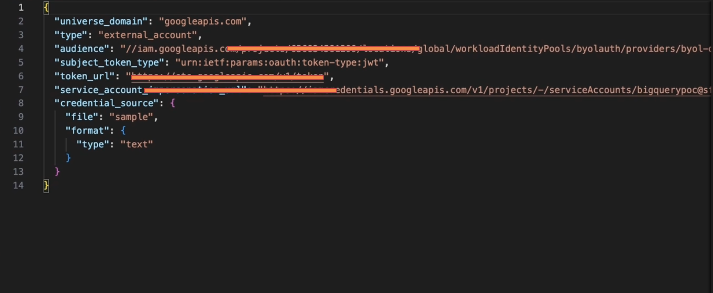
- Download the OIDC config:
- Back on the pool details, click Download Config.
- Select Provider as the name you gave.
- Define the OIDC ID token path and Format type as “text.”
- This returns a JSON blob, which looks like curly-braced code with keys like “type,” “client_id,” and “token_uri.” Copy the whole thing.
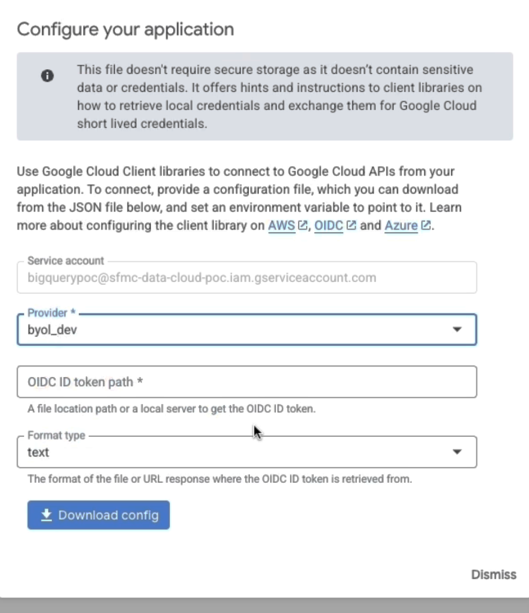
The config should look like this:
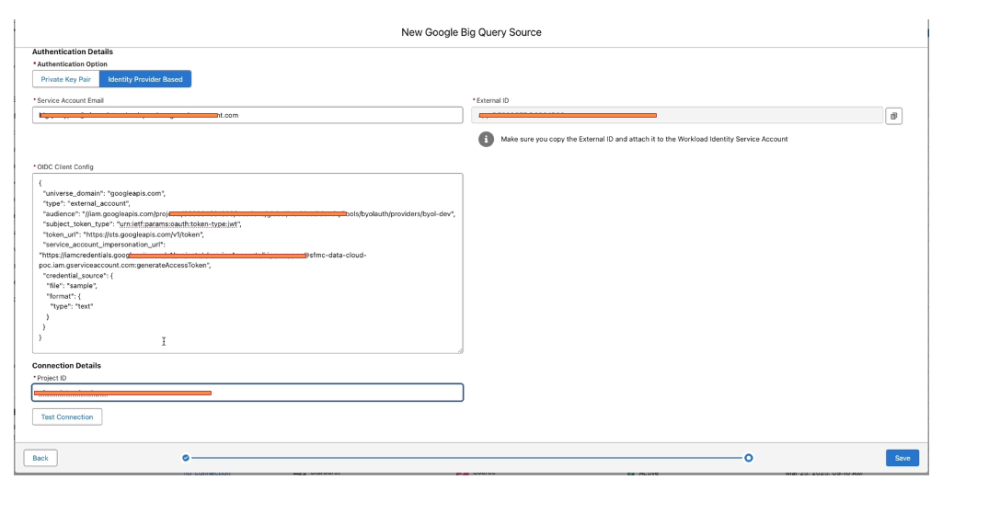
- Paste and test in Data 360:
- Return to your open Data 360 window.
- Paste the OIDC config into the OIDC Client Config field.
- Double-check that External ID, Service Account Email, and Project ID are all set.
- Click Test Connection, it should ping successfully (green check!).
- Hit Save.
Now you’re connected! Use this in Data 360 to create data streams, federate BigQuery tables, or build apps. Test by querying a sample dataset; everything flows securely via Salesforce IDP.
Quick troubleshooting steps
- External ID vanished? Restart Step 1 — it’s auto-generated fresh.
- Test fails? Verify My Domain URL (no typos) and ensure that your service account has BigQuery roles (e.g., “BigQuery Data Editor”) in GCS IAM.
- Permissions hiccup? Double-check attribute mappings; they’re picky about exact syntax.
Improvements on the roadmap
At Salesforce, we believe in empowering organizations to unlock the full potential of their data ecosystems. This IDP-based feature is tailored precisely for businesses in your shoes, making secure data federation feel straightforward rather than overwhelming.
Looking ahead, we’re laser-focused on evolving this even further to keep things effortless as your needs grow. Based on early user input, here’s a peek at what’s cooking:
- Automated External ID syncing: Wave goodbye to manual copy-pasting and let the system handle ID generation and sharing automatically
- Smarter error handling: Crystal-clear messages with one-click diagnostics and fixes, so troubleshooting becomes a breeze even for beginners
- Multi-org support: Seamless scaling across multiple Salesforce orgs, plus deeper integrations with other data lakes for zero-copy federation
We’re always iterating based on your feedback, so if you have ideas or spot opportunities, share them with your account team! In the meantime, dive deeper into this feature via our docs (see below) or chat with your Salesforce rep for personalized onboarding. Together, let’s craft secure, scalable data solutions that turn insights into action — without the setup stress.
Resources
Ready to roll up your sleeves? These beginner-friendly guides will have you referencing back as needed:
- Authentication policies documentation: A straightforward breakdown of how IDP fits into Salesforce’s security framework, with tips on customizing for your org
- Set Up a Google BigQuery Data Federation Connection: Our official step-by-step companion to this post, complete with video walkthroughs and FAQs for common first-timer questions
About the author
Gaurav Garg is a Senior Product Manager on the Salesforce Data 360 product team, where he champions innovations that make data unification accessible for everyone, from startups to enterprises. As a key player on the “Bring Your Own Lake – Zero Copy Data Federation” squad, Gaurav collaborates hand-in-hand with top data lake partners like Google BigQuery to bridge ecosystems seamlessly. Passionate about demystifying complex tech for real-world impact, he loves hearing from users at all levels. Connect with him on LinkedIn to swap stories on data adventures or geek out over the latest in federated auth.