
Building enterprise-grade agents often involves a fundamental tension. Large Language Models (LLMs) are great at natural conversation, but they lack the predictability that enterprise workflows demand. You can prompt an LLM to verify a customer before sharing order details, but you can’t guarantee it will follow that sequence every time. Traditional prompt engineering doesn’t solve this. As you write longer prompts and add more instructions, the agent’s behavior can become less predictable.
Agent Script is Salesforce’s new language for building agents. It introduces hybrid reasoning, the ability to mix deterministic code with natural language prompts in the same instruction block. With Agent Script, business-critical logic executes reliably every time. Conversational elements stay flexible.
It’s also a context engineering tool. Rather than hoping the LLM picks up on what’s relevant, you programmatically construct the prompt it receives based on variables, conditions, and conversation state. The LLM only sees what matters for the current moment.
In this post, we’ll cover the language fundamentals and basic building blocks of an agent with Agent Script. You’ll learn the syntax, understand the flow of control, and see how Agent Script constructs prompts at runtime.
Language Basics at a Glance
Before we start building, let’s cover the foundational syntax elements you’ll encounter throughout Agent Script. Understanding these basics will make the rest of the blog much easier to follow.
Property-Based Syntax
Everything in Agent Script is expressed as key: value pairs, making the language readable and declarative.
1description: "Handles customer orders"
2agent_name: "Order_Management_Agent"
3is_required: True
Whitespace Sensitivity
Agent Script uses indentation to define structure, similar to Python. You must use spaces (not tabs), and consistent indentation is essential for the script to parse correctly. The recommended convention is three spaces per indentation level.
1inputs:
2   customer_id: string
3   order_id: string
Note: If your indentation is inconsistent, the script won’t compile. Pay close attention to this when copying and pasting code.
Resource References with @
Agent Script uses the @ symbol to reference resources like variables, actions, topics, and outputs. This is how different parts of your agent communicate.
1@variables.customer_email    # Reference a variable
2@actions.lookup_order        # Reference an action defined in the topic
3@topic.order_status          # Reference another topic
4@outputs.status              # Reference an output from an action (only valid after action runs)
5@utils.transition to         # Reference a utility function
6@utils.escalate              # Another utility function
Note: A common mistake is assuming @ works like a standard Salesforce merge field where you can reference any org resource. @actions.get_order works only because you defined get_order within your topic’s actions:block. Something like @Account.Name won’t work because it’s not a block in your script or a built-in utility.
Comments with #
You can add comments anywhere in your script using the # symbol. Everything after the # on that line is ignored by the compiler. Use comments liberally to document your agent’s logic. Agent Script has no dedicated multiline comment syntax. For multi-line comments, use # at the start of each line.
1# This action fetches order details from the Order Management System
2lookup_order:
3   description: "Get order by ID"  # This description helps the LLM decide when to use it
Arrow Syntax (->) for Procedural Logic
When you need to write step-by-step logic — like conditionals, running actions, or setting variables — use the arrow syntax. This switches the block from declarative mode to procedural mode.
1instructions:->
2   if @variables.is_verified:
3      run @actions.get_order
4         with order_id=@variables.order_id
5         set @variables.status = @outputs.status
The arrow tells Agent Script: “What follows is executable logic, not just configuration.”
Note: : can also be used, but -> is common for clarity.
Pipe Syntax (|) for Prompt Text
The pipe symbol marks text that should be sent to the LLM as part of the prompt. This is how you provide natural language instructions.
1instructions:|
2   | This text becomes part of the prompt that the LLM receives.
3     Indented text continues on the same logical line.
4   | This pipe starts a new line in the prompt.
You can also use the pipe for multiline strings outside of procedural blocks:
1instructions:|
2   You are a helpful assistant.
3   Always be polite and professional.
4   Never share sensitive customer information.
The key insight here is that logic executes deterministically, while pipe text is assembled into a prompt for the LLM. This separation is the heart of hybrid reasoning.
Template Expressions ({! }) for Dynamic Values
To inject variable values or expressions into your prompt text, wrap them in formula syntax {! }. At runtime, Agent Script replaces these with actual values.
1| Hello {!@variables.customer_name}, your order status is {!@variables.order_status}.
2| Your order total is ${!@variables.order_total}.
In the above script, if customer_name is “John”, order_status is “shipped”, and order_total is 150, the LLM receives the below input:
Hello John, your order status is shipped.
Your order total is $150.
The LLM sees concrete values rather than variable names. This makes its job easier and your agent more reliable.
Note: Template values are not just variables. They can also be expressions using operators. Check out the documentation to learn more about supported operators (see here).
Slot-Filling with ...
When exposing an action to the LLM as a tool, you often want the model to extract input values from the conversation. The ... syntax indicates that the LLM should “slot-fill” this parameter based on user input.
1reasoning:
2   actions:
3      lookup: @actions.get_order
4         with order_id=...                       # LLM extracts from conversation
5         with customer_id=@variables.customer_id  # Bound to a specific variable
6         with limit=10                            # Fixed literal value
In this example, the LLM determines the order_id from the conversation, pulls the customer_id from a variable, and sets a constant limit of 10.
Note: The ... syntax is exclusively for slot-filling in action inputs. Don’t use it as a default value for variables as this is a common mistake
Expression Operators
Agent Script supports a familiar set of operators for comparisons and logical expressions. You’ll use these in if statements and available when conditions.
1# Comparison operators
2@variables.count > 10
3@variables.count >= 10
4@variables.count < 5
5@variables.count <= 5
6@variables.status == "shipped"
7@variables.email != ""
8
9# Logical operators
10@variables.is_verified and @variables.has_order
11@variables.is_premium or @variables.is_vip
12not @variables.is_blocked
13
14# Null checks
15@variables.order_id is None
16@variables.customer_name is not None
Note: Agent Script supports + and - for arithmetic but does not currently support *, /, or %. If you need complex calculations, use a Flow or Apex action instead.
Conditionals
Conditionals (if/else) control which instructions execute or which prompts are assembled.
1instructions:->
2   if @variables.is_verified:
3      | Welcome back! How can I help?
4   else:
5      | Please verify your identity first.
6
7   if @variables.order_total > 100:
8      run @actions.apply_discount
Note: else if is not currently supported. Use separate if statements instead.
The Essential Blocks
In your Salesforce DX project, Agent Script lives within the aiAuthoringBundles directory. For example, if you are building a ‘HelloWorld’ agent, your script resides in a .agent file at this path:
force-app/main/aiAuthoringBundles/HelloWorld/HelloWorld.agent
This file is the brain of your agent, containing the configuration, variables, and conversation topics we are about to explore.
Every Agent Script file is organized into blocks, which must appear in a specific order. Below is a bird’s-eye view of the top-level blocks in order.
1config:
2   # Agent identity
3
4variables:
5   # State management
6
7system:
8   # Global instructions and messages
9
10start_agent topic_selector:
11   # Entry point — every conversation starts here
12
13topic my_topic:
14   # A conversation area with its own actions and reasoning
Note: The language and connections are out of scope for this post, but we will cover a dedicated block on how to use connections.
Let’s walk through each block using an example agent. Let’s call it an ‘Order Management’ agent that looks up orders for customers.
1. config — Agent Identity
The config block defines basic metadata for your agent. At minimum, you need an agent_name. For Agentforce Service Agents that interact with external customers, you also need a default_agent_user. The default_agent_user is optional for Employee Agents.
1config:
2   agent_name: "Order_Management_Agent"
3   agent_type: "AgentforceServiceAgent"
4   default_agent_user: "orderagent@acme.com"
The agent_name serves as the unique identifier for your agent.
2. variables — State Management
Variables allow your agent to remember information across conversation turns. This is crucial because LLMs don’t inherently remember previous exchanges — you must explicitly track state.
Agent Script features two types of variables:
- Mutable variables: these can be read and written by the agent. It is recommended to provide a default value for mutable variables.
- Linked variables: These are read-only and pull their value from an external context (such as the current session). They must have a
sourceand cannot have a default value.
1variables:
2   # Mutable variables — agent can read and write these
3   customer_email: mutable string = ""
4      description: "Customer's email address for verification"
5   customer_name: mutable string = ""
6      description: "Customer's verified name"
7   is_verified: mutable boolean = False
8      description: "Whether the customer's identity has been confirmed"
9   order_id: mutable string = ""
10      description: "The order ID currently being discussed"
11   order_status: mutable string = ""
12      description: "Current status of the order"
13   order_total: mutable number = 0
14      description: "Total amount of the order"
15   delivery_date: mutable string = ""
16      description: "Expected delivery date"
17
18   # Linked variable — read-only from external context
19   session_id: linked string
20      description: "The current session identifier"
21      source: @session.sessionID
To learn more about various supported data types, check out the official documentation (see here)
A few important notes:
- Boolean values must be capitalized:
TrueorFalse, nevertrueorfalse. - The
descriptionfield helps the LLM understand what the variable represents, which improves slot-filling accuracy. - It is recommended that mutable variables have a default value; linked variables never include one.
3. system — Global Instructions and Messages
The system block defines your agent’s personality and provides two required messages: welcome (shown when a conversation starts) and error (shown when something goes wrong).
1system:
2   messages:
3      welcome: "Hi! I'm your Order Support Assistant. How can I help you today?"
4      error: "Sorry, something went wrong. Let me try that again."
5
6   instructions:|
7      You are a friendly and efficient order support agent for Acme Store.
8      Always verify the customer's identity before sharing any order details.
9      Be concise but helpful in your responses.
10      If you don't know the answer, say so honestly.
Note: These instructions apply globally across all topics. However, you can override them at the topic level when a specific topic requires different behavior. Below is how you would override at the topic level. Topics are covered in more depth below.
1topic professional:
2   description: "Professional business communication"
3
4   system:
5      instructions: "You are a formal business professional. Use professional language, avoid casual expressions, and maintain a respectful tone."
6
7   reasoning:
8      instructions:->
9         | How may I assist you professionally?
When a topic defines its own system.instructions, they replace the global instructions for that topic. This is useful when different conversation areas require distinct personalities or behaviors.
4. start_agent — Entry Point
The start_agent block is unique. Every user message — whether it’s the first or the fiftieth — begins execution here. This is your agent’s front door.
Typically, you use start_agent to welcome users and route them to the appropriate topic based on their intent.
1start_agent topic_selector:
2   description: "Welcome the user and route to the appropriate topic"
3
4   reasoning:
5      instructions|
6         Select the tool that best matches the user's message and conversation history. If it's unclear, make your best guess.
7
8      actions:
9         go_to_verification: @utils.transition to @topic.verification
10            description: "Verify customer identity before accessing order information"
11            available when @variables.is_verified == False
12         go_to_order_status: @utils.transition to @topic.order_status
13            description: "Check order status, tracking, or delivery information"
14            available when @variables.is_verified == True
Notice the available when conditions. The go_to_order_status transition only appears as an option when the customer is already verified. This is how you control flow based on state.
Note: Actions and transitions are covered in separate sections below.
5. Topics — Conversation Areas
Topics represent distinct areas of functionality in your agent. Think of topics as chapters in a conversation: “verify identity,” “check order status,” or “process return.” Each topic has its own actions, instructions, and tools. Our agent will use two topics: verification and order_status.
1topic verification:
2   description: "Verify the customer's identity"
3   # ... actions and reasoning go here
4
5topic order_status:
6   description: "Help with order inquiries"
7   # ... actions and reasoning go here
The description is important — it helps the LLM understand when a topic is relevant, especially during topic classification in start_agent.
Key principle: Every user message starts at start_agent. From there, the agent transitions to the appropriate topic based on context.
6. Actions: Defining What a Topic Can Do
An action defines a capability — something the topic can call, such as a Flow, Apex class, or API. Actions are defined at the topic level in the actions: block.
Think of this as the definition layer: you are declaring which external interfaces exist and defining their inputs and outputs.
1topic order_status:
2   description: "Help with order inquiries"
3
4   actions:
5      get_order:
6         description: "Retrieve order details by ID"
7         inputs:
8            order_id: string
9               description: "The order ID to look up"
10               is_required: True
11         outputs:
12            status: string
13            total: number
14            delivery_date: string
15         target: "flow://Get_Order_Details"
16
17      get_tracking:
18         description: "Get shipment tracking info"
19         inputs:
20            order_id: string
21         outputs:
22            carrier: string
23            tracking_number: string
24         target: "flow://Get_Tracking_Info"
This tells Agentforce: “This topic has access to these two actions. Here is what they are called, what they require, and what they return.” To learn about target types and supported data types, visit the official documentation section (see here)
Simply defining an action does not mean it runs. It is like declaring a function; nothing happens until it is called. So how do actions get called? That’s the job of the reasoning layer.
7. Reasoning: The Orchestration Layer
The reasoning block is where you orchestrate how the topic behaves. It acts as the bridge between action definitions and actual execution.Every topic must have a reasoning: block. Inside reasoning, you have two key sections:
instructionsThe logic and prompts that execute each turnactions: The tools you expose to the LLM (the “exposure layer”)
1topic order_status:
2   description: "Help with order inquiries"
3
4   actions:
5      # DEFINITION LAYER — what CAN be called
6      get_order:
7         description: "Retrieve order details"
8         inputs:
9            order_id: string
10         outputs:
11            status: string
12         target: "flow://Get_Order_Details"
13
14   reasoning:
15      # ORCHESTRATION LAYER — when and how things happen
16
17      instructions:->
18         # Logic and prompts go here
19         ...
20
21      actions:
22         # EXPOSURE LAYER — tools the LLM can choose
23         ...
Reasoning Instructions: Logic + Prompts
The instructions: block inside reasoning is where the orchestration happens. You write a mix of:
- Procedural logic (using
->or:): Executes deterministically from top to bottom - Prompt text (using
|): Gets assembled and sent to the LLM
1reasoning:
2   instructions:->
3      | Help the customer with their order.
4
5      if @variables.order_id != "":
6         | Their order ID is {!@variables.order_id}.
7      else:
8         | Ask them for their order ID.
The arrow -> signals “this is procedural code”.
Note: Using the arrow is optional and you can use just ‘:’. The pipe | signals “this is prompt text.”
When this executes:
- Agentforce processes the logic top to bottom.
- Prompt text accumulates based on which conditions are true.
- The final assembled prompt is sent to the LLM.
Scenario A: order_id = ""
Assembled prompt → “Help the customer with their order. Ask them for their order ID.”
Scenario B: order_id = "12345"
Assembled prompt → “Help the customer with their order. Their order ID is 12345.”
Notice you’re dynamically constructing the prompt based on state.
Note: All pipe text that passes conditional checks is appended into a single prompt rather than a sequence of discrete tasks. The LLM receives one unified instruction block. And here’s the key part: the reasoning loop re-executes these instructions with every turn. As variables change across turns, different conditions match, and the assembled prompt is rewritten accordingly. This ensures the LLM always receives a fresh, context-appropriate instruction set instead of a running history of past instructions.
Calling Actions from Instructions
There are two different ways to invoke actions:
Method 1: Deterministic Execution with run
Use run inside reasoning.instructions when the action must execute under specific conditions without requiring LLM judgment.
1topic order_status:
2   actions:
3      get_order:
4         description: "Retrieve order details"
5         inputs:
6            order_id: string
7         outputs:
8            status: string
9            delivery_date: string
10         target: "flow://Get_Order_Details"
11
12   reasoning:
13      instructions:->
14         | Help the customer with their order.
15
16         # This ALWAYS runs when conditions are met
17         if @variables.order_id != "" and @variables.order_status == "":
18            run @actions.get_order
19               with order_id=@variables.order_id
20               set @variables.order_status = @outputs.status
21               set @variables.delivery_date = @outputs.delivery_date
22
23         if @variables.order_status == "shipped":
24            | Great news — the order is on its way!
The run command:
- Executes immediately when the code path is reached
- Uses
withto pass inputs - Uses
setto capture outputs into variables
When to use: Automatic data fetching, required validations, or any logic that must occur regardless of user input.
Method 2: LLM Tool in reasoning.actions
Use reasoning.actions when you want the LLM to decide whether to call an action based on conversation context.
1topic order_status:
2   actions:
3      get_order:
4         description: "Retrieve order details"
5         inputs:
6            order_id: string
7         outputs:
8            status: string
9         target: "flow://Get_Order_Details"
10
11   reasoning:
12      instructions:->
13         | Help the customer with their order questions.
14
15      actions:
16         # This creates a TOOL the LLM can choose to use
17         lookup_order: @actions.get_order
18            description: "Look up an order when customer asks about it"
19            with order_id=...
20            set @variables.order_status = @outputs.status
This creates a tool called lookup_order that:
- References the defined action (
@actions.get_order) - Has a
descriptionthe LLM uses to decide when to call it - Uses
...for slot-filling, allowing the LLM to extract values from the conversation
Captures outputs with set
When to use: User-initiated actions, optional features, or any scenario where conversation context should drive the decision.
Note: For brevity, the example above shows only one action, but a topic can include multiple actions. You can also reference these actions in the prompt with {!@actions}. See the example below.
1topic order_status:
2   actions:
3  get_tracking:
4description: "Get tracking info"
5inputs:
6order_id: string
7outputs:
8 tracking_number: string
9target: "flow://Get_Tracking_Info"
10   reasoning:
11instructions:->
12       | Help the customer with their order.
13       | If they want tracking info, use {!@actions.get_tracking}.
14
15       actions:
16         # This creates a TOOL the LLM can choose to use
17         get_tracking: @actions.get_order
18            description: "Track an order"
19            with order_id=...
20            set @variables.tracking_number = @outputs.status # assumes tracking number is a variable
Setting Variables
There are two common ways to set variables at runtime:
- Capture action outputs: Use set to store results from an executed action.
1run @actions.verify_customer 2 with email=@variables.customer_email 3 set @variables.customer_name = @outputs.name 4 set @variables.is_verified = @outputs.is_valid - LLM slot-filling: Use
@utils.setVariablesto let the LLM extract values directly from the conversation.1reasoning: 2 actions: 3 collect_email: @utils.setVariables 4 description: "Collect customer email" 5 with customer_email=... # LLM extracts from conversation
When to use: Use action outputs for data from external systems, Flows, or Apex. Use setVariables for collecting user input through conversation.
Flow of Control: How Execution Works
The diagram below shows how topics, actions, and reasoning work together at runtime.
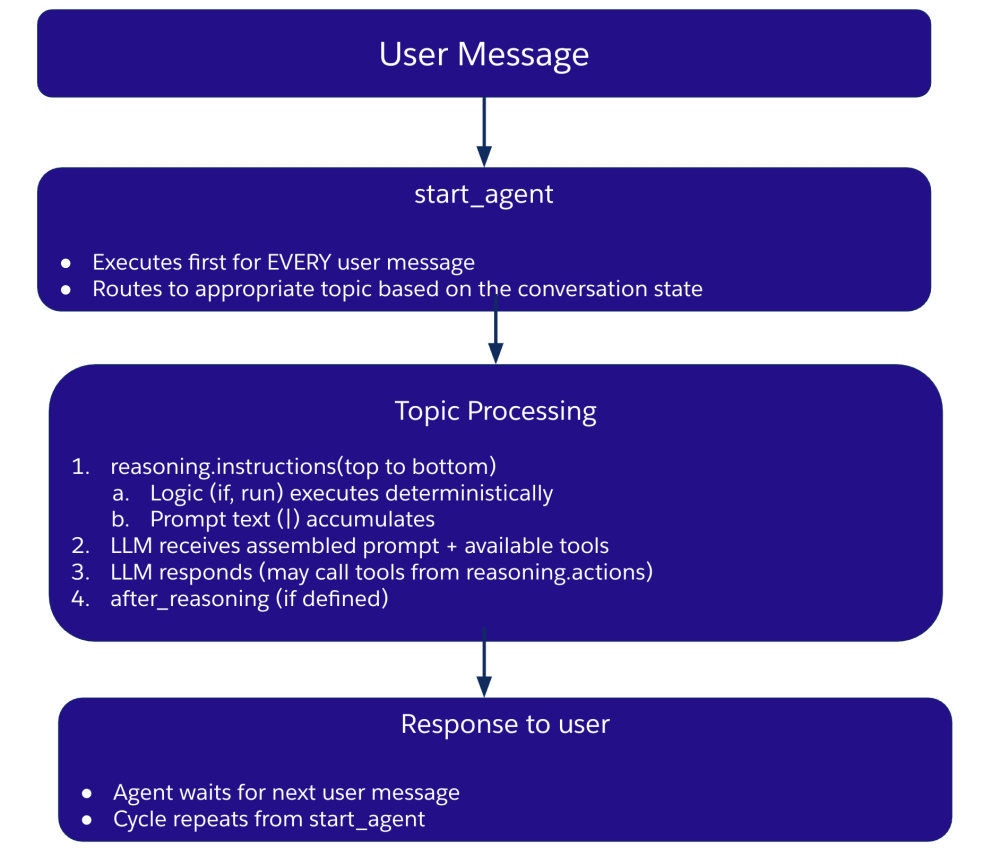
Key principles to remember:
- Agent Script gives you hybrid reasoning: This combines LLM flexibility with programmatic control. The key mental models include:
- Topics: Conversation areas (what your agent can talk about)
- Actions: Definitions at the topic level (what can be called)
- Reasoning: An orchestration layer containing instructions and exposed tools
- Every message starts at
start_agent: This occurs even mid-conversation. - Instructions execute top-to-bottom: the LLM only sees the final, assembled prompt.
- Transitions are one-way: when you transition topics via
@utils.transition, you do not automatically return to the previous topic. - Wait for input after completion: The flow then cycles back to start_agent.
Note: There are ways to return to the original topic via topic delegation, which we cover in the Topic Delegation (Returns to Caller) section below.
After Reasoning: Post-Processing Hook
The optional after_reasoning block runs after the LLM completes its response. Use it for deterministic cleanup or transitions that should always occur once a topic finishes.
1topic verification:
2   reasoning:
3      instructions:->
4         | Verify the customer's identity.
5
6   after_reasoning:
7      if @variables.is_verified == True:
8         transition to @topic.order_status
Unlike reasoning.actions where the LLM chooses, after_reasoning executes unconditionally if the condition is met. This is ideal for enforcing guardrails or mandatory flows after the LLM has spoken.
Topic Transitions
Moving between topics uses different syntax depending on the context:
- LLM-selected:in
reasoning.actions, use@utils.transition
1reasoning:
2   actions:
3      go_to_returns: @utils.transition to @topic.returns
4         description: "Help with a return"
5         available when @variables.is_verified == True
The LLM sees this as an available tool and decides when to use it based on conversation context.
- Deterministic:n
reasoning.instructionsorafter_reasoning, use a baretransition tofor immediate execution.
1reasoning:
2   instructions:->
3      if @variables.end_conversation:
4 transition to @topic.farewell1after_reasoning:
2 if @variables.needs_escalation:
3 transition to @topic.escalationThese execute immediately once the condition is met, requiring no decision from the LLM.
Critical syntax rules:
@utils.transition to→ only inreasoning.actions- bare
transition to→ only inreasoning.instructions:->orafter_reasoning
Note: Never mix these — using the wrong syntax in the wrong place will cause errors.
Topic Delegation (Returns to Caller)
While the methods above are one-way, you can use a direct @topic.<name> reference to delegate execution to another topic. the referenced topic completes, the flow automatically returns to the original topic.
1reasoning:
2   actions:
3      consult_specialist: @topic.specialist_topic
4         description: "Consult the specialist, then return here"
This is useful when you need another topic’s expertise but want to continue the current conversation afterward.
Conclusion
In this post, we explored the Agent Script syntax and its foundational building blocks. To explore more code samples, check out the Agent Script Recipes Sample App. In the next post, we will dive into how to use developer tools like Agentforce DX and the new Agent Builder to develop, debug, test, and deploy agents.