The new Cloud Flow Designer, generally available as of the Spring ’12 release, makes creating, editing, and packaging flows easier than ever…and without having to install and maintain desktop software. The Cloud Designer makes it very easy to assemble flow screens, make branching decisions, assign values to variables, and lookup/create/update/delete records in Salesforce. But you may have noticed that something from the desktop designer is missing: the ability to convert leads. Don’t fret: with the Cloud Designer, there’s a way to do that!
Apex Code and Visual Workflow
Visual Workflow was designed to be complementary to the work you do in VisualForce and Apex. According to force.com idealists (myself included), developers write atomic, general-purpose functionality, which business users can then plug into their declarative designs. And Visual Workflow is no exception. You can now expose your Apex code as a step in a Flow, with inputs and outputs!
We can use this capability to our advantage here. We know that Apex Code can easily convert a lead, just like it does in the regular Salesforce UI. Taking that code and exposing it as a step in a flow is as easy as adding a few lines of code.
The Sample Package
We’ve created a sample package that illustrates this concept. In your Salesforce Developer Edition org or Developer Sandbox, install the following package:
Visual Workflow – Sample – Convert Lead
My special thanks goes to Visual Workflow Product Manager Varadarajan Rajaram for providing the sample code.
This package contains two items: an Apex class (VWFConvertLead) and a sample Flow that uses the Apex. Drill into the VWFConvertLead class and have a look at the sample code.
The Process.Plugin Interface
If you want to make an Apex class available in Flow, that class must implement the Process.Plugin interface. This is the interface exposed in Apex that you must implement to allow a flow to call Apex. The interface has two methods you must implement: describe() and invoke().
The describe() Method
describe() tells Visual Workflow what data should be passed into the Apex step, and what data the step will return. The sample VWFConvertLead class does just that in the describe() method:
Both input and output parameters are represented in this code, so that you can pass data into the Flow step, then use the data the class returns after the step executes. Some input and output parameters in the sample are mandatory, while others are optional.
Once you’ve successfully implemented all Process.Plugin methods in your class, it will show up in the Cloud Designer’s Palette tab:

Apex Plugin in the Cloud Designer Palette
A few things to note: This plug-in appears under the Lead Management section of the palette, and once selected in the palette the Description pane displays the plug-in description, the inputs, and the outputs that the step expects and generates. Your class can populate this information in the describe() method:
The Cloud Flow Designer discovers all plug-ins and their describe() implementations, so using the plug-in metadata will help you organize and document the Apex plug-ins you create for your Flow editors.
The invoke() Method
This is where the hard work of converting a lead gets done. While the ins and outs of converting a lead with Apex code are beyond the scope of this post, it’s worth reviewing portions of this invoke() implementation to see examples of retrieving data inputs and populating data outputs from this step in a flow.
First, the class receives an instance of Process.PluginRequest as an input parameter, and returns a Process.PluginResult to the flow. Next, we retrieve the input parameters from the flow:
Think about the amount of work you could get done with a class like this…then think about encapsulating that work, and giving your flow designers an easy, well-documented plug-in to do profound and powerful things!
About collections: Process.Plugin and Visual Workflow do not currently support collections, so doing something like retrieving a variable number of choices to populate radio buttons isn’t directly supported in Visual Workflow. There are alternative ways of accomplishing this…but that’s best left for another post.Using the Plug-in
Let’s see this thing in action. Open the SAMPLE – Lead Convert Flow in the cloud designer and double click the Convert Lead step:
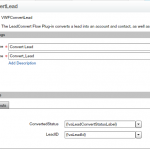 Note the Input and Output tabs. Click Add Row on the Input tab and review the optional parameters you can pass into the step. Remember those input and output parameters you defined as either optional or mandatory in the describe() method? Time to enjoy the fruit of your labors!
So there you have it: using Process.Plugin provides a way to encapsulate powerful logic into a flow, encourages good developer practices, and can make you a hero to anyone responsible for a business process.
Have you used Process.Plugin in your flows? Leave a comment and tell us about your experience!