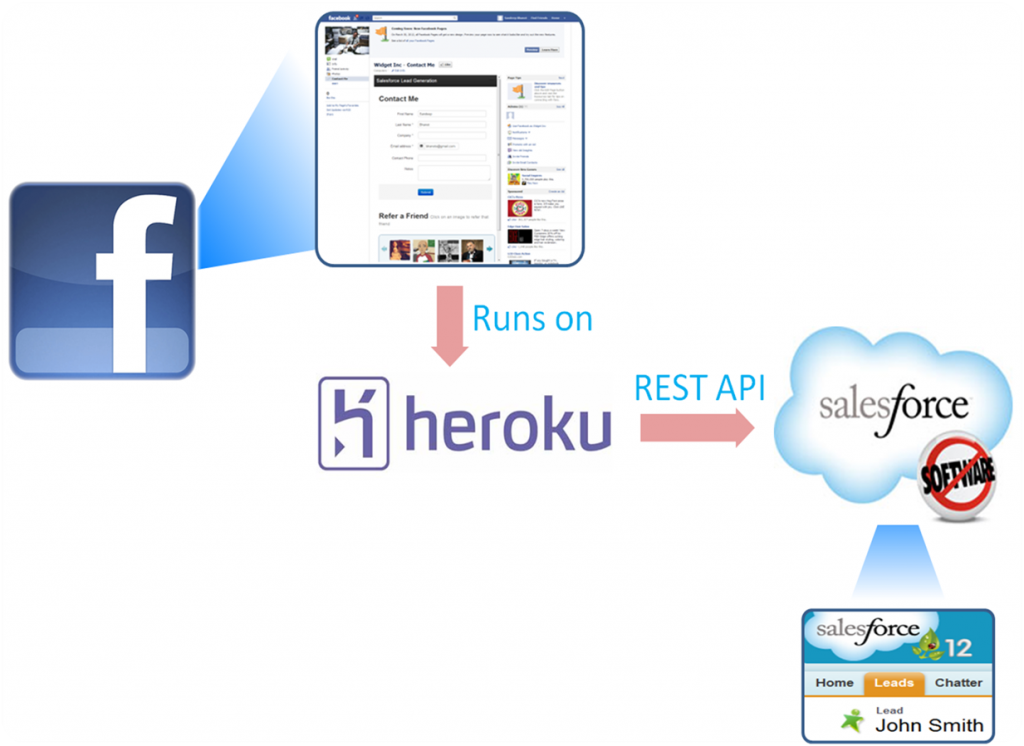
I presented the Creating a Force.com backed Facebook app on Heroku session at this year’s Dreamforce where I discussed combining the power of three great platforms – Facebook, Heroku and Force.com – to create powerful social applications that are focused on the enterprise (no Farmville cows were harmed in the making of this session). The sample application that I built during the session was one that I have talked about before – Social Web-to-Lead. For Dreamforce, I refreshed and updated the application and added a couple of interesting bells-and-whistles. Here’s what (and how) I did. The full application code is available for download from this GitHub repo and you can watch the full session recording as well.
Application Use Case
The application turns the most basic and humble of CRM functions, capturing a web lead, into a social activity. It is a Facebook application built on Heroku that lets Facebook user’s enter their contact information via a ‘Contact Me’ link (typically from a company’s Facebook Page). That information is then captured directly as a Lead record in a designated Salesforce Org. The application also lets users tap into their Social Graph by referring some of their Facebook friends (who are also tracked as Lead records in Salesforce). This short video shows a quick demo of the application.
Tip: Make sure to watch the video in full screen and 720p resolution.
//www.youtube.com/watch?v=tIQawAkaEuo
Application Architecture
 The figure on the right shows the high-level architecture for Social Web-to-Lead. The Facebook application is hosted on Heroku and is written in Node.js. It uses the Express web framework on the front end and a responsive design courtesy of Bootstrap. The application invokes the Force.com REST API from Heroku to insert new Lead records into Salesforce.
Bootstrapping the application
Enough with the buzzword bingo. Lets walk through how I combined Facebook, Heroku and Force.com to create Social Web-to-Lead. I started like many other developers who create Facebook apps these days – by using the native Heroku-Facebook integration to create a new Facebook application. The Facebook Cloud Services integration with Heroku lets you to create a Facebook application that is hosted on Heroku in a matter of minutes. Once I had gone through the simple wizard of creating a new Facebook application (selecting Node.js as my language of choice), I downloaded the source code for the sample app onto my local computer using a git clone command.
The application was now ready to be customized and converted into Social Web-to-Lead.
Invoking the REST API from Node.js
My first order of business was figuring out how to invoke the Force.com REST API from my Node.js application. At first, I started to implement my own OAuth + REST API module in order to authenticate with Salesforce and invoke the API. Fortunately, before I was too far along that path I came across nforce – an excellent REST API wrapper for Node.js written and maintained by two stalwarts of the Force.com development community – Kevin O’Hara and Jeff Douglas. Adding nforce to my application was as simple as running
to install the nforce NPM module on your local computer (this assumes that you already have Node.js installed). Here is a small snippet from web.js (the main server-side JS script for the application) that shows how I then used nforce to do the OAuth authentication with Force.com.
Line 1 ‘imports’ the external nforce library for use in this application. Line 6 and 17 show how you can then use nforce to create a new connection with a Salesforce Org. I used the username-password OAuth 2.0 flow for Social Web-to-Lead, but nforce also supports the Web Server flow. Notice the use of Environment Variables (i.e. process.env…) in passing the OAuth parameters to nforce. As described in this article, instead of hardcoding in code or using property files, Environment Variables are the recommended way of passing environment specific values to a Heroku application.
With the OAuth authentication done, here is another snippet from web.js that shows how the oauth response is used to insert a new Lead record into Salesforce.
The createLead method is invoked (line 4) every time the user hits the Submit button on the ‘Contact Me’ page. Lines 8 and 9 show how I then use the createSObject and insert methods of the nforce library to create a new Lead record via the REST API. Also of interest are lines 12-15. The OAuth access token returned by the initial authenticate call is only valid for a certain period of time. If there is a prolonged period of inactivity on the web application, the token may expire and the REST API insert call would fail with a 401 (Unauthorized access) error. I’ve implemented a poor man’s version of the OAuth 2.0 Refresh Token flow (which is not supported with the username-password OAuth flow that Social Web-to-Lead uses) by simply looking for that error code and manually ‘rehydrating’ the OAuth access token by calling the authenticate method again.
In subsequent posts I’ll discuss how I made Social Web-to-Lead more efficient by using a Redis add-on to make the Lead creation asynchronous. I’ll also cover another interesting use case that the application supports – real time push notifications from Force.com to the Facebook application using WebSockets.