Back in February, I blogged about how web applications can use OAuth to obtain a token and access the Force.com API on behalf of Portal users; I’ve had a couple of questions on how to build mobile apps that do the same, so here are the details.
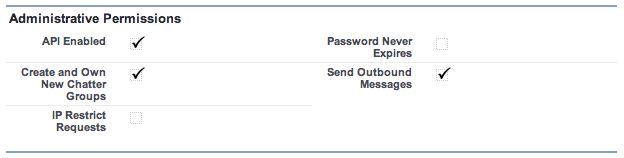
I’m going to assume that you’ve set up a portal, its associated Force.com Site, written a custom login page and its controller in Visualforce and Apex, and set it as the ‘Authorization Required Page’ for the Site (here’s a step-by-step tutorial I wrote on the topic last year that will walk you through the details). As I mentioned in that earlier post, your Portal users must have the ‘API Enabled’ permission on their profile. Since you can’t set this on the default ‘High Volume Customer Portal’ profile, you will need to create a custom profile as a clone of the existing one and check ‘API Enabled’ on that custom profile.
Now you’re ready to write a mobile app for your Portal users.
I highly recommend installing the Salesforce Mobile SDK and using one of its template applications (iOS, Android) to experiment. The Contact Explorer is particularly useful for our purposes, since Portal users can access Contacts via the API. I’ll focus on the hybrid iOS case here, since that’s where my experience is, but the principles are the same for native and Android apps.
In Xcode, create the hybrid template app by selecting File | New | New Project, clicking ‘Hybrid Force.com App’, and hitting next. Give your app a ‘Product Name’. Since we’re just experimenting, we’ll use the sample Consumer Key (if you’re writing a real app, you’ll need to create a Connected App in a Developer Edition org and use its Consumer Key). Do NOT select ‘Use Automatic Reference Counting’. Select a location for your project directory, and the Mobile SDK will create a template project.
One manual step is required before you can run the app – select the yellow ‘www’ folder in the Project Navigator view on the left, right click, and delete it, clicking ‘Remove References Only’. Now right click the top-most yellow folder, select Add Files to “[Your Project]”, find the ‘www’ folder in the project and select it. Select ‘Create folder references for any added folders’ and click ‘Add’. A blue ‘www’ folder will now be visible in the Project Navigator.
Now you can run the template app, either on the iOS Simulator, or a real iOS device. Click ‘Run’, and, when the app launches, you should see a login page.
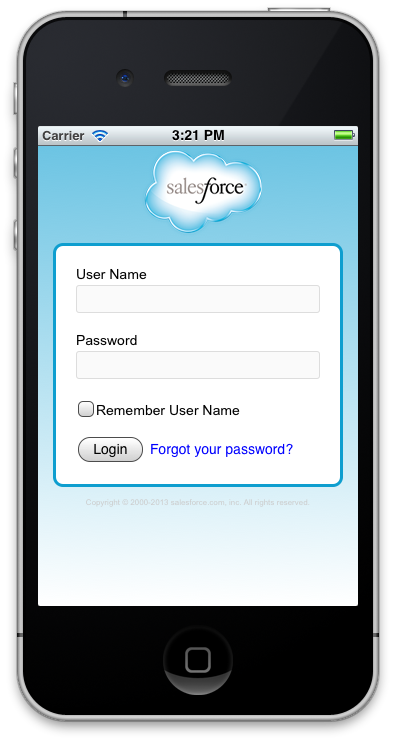
If you don’t, check that you correctly deleted and re-added that ‘www’ folder as detailed above. By default, the mobile app is configured for accessing production or developer edition orgs. Login with a username and password and you’ll see the authorization page.

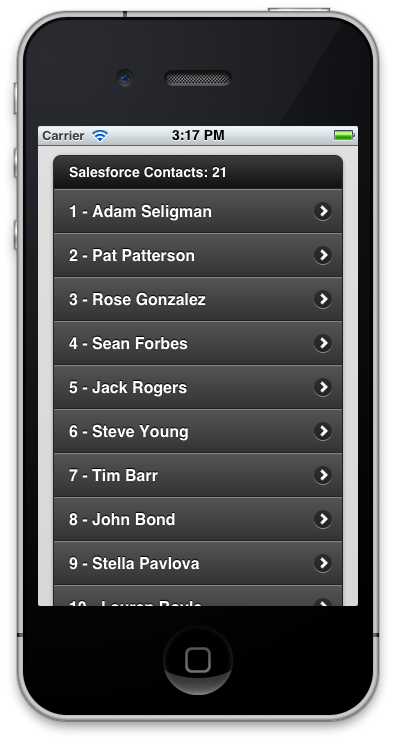
Click ‘Allow’ and you’ll see a series of buttons. Click ‘Fetch SFDC contacts’, scroll down, and you should see a list of Contact records from your org.
So far so good – we’ve retrieved a contact list as a ‘regular’ Salesforce user. How do we enable this for Portal users? As I mentioned in the earlier blog post, we can now use the Force.com Site Secure Web Address for OAuth. In the case of a Mobile SDK app, we need to set this in the app settings. Click the Home button and open the iOS Settings App. You’ll see an entry for your template app. Click it and you’ll see its settings page:
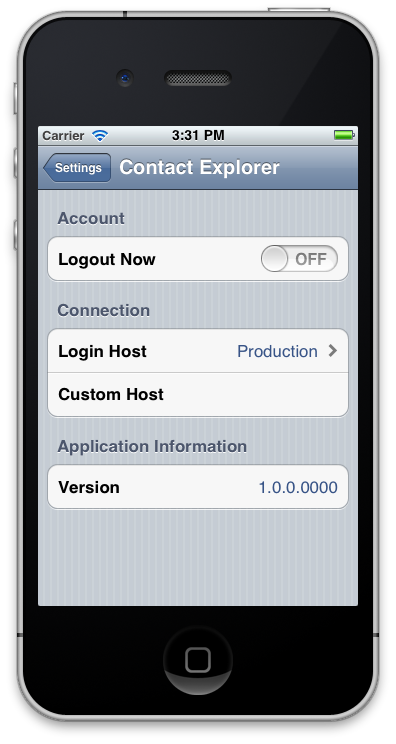
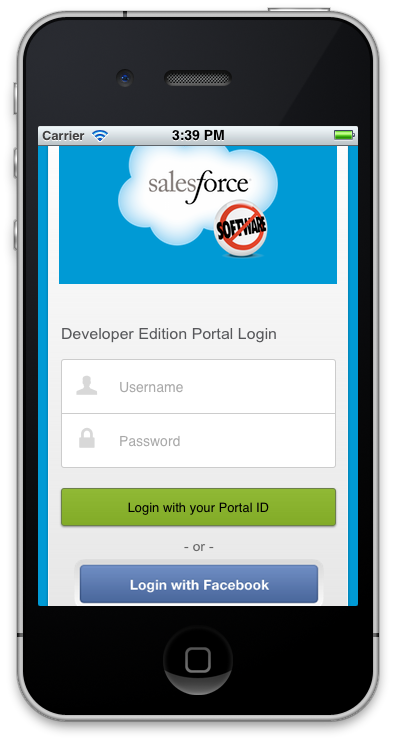
Set ‘Logout Now’ to ‘On’, change ‘Login Host’ from ‘Production’ to ‘Custom Host’, then set the ‘Custom Host’ to the hostname (just the hostname – no https:// prefix) of your Force.com Site. In my case, this is authtest-developer-edition.na14.force.com. Restart the app, and you should see your Site’s custom login page. Here’s mine:
NOTE – the Mobile SDK is configured to load pages from salesforce.com and force.com ONLY. If you try to login with Facebook (via an Authentication Provider) or any other external site, you’ll get a ‘whitelist error’. To allow an external site, you will need to add it to the whitelist. In Xcode, open the ‘Supporting Files’ folder, and click the ‘Cordova.plist’ file. Open the ‘External Hosts’ array and you will see the existing whitelist: *.force.com and *.salesforce.com. You can add your required hosts to this list, remembering any additional locations for static files and the like. For example, for Facebook login, you’ll need to add *.facebook.com, *.fbcdn.net and fbstatic-a.akamaihd.net.

With that in place, you should be able to login to the Portal. You should see the same authorization page, then be able to retrieve a contact list, just as you did before, but this time in the context of a Portal user. Congratulations!
Coming Soon – Salesforce Communities
Salesforce Communities will be generally available in the Summer ’13 release (safe harbor!) – you’ll be pleased to know that you can enable a mobile app for Community users, and it’s MUCH easier than it was with Portal. You get an automatically built login page for your Community, including your branding and whichever Authentication Providers and SAML Identity Providers you have selected for login. You just need to set the community hostname and path in the mobile app config – for example, UniversalTelco.force.com/customers. Here’s the login page for an example community I configured to show in my Salesforce Identity workshop next week at GlueCon:

Here’s a short video that shows the different login settings:
//www.youtube.com/watch?v=zOL9N6hr4TI
Building a mobile app for Portal or Community users? Let us know in the comments!