 Lots of people want to understand the Internet of Things — so here’s a demo you can complete in about 10 minutes. I’ve shown examples of direct connections with quad-copters and 3D printers, and I’ve talked about the Six Requirements for Your First IoT Project and how to Understand the Internet of Things in 5 Easy Steps. This is a different, all clicks no code approach.
Today I want to show you a powerful approach to IoT using The Device Cloud, an offering from Salesforce partner Etherios. Etherios has created a great solution that let’s you harness sensor data in Salesforce. It also handles a lot of inputs, acting as an intermediate destination for high-volume data. You can set up rules that distill actionable insights from the high volume data, and then put those insights right where they’ll do the most good: next to your customer data.
In this Internet of Things tutorial, you’ll harness real-time sensor data from your iOS device and use it with your Salesforce1 Platform app. This blog will walk you through signing up for a Device Cloud developer account, starting a trial of the Etherios Salesforce1 Platform app The Social Machine and triggering events in Salesforce based on sensor data. Note that you will also need to install a demo iOS app from Etherios.
Let’s get started with a quick demo from Brad Cole, Device Cloud Architect, who was also kind enough to write up the detailed instructions below.
Hands-On Internet of Things: The Device Cloud
The first step in this Learn IoT tutorial is to sign up for a free developer account on The Device Cloud by Etherios. You can get one by visiting the Etherios Developer Zone and following the signup process.
Device Cloud aggregates device data, regardless of protocol or format, and allows users to perform data analytics and visualizations. Device Cloud is used as the communication conduit between your enterprise and any number of end devices. It manages access to your devices’ data as well as other tasks like configuration and firmware/software updates.
The simplest example of a device to connect to the enterprise is your iOS device. To install the simulator, hit this link on your iOS device browser. This app leverages four sensors on your device to generate different types of data to send to Device Cloud.

The sensors available in the app are:
- GPS Tracker – Measures current latitude, current longitude, update frequency (in meters), change from starting location, and speed
- Accelerometer – Measures movement on X, Y and Z Axis
- Audio Sensor – Measures the microphone input volume level
- Light Sensor – Measures luminosity value of the light detector built in the camera
Once you’ve installed the app, click Settings and enter your Device Cloud credentials obtained above. After your credentials have been entered, your mobile device is now ready to send data to Device Cloud. [Editor’s note: the Etherios developer account you’re using in this Internet of Things in 10 Minutes article is governed to a maximum sensor upload frequency of every 5 seconds. You will get an HTTP error response 429 if you upload more frequently. I set my upload frequency to 10.]
If you haven’t already, login to Device Cloud. You should see your device show up in the list under the Device Management tab.
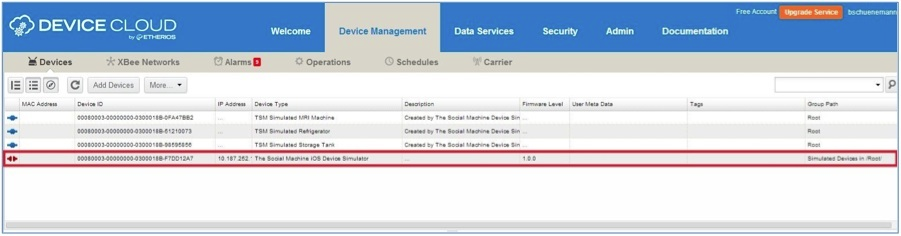
You can also tab over to the Data Services > Data Streams tab to see the real-time sensor data that your phone has been uploading. You have completed this section in this Internet of Things in 10 Minutes lesson!

Harness Internet of Things: Create an Alarm
Next in Internet of Things in 10 Minutes, you’re going to create an alarm in Device Cloud to trigger when a certain condition is met. Let’s keep it simple and fire an alarm when the mobile device senses low light conditions.
To create the alarm:
- Navigate to Device Management > Alarms
- Click New
- Select “Dia channel data point condition match” and add a name and description
- For the dia instance, select light
- For the dia channel, select luminosity
- Add Value < 0.1 for the fire condition
- Add Value = 5 for timeout reset condition
- Click Next then Create
[Editor’s note: you might be wondering what “DIA” stands for. It’s “Device Integration Application.” This is a piece of Etherios specific technology behind their Device Cloud service.]
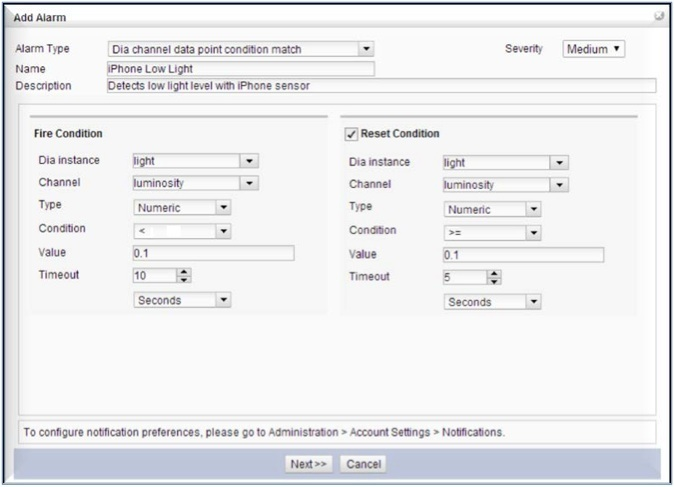
You just created an alarm in Device Cloud that will fire when the luminosity sensor on your mobile device reads a value of less than 0.1 lumens, and it will automatically reset the alarm after the value is greater than or equal to 0.1 lumens for 5 seconds. Other alarms within Device Cloud can be created to monitor any number of different conditions. Alarm notifications can be handled via email or a web services push operation.
For email, you can configure daily or real-time email notifications based on your alarms. Web services push notifications can be configured to deliver each individual event or a batch of events based on time our event count.
Integrate Internet of Things with Your Enterprise
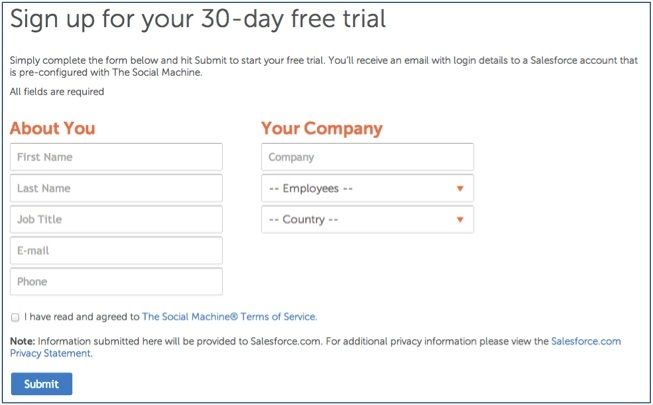
The next step in learning about the Internet of Things is to connect this data to Salesforce so that it sets off alarms in your enterprise. We do that via a Machine Process in The Social Machine. The Social Machine is built completely on the Salesforce1 Platform and enables you to seamlessly connect your products into the enterprise. These connections transform raw machine data into actionable business information. Create a Social Machine trial by clicking here.
[Editor’s note: this uses Salesforce’s standard TrialForce process for ISVs like Etherios. You’ll receive a new username and password for a trial org that has The Social Machine already installed. Note that it will use your email address as your username. If you have already used your email address as a username, you will get an error. I used a simple “reid.carlberg+TSM2@gmail.com” to guarantee uniqueness. If the GMail + trick is new to you, you can learn all about it here.]
In your salesforce.com trial org, click the Device Clouds tab. This is where you will create the bidirectional link between the Device Cloud and The Social Machine.
- Click “Add New Device Cloud”
- Enter your Device Cloud credentials.
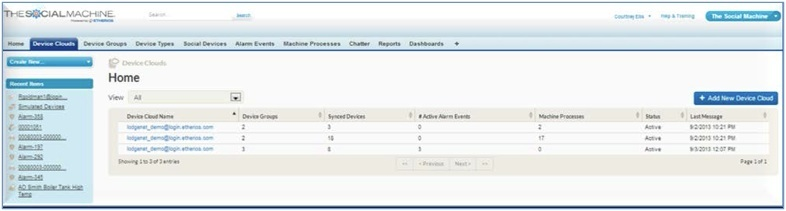
This process establishes a link between Salesforce and The Device Cloud, including the push monitor for Alarm notifications you set up earlier. Your device inventory from Device Cloud is represented as “Social Devices” in Salesforce. You may view information about those devices such as Device Groups and Device Types and current data values. The social device data is kept in sync as a result of the linkage established in this step.
Act on Internet of Things Sensor Data
Now we’re going to talk about integrating the Internet of Things and your enterprise. This is where Machine Processes come into play. A Machine Process is a set of configurable Actions executed in Salesforce when Device Cloud triggers or resets an alarm event.
- Click the Machine Processes tab
- Click +Add New Process
- Fill in the blank fields on the page by clicking on the Empty and –Select— placeholders [Editor’s note: you will see two fields with a red empty in them. The top one is the name, the bottom one is the description. You must enter both of them.]
- In the Device Cloud field, select the Device Cloud that you’ve associated with The Social Machine
- Choose the alarm that you just created

Once you’ve created a new process, it should look something like this:
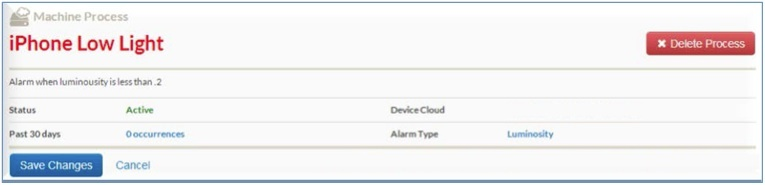
You should see two related lists below labeled “Trigger Actions” and “Reset Actions.” These are the actions we want to take when the low light alarm from our mobile device fires and resets. In this case, you want to send an email.
- Click Add New Trigger Action
- Select Send Email
- Type in your email address in the TO: field
- Click Save
The only thing left to do is trigger the alarm. Open up the TSMSimulator app on your iOS device, click Light Sensor, and cover the light sensor by putting the phone down on your desk or covering it with your hand. You should see a luminosity value drop to about 0.02, which will trigger an alarm.
You should receive an email within a few seconds notifying you of the alarm. Your device is now connected to the enterprise and notifying you of issues. You have completed the Learn IoT tutorial!
Internet of Things: Extra Credit
If you’re a coder, you probably want to learn more about programming the Device Cloud. Of course you can also develop custom actions by extending the SocialMachineAction class, like this:

And you can experiment further in the Internet of Things lesson without using code. Try adding additional trigger tasks to the Machine Processes like creating a Case as shown in the introduction video. You could also try configuring alarms for the other sensors in the iPhone device simulator app. Install the device simulator app on a friend’s iPhone and see how easy it is to extend this functionality to multiple devices.