 This will be the last in the Nothing but .NET series, and I have saved the best for last. Throughout this series I have focused on various aspects of the new Force.com Toolkit for .NET. Last month at Dreamforce 2014, salesforce.com and Microsoft quietly introduced the new Connected Service Provider for Salesforce. It utilizes the open source Force.com Toolkit, but delivers it in a way that helps make .NET developers super productive.
Connected Services, which was first introduced by Microsoft in Visual Studio 2013, is a Visual Studio Extension that offers you access to various service providers through the Visual Studio Extension Gallery. The Salesforce Provider installs the Force.com Toolkit for .NET, which already makes it easier to access Salesforce through the REST API. Additionally, it configures scaffolding code and code models that help get your connected services project up and running as quickly as possible.
I had an opportunity to assess a technical preview version of the Salesforce Connected Service Provider. In this last post, I will tell you about some of the exciting things you can expect with this new provider, which was recently made publically available with the Visual Studio 2015 Preview.
Configuring the Connected Service App
You can get started with the Salesforce Connected Services Provider by downloading and installing the Visual Studio 2015 Preview. From there, you can access Connected Services by creating a new ASP.NET Web Application using the MVC template or a Console app for those automated batch jobs you may be building. You will need to download and install the Salesforce Provider from the Visual Studio Gallery and once you do, a restart of Visual Studio is required.
To add a Connected Service to your new project, you simply right-click the references folder and select Add Connected Service. It should be located right under Service Reference. Currently, working with the Force.com Toolkit for .NET involves setting up a Connected App in your Salesforce org. One of the nice things about working with the Salesforce Connected Service Provider is that it handles all this for you.
As you go through the wizard to configure the provider, it first prompts you to select a Salesforce environment that you will use during development (see Figure 1). You will be asked to authenticate to that environment using your credentials and either allow or deny access to the client application you are creating. Keep in mind that credentials you enter here will only be used for configuration and will not be the credentials used to authenticate against the REST endpoint at runtime.
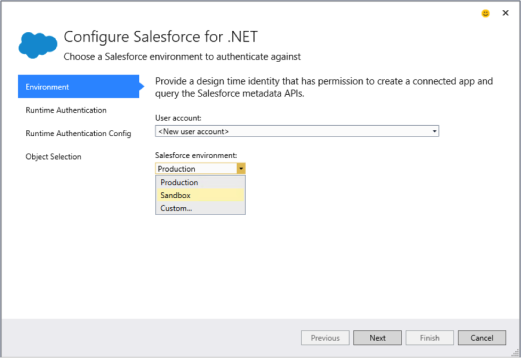
Figure 1 – Salesforce Provider Environment Selection allows you to select the Salesforce org your app will connect to during development.
By clicking allow, you are granting the connected service permission to access your basic information, access and manage your data and perform requests on your behalf. What it actually does is create a new connected app with the same name as your Visual Studio project and set the callback URL and oAuth scope settings for you. All you have to do is return to the connected app definition, click to reveal the secret and copy this secret value into your web.config to complete the configuration process. Sweet!
The next step is to select a runtime authentication model. As I mentioned in the fourth article of this series, the .NET Toolkit currently supports two oAuth 2.0 authentication flows: Web-Server and Username-Password. These correspond with the first and third options available in this step (see Figure 2). The second option, “Service account using a digital certificate” involves using a JWT bearer token and should only be used when your users do not have a Salesforce account. For most web applications, you will want to select the first option which utilizes the web-server oAuth authentication flow. The product team didn’t get a chance to complete the JWT Bearer Token flow for preview, but left the option in to get feedback if it’s a desired option.
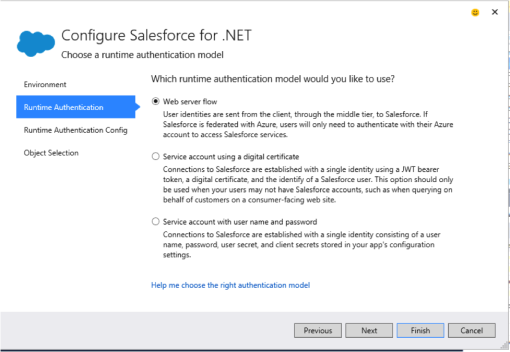
Figure 2 – Step 2 of the configuration process involves selecting a method that your users will use to authenticate to Salesforce.
Benefits of Strongly-Typed Models
If you have been following the Nothing but .NET series, then you know that you can use strongly-typed or dynamically typed objects when performing operations against Salesforce objects using the Force.com Toolkit for .NET. Obviously, working with strongly-typed objects has the advantages of access to intellisense and the ability to detect typo errors at compile time rather than at runtime.
When you configure the Salesforce Provider, you are given the option to generate models for all objects or just particular ones that you select (see Figure 3). If you select this option, then the Provider will create class file definitions for each of the selected objects in your Salesforce org. If you are creating an MVC app, then you can easily use these model files to automatically generate code for your views. This can be a real time saver when it comes to developing your application.
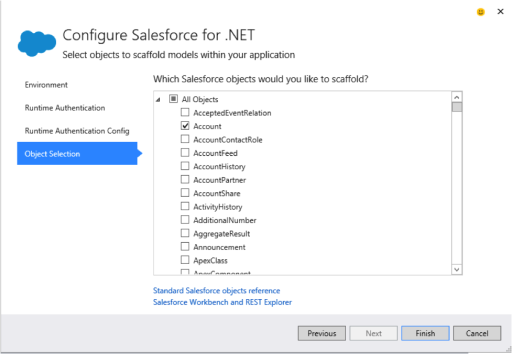
Figure 3 – You can optionally generate models for all or selected Salesforce objects, which allows you to use scaffold templates to automatically build out views in MVC applications.
Keep in mind that if you opt to scaffold all objects, the final configuration will take longer to execute. After all, most orgs come with over 200 objects and it takes a while to create all those model files. Once the installation is complete, you should be directed to a web page that lets you access the documentation.
What was Installed?
The installation will add the DeveloperForce.Force NuGet package to your project, along with a few other .NET references you will need. It will also add a couple of configured class files (SalesforceService.cs and SalesforceOAuthRedirectHandler.cs) that will be located in the Service References/Salesforce subfolder.
This is where you will find the code to instantiate the AuthenticationClient and authenticate the user using the WebServerAsync method (if you picked the Web Server flow as I suggested). It also provides a way for you to store the Access Token, Instance URL and Refresh Token in Session variables, so they can be used later to create the ForceClient.
The best part is that it has already setup your connected app in Salesforce. That’s right. Check it out by logging into your Salesforce instance and going to Setup | Create | Apps. There will be a new connected app named whatever you named your Visual Studio project. All you need to do it click the Click to Reveal link to get the consumer secret. You will need to copy this value into your web.config, which already has the settings needed to authenticate.
There are a few other steps needed to get completely setup, but they are very straight forward and the documentation provided does a great job of explaining them in the Next Steps section.
Customizing the Scaffolding Code
One of my favorite things about the Salesforce Provider is the use of T4 templates for scaffolding code. This means that you can customize the code that is scaffolded into your project. The Salesforce Provider comes with three T4 templates, but you have the option of installing a T4 Editor and editing the existing templates or creating entirely new ones.
This means you have full control over the code that is generated for your projects. If your development team adheres to certain coding standards or styles, you can have these applied directly to the code that is scaffolded for each project.
What’s Next?
The new Connected Service Provider uses the currently available open source Force.com Toolkit for .NET. If you are doing active development with the Salesforce REST services and especially if you are even considering using the Force.com Toolkit, then I strongly suggest you check out Connected Services.
This is just the beginning too. The Connected Services Salesforce Provider is already good, but it will just get better since the underlying technology used to connect to Salesforce is open source. Additionally, Connected Services appears to be the new way to access SaaS endpoints. When you configure your connected service, you will notice that it includes providers for connecting to Azure Mobile Services, Azure Storage and Office 365 API’s. I would not be surprised to see other SaaS providers added to the list in time. So, what are you waiting for? Download and install it today!
About the Author
Our guest blogger, Sara Morgan, is an independent Software Developer and long-time .NET programmer who has recently been wooed into the world of Force.com development. She recently filmed her first introductory course covering Visualforce for Lynda.com.