In this blog we’ll explore how to build a Tic-tac-toe app using Lightning Components. We’ll do so by go over steps to help us decompose the app into smaller components and wire them up using events. You can use the steps used here to build any other Lightning app.
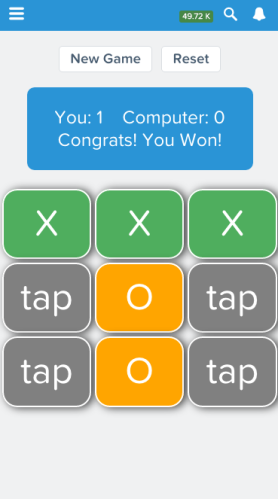
The below picture shows how the completed app looks. You can install the unmanaged package from here, add it to Salesforce1 Mobile (Setup > Mobile Navigation) and open “Tic Tac Toe” in Salesforce1 Mobile to see it in action. You can also open it as a standalone app by going opening /c/TicTacToeApp.app
Let’s go over the steps that help us build it.
Step 1 – Make A List Of App’s Main Features:
First start with the main features. In our case, our app:
-
Should be a single player game – the 2nd player should be computer that selects a tile based on some logic (AI)
-
Should be able to Start a new game or reset everything at any point
-
Should keep track of previous scores.
-
Should show exactly which 3 tiles caused the success of the user or computer.
Step 2 – Divide The App Into Components:
Based on the main features, we can get an idea as to how to divide the app into components.
In our case, the app is divided into 3 main components:
-
TicTacToeGrid Cmp: This is the main component that handles game logic (feature #1 and #2)
-
Scorecard Cmp: This simply maintains the score from one game to another (feature #3)
-
Tile Cmp (9 of them): There are 9 “Tile” components, each representing different cell in the grid (feature #4)

Step 3 – Assign Responsibilities To Components:
Next step is to go into details of what each component is responsible for (and not responsible for). This will not only help us implement all the features but also help us figure out what Lightning events we need and how to wire them up.
TicTacToeGrid Cmp:
This is the main component that creates a grid of 9 Tile child components and a Scorecard child Component.
It’s responsible for:
- Creating the UI and Grid of Tiles
-
Starting a new game
-
Resetting the game board
-
Wait for Computer’s turn and select a tile on-behalf-of computer (AI)
-
Telling others when the game is over including who won, who lost or draw
It’s not responsible for:
-
Maintaining the score of previous games (Scoreboard component does this)
-
Displaying current game’s status after it’s over (Scoreboard component does this)
-
Dealing with Tile clicks (Tile component handles this)
Scorecard Cmp:
This is a simply score display component.
It’s responsible for:
-
Keeping track of Scores,
-
Displaying game final status
-
Listening and resetting itself
Tile Cmp:
There are 9 of these components and each represent a single cell in the grid.
Each Tile component is responsible for:
-
Listening to user clicks and changing it’s value to ‘X’
-
Listening to ‘Computer’ clicks and changing it’s value to ‘O’
-
Telling others (TicTacToeGrid) that the user has clicked on it.
-
Finally, display which set of 3 tiles caused the game to over (shows them in green).
Step 4 – Use Scenarios To Wire Up Events
Now that we have assigned responsibilities to each component, we can see how to wire them up. In Lightning we can do this using eventing library. By playing out the scenarios and using component ‘responsibilities’ from Step 2, we can figure out all the events.
Our app has 3 scenarios:
- User clicks on a “New Game” button
- User clicks on a “Reset” button
- User clicks on a “Tile” to play the game.
At the end our app uses 5 events. The below picture shows how they are wired, which direction they travel. You can tell when they are used pretty much by looking at their names.
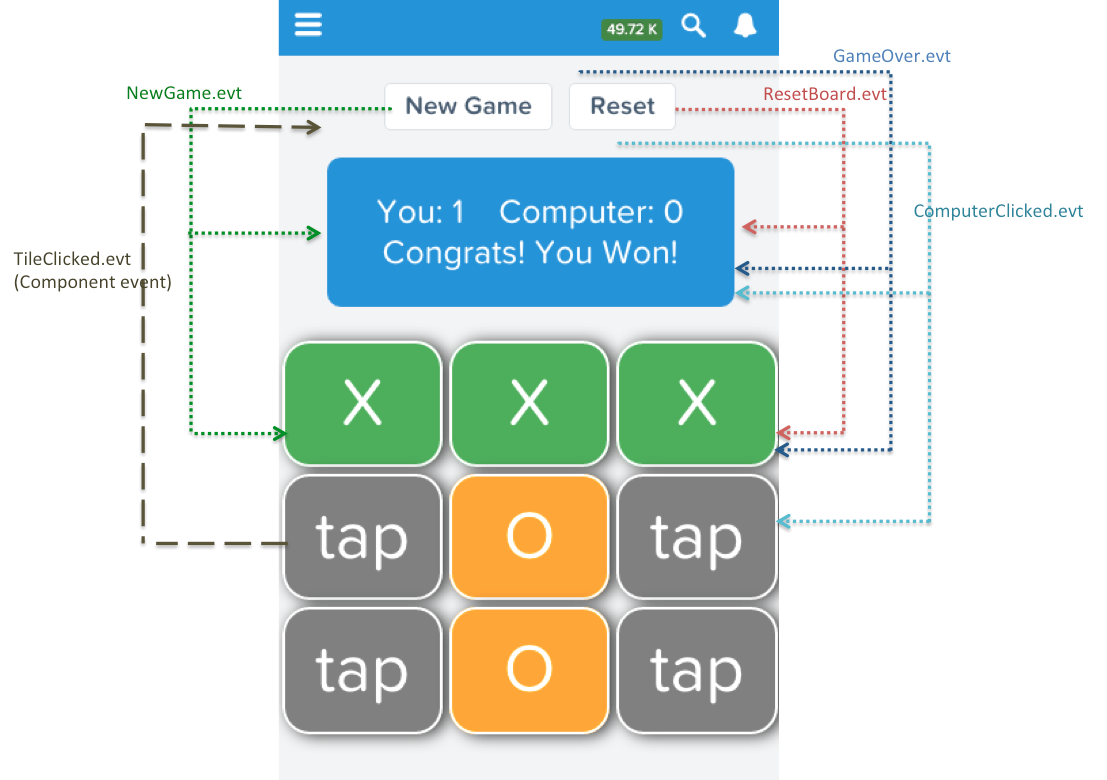
Let’s understand how events are wired up by going through them.
Scenario 1: User Clicks On ‘New Game’ button
From earlier Step 2, we know that TicTacToeGrid.cmp notifies child components that a new game is about to begin. Because it goes from Parent to child(and grandchild) components, we’ll create an Application event called: NewGame.evt. We will fire it when the user clicks on the “New Game” button.
NewGame.evt event looks like below:
TicTacToeGrid.cmp Component registers the event to indicate that it might trigger this event
1. When the “New Game” button is clicked, TicTacToeGrid.cmp fires the event.
2. All 9 Tile.cmp components listen to this event like below:
3. And when the event comes, each one of them reset their values themselves
4. Scoreboard.cmp also listens to this event like below:
5. When the event comes, Scoreboard.cmp simply clears it’s Win/Lose status message like below:
Scenario 2: User Clicks On ‘Reset’ Button
This is similar to the above scenario. Only difference is that when Reset happens, Scoreboard.cmp clears previous scores in addition to Win/Lose status.
Scenario 3: User Clicks On A Tile
-
Tile.cmp updates itself with ‘X‘ and fires TileClicked.evt.
-
TicTacToeGrid.cmp notices the event and check if the game has won/not.
-
If the game is not won and if there is an empty tile, then AI selects one of them
-
TicTacToeGrid.cmp then triggers ComputerClicked.evt
-
Tile.cmp updates that particular tile with ‘O’
-
End
-
-
If the game is won, then go to 3
-
-
TicTacToeGrid.cmp fires GameOver.evt
-
ScoreBoard.cmp updates Score and displays who won
-
3 out of 9 Tile.cmp components highlights themselves in green if they are the reason the game ended.
-
Summary:
- It’s very easy to decompose apps into components if we list out the main features first
- Assigning responsibilities to components will help in knowing what kind of events we need.
- Use scenarios or use-cases in conjunction with component responsibilities to nail events.
- Use application events to notify multiple child components and use component events to notify top-level component.
- Trigger a new event for each scenario.
- If the scenario has a cyclic effect (like UserClick triggers ComputerClick), use two events, one for going from child-to-parent and another for parent-to-child.