Salesforce emails are a wonderful and powerful capability, but when working in sandboxes (or even production), they can provide a set of unique challenges where you must try to provide explicit control. This blog post aims to provide insight on how to control the output of emails; both in sandbox and production, as well as capture those emails before they go out so that they can be used in a UAT situation.
Email Control Challenges
The two kinds of challenges you’ll face are the following:
- Emails from Sandboxes are sent
- Unintentional Emails sent and/or you need to exempt certain emails from being sent at certain times
Emails from Sandboxes are sent
You’ve created some great Workflow Emails and now you need to test them. Or, maybe you are adding some fields and need to datafix pre-populate them in your sandbox which will fire the workflows. Sure, you could turn off the workflows, or maybe put an exception in them for a certain login, but is that really the most scaleable approach? And moreover, it will require you to re-enable and to think about others who may need the same functionality change. A possible solution here is two-fold.
- First, Email Relaying to send all emails to a given Exchange IP that can then re-direct them to a local Exchange email address so that nothing goes out and can be viewed by your organization.
- Second, using Custom Settings in conjunction with your Workflows to determine when the email should be sent if Email Relaying is either turned off, or you simply don’t want to generate thousands of emails for a data fix.
Email Relaying
Salesforce has a great feature called Email Relaying that lets you redirect all emails (other than System generated; password reset, etc) to a desired Exchange server IP. You, of course, would have to coordinate with your Production Operations folks to get one set up and make sure it’s externally exposed. But once it is, they can examine the Mail “header” and redirect as desired. Everything from your orgs could be redirected because of the header associated (have them look for an Org ID starting with 00D), or you could ask them to allow certain ones addressed to certain team members.
I caution against the latter approach though because you could possibly send a barrage of emails accidentally to that person and they could just as easily see them in the new Exchange inbox.
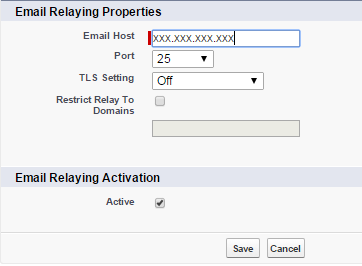
To setup Email relaying, you go to Setup > Administer Email Administration > Email Relay Activation. If you don’t see this feature, request it from Customer Support. Simply set the IP, Port, and TLS setting and then mark to Active. Generate an email to test and you’re done! If you ever want to turn it off (i.e. Production), just un-check Active and emails will flow as normal.
Now you can block all Sandbox emails with a single mechanism and have them all go to a single server inbox where they can be verified/validated by your QA team without concern for slamming customers. Yes, this can be used for Production, but you would likely block emails you intended to go out and wanted to be delivered. So how do you block those you want blocked, but allow those you want let through?
Custom Setting Hierarchies
Here is where you really start playing with fire! As you know Custom Settings can only be used by Workflows when they are Hierarchy; that is, based upon the Role of the person logged in. So, how can we use those to help us with Workflow emails which are probably 80% or more of our total email volume? Very easily actually, as you would:
- Set up your desired Custom Setting as a Public Hierarchy Custom Setting (i.e. CS_Case_Workflows__c) and create a Custom Field to indicate if you should send emails or not (i.e. Allow_Emails__c).
- Set the OWD for the new Custom Setting to True for Production and False for Sandbox.
- Modify each desired Workflow to have “IF($Setup.CS_Case_Workflows__c.Allow_Email__c,” precede your current Workflow condition formula and add a trailing parentheses to close out the IF formula.
That’s it! You can even modify all of the Workflows using Eclipse and turn off your Build Automatically checkbox. Then, after all are updated, Highlight them all, right-click and select “Send To Server” and you are Done! Not only do you have Email Relaying as a redirect, but you have a 2nd level of control to even prevent those from firing. BUT, what if you decide that you want them to fire for certain testers? Here’s where the power of the Hierarchy REALLY comes in. Just put an entry under the Custom Setting for the User (or Profile) to be exempted. The workflow will automatically adjust to that setting and send for those Users, but no one else. And if used in Production, you can do the opposite; have the OWD as True, but the User setting as false in the event of a large scale datefix.
Unintentional Emails sent
This topic is essentially solved with the Custom Setting Hierarchies described above. Moreover, it can actually be used in Production to great effect as well so that specific Users/Profiles can be exempted from the OWD (Org-Wide Default) set-up. Maybe you have a mass change User account that is used to do mass updates and when you are updating the Case object, you don’t want to send notices to the customer stating that their case has been updated. You can create an entry for that login to NOT send the emails and your workflow will simply adjust based on the configuration noted above. Email relaying isn’t used in Production because you want emails to go out. But now you can granularly control 80+% of your emails by User/Profile if you desire. You can even stop ALL emails from going out for a given object by just changing the OWD.
Conclusion
I hope you’ve seen how investing just a little time can reap huge dividends as far as your ability to control emails and project your professionalism to customers. With these capabilities, there is no reason why an accidental email should ever be sent to apologize for or to saturate a customer (or your own inbox) with unnecessary emails. You can use any combination of these features to get just the outcome you want from either a Sandbox or Production. There is no reason to look unprofessional, or just as bad, have to explain yourself to your VP of why you sent so many emails you shouldn’t have, and then have to send apologies. Best of all, it’s all intrinsic and very simple to setup.
About The Author
Robert Nunemaker is a retired Air Force member and has been using the Force.com platform since 2007. He is an Certified Advanced Administrator, Advanced Developer, and Sales Cloud Consultant. He has presented at Dreamforce 2013 and 2014 on APEX Design Patterns and has worked for Citrix Systems for 16 years; most recently as a Senior Applications Architect. His favorite subjects are platform issues such as security, reusable patterns, and stability (and the New York Yankees!).