The REST API is a powerful web service API that allows you to interact with Force.com. Its advantages include ease of integration and development, and it’s an excellent choice of technology for use with mobile applications and Web 2.0 projects.
This article will guide you through the process of creating a simple jQuery application that connects to the REST API and allows you to create records in your salesforce organization directly from an external website. The same process could be used to create a mobile application for your sales reps, or integrating a backend system with salesforce to sync data.
Requirements
- A salesforce developer edition
- A web server that runs on HTTPS and that is accessible to the Internet. This is necessary to host the HTML files.
Step 1. Creating a Connected App
Because we are creating a new application that will connect to salesforce, a Connected App is needed to make salesforce aware of this application.
- Go to Setup | Create | Apps and click New under Connected Apps.
- Specify the Name and API Name.
- Select Enable OAuth Settings.
- Under Callback URL specify the URL of the web page that we’ll use to create account records.
- Move all the available OAuth scopes to the Selected box under Selected OAuth Scopes.
- Click Save.
You should now have a Consumer Key and Consumer Secret, keep these values handy.
Step 2. Choosing the correct Authentication flow
The first step in connecting to the REST API is to authenticate the user and get a valid access token (session Id) that can be used in subsequent calls to the API.
Depending on the type of application you are creating, the authentication flow will be different. In this case, we’ll use the User-Agent OAuth Flow because our application runs in the client side (the user’s browser).
At a basic level, the flow is as follows:
- The application redirects the user to the authorization endpoint passing the required parameters, i.e response_type, client_id and redirect_uri.
- The user logs in with their salesforce credentials.
- The authorization endpoint redirects the user to the redirect URL (this is the web page you specified in the Connected App) and appends the access token (session Id) to the URL.
- You can then use this access token to make calls to the API.
Step 3. Create the initial html page
Create an HTML page called ConnectRESTAPI.html. This page has a button that allows the user to connect to the REST API. Note this is not the same page that we configured as the callback URL, we will work on that one on the next step.
Step 4. Create the page used as the callback URL
Create an HTML page called UseRESTAPI.HTML. This is the page that we configured as the callback URL and will also be the main page from where we will make API calls.
When the authorization endpoint redirects the user to the redirect URL, the access token is appended as follows https://mycallbackurl.com#access_token.
The GetURLParameter function allows you to retrieve this value. Pay special attention to the decodeURI() method. If you don’t decode the access token, the server might not understand some of its characters and the API call will fail to authenticate.
In order to create an Account record via the REST API, we need to submit a HTTP POST request to /services/data/v20.0/sobjects/Account/.
Remember that when making calls to the REST API, you need to use the access token that was granted to you. This is done by adding an Authorization header with the value of “Bearer +access token” as seen in the $.ajax request.
Finally, we create two functions that will be used to process the response from salesforce, one is used if the account is successfully created and the other one is used if an error occurs.
Step 5. Whitelist your domain
Because your page is on a different domain that your salesforce organization, we need to whitelist it to allow javascript callouts to access resources from your organization.
- Go to Setup | Security Controls | CORS.
- Add your domain to the list of Whitelisted Origins.
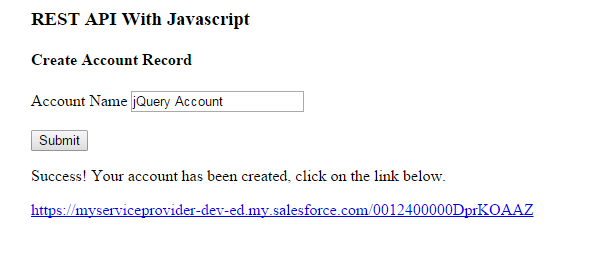
Test your application
- Load the initial HTML page and click the “Connect to the REST API” button.
- You will be asked to log into your org and to grant permission to the application.
- You will then be redirected to the main HTML page.
- Add a name to the “Name” field and click submit, if everything works fine you should see something like this:
The complete code for this example can be found at https://github.com/pgonzaleznetwork/SFDC-Projects
What next?
You should now have the basic knowledge to start creating applications with the REST API. This example focused on creating applications on the client side, but you can also create applications on a server using a server side code like Java or PHP. Check out the Force.com REST API Developer’s Guide to learn more.
About the Author
Pablo Gonzalez is a member of the Mission Critical Support team which provides the highest level of support to enterprise Salesforce customers. They also assist developers to troubleshoot their integration with salesforce.com APIs, Apex, Visualforce and implementation of other salesforce.com developer products.