This blog post provides a high level overview of the steps needed to create and publish a Lightning component for AppExchange. We will walk through the design, creation, testing and distribution of your Lightning component, with considerations for security, packaging, documentation and capturing success metrics.
This post is broken down into three steps:
- Design your component
- Build and test your component
- Publish your component in the AppExchange
Lightning Components
The Salesforce Spring ’17 release features two ways developers can leverage the Lightning Experience for the best apps. The first is Lightning Data Services for easier data transport and the second is Base Lightning components for easily constructing user interfaces. As Salesforce continues to contribute to the Lightning Experience ecosystem with fresh components, curious developers may ask themselves:
How can I contribute components?
The Lightning Component Framework is not only made of components made by Salesforce, but is also comprised of robust components built by our thriving developer community. Components can be published on the AppExchange, installed by an administrator and then easily utilized for end users via the Lightning App Builder.
How does a developer go from an idea all the way to a published component that others can download and use from the AppExchange? Today’s blog post uses as an example the first Lightning component I published: a customizable data tree. How did I move my component from design to publishing? Let’s take a look.
 Step 1. Design your component
The first step leading to the creation of a Lightning component is to give yourself a blueprint of what you want to build. At this point, you want to ask yourself questions such as:
- What is the goal of this new component?
- Can it be reusable?
- Is it a single monolithic component or should it be split into smaller, modular components?
 Before you dive into coding – consider a basic rule of development: never re-invent the wheel. While you consider your idea, browse the AppExchange to see if someone has already built what you need.
In my case, I was looking for a generic component on which I could test my Lightning development skills.
With a bit of research on AppExchange I noticed there were no Lightning tree components available. I then began creating my own with the plan of contributing it to the Salesforce community.
Step 2. Build and test your component
Building individual Lightning Components is well beyond the scope of this blog post. Thankfully we have Trailhead which includes a wealth of information and interactive tutorials on developing for Lightning, including a module specific to learning the Lightning Component Framework.
After reviewing the modules and begin coding a killer helper.js, consider the following in regards to developing specifically for the AppExchange.
Set up your Developer Editions
I recommend using two Developer Edition instances if you intend on publishing to the AppExchange. Remember that these instances are free to developers, and it’s easy to sign up for a new one.
Here’s what I recommend:
- One instance for development and publishing
- One instance for testing and security review
Both of these should be completely new, and should spin up with Lightning Experience as default. The new instances prevent accidentally relying on existing code, objects or static resources. It will make sure you have no background processes like triggers blocking your development.
When starting you should also activate LockerService on both orgs from as this a requirement for successful publishing.
Two orgs also helps you avoid common issues with namespace and access control. If you want to publish on the AppExchange you need to consider how your code will be packaged and run in a completely different environment. You can read more about this in the ISVforce Guide, made for independent software vendors.
Note that if you are working on additional contributions later on, you will need to reuse your existing developer org to keep the same namespace.
Decide what kinds of package you want
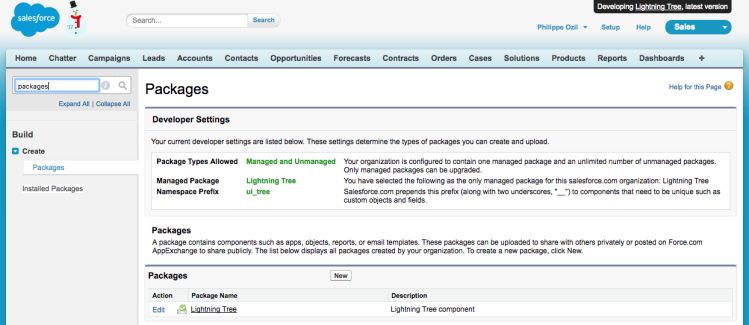
Salesforce has two types of packages for distributing software: managed and unmanaged. Unmanaged packages are intended for ad hoc sharing of code and do not support versioning, nor do they protect any of the material in the package. That last part is something of an advantage if you are trying to share code, however, as people can see how the package is put together and even modify it.
A managed packaged exists within its own namespace and the resources in that package are not visible to those who install it. It has the advantage of being able to support upgrades, which means if you want to offer fresh versions of your code you can maintain it within the same package and users can go to a single link to install and upgrades.
A managed package is required if you intend to distribute your component on the AppExchange.
My personal choice for my example Lightning Tree component was a compromise between these two options, as you can see in the screenshot. I released the component as a free managed packaged to be able to deal with maintenance and improvements but I also shared the source code on GitHub for learning purposes.
If you are considering releasing a paid app on AppExchange, there are a few mandatory extra steps needed such as registering as a Checkout Partner or signing an ISV contract. For the sake of brevity, we will not discuss those in this post.
Mind your access control
Never assume that because your project runs fine in your personal developer org it will work for other orgs as well.
Access control is what determines which users can use which parts of the functional parts installed in a Salesforce instance.
By default, if you do not set any access attributes on your Lightning components, attributes, events and the like, everything is public. That setting is perfectly fine if you run everything in your own org. However, as soon as you want to share your component and deploy it to another org, it will cease to function. This setting will throw errors when sharing as public only works within the org which owns the namespace.
Let’s have a look at a practical example. If I declare a component in my main developer org using just <aura:component> then, my component is public. As a result I will not be able to access it in any other org even after deploying its package. In order to share my component, I need to declare it using <aura:component access="global"> . The same logic goes with applications, attributes, events, interfaces and methods: they also need to be global if you wish to expose them.
It is your responsibility as a developer to ensure that your component beats the correct access settings. If you fail to configure them properly, your contribution may be unusable on other orgs. Deploying and testing your project on a secondary org is key to help you avoid those issues.
Development best practice is to specify access attributes manually from the start. If you are planning to contribute an application or component, remember to always use “global” access to expose functionalities.
Don’t forget documentation
If you are familiar with JavaDoc, the Aura framework (which is the foundation layer behind Lightning) offers a similar solution. The Aura documentation framework is fairly basic but integrates with the standard components’ documentation. If your end users are using several custom packages in their org, leveraging the Aura documentation is a simple way to put all of the useful information about their installed components in one spot.
As a reminder, your personalized Aura documentation is available at this url:
https://<YOUR_INSTANCE_URL>/auradocs/reference.app

Notice the descriptions and default values in the screenshot above? These are defined in your component attribute definitions! I highly recommend not skimping on this aspect of documenting your components. Not only will it be useful for you when you do further development, it also clearly explains to any user of your component what the values are and types.
Also, you can easily provide example usage that will be shown on the “Examples” tab as seen in the screenshot above. Examples are included by adding a documentation definition to your component bundle.
3. Publish your component on the AppExchange
By now I’ve assumed you have built a managed package with killer features and robust documentation. Let’s take a look at the best way to share it with the community. Be aware that this stage requires a bit of work to set up at first and that it may some time as components are subject to the same rigorous security review as AppExchange Apps. The security review is definitely worth the effort as being listed in the AppExchange will provide greater visibility for your project and it may also help you monetize your work.
Here is a high level overview of the steps that you will go through:
- Begin with a bit of digital paperwork by registering as a Salesforce Partner.
- Once you join our Partner Community (welcome!), you gain access to the Publisher Console. This is where you declare, customize and track your contributions to the AppExchange.
- Connect your developer org to your AppExchange account. To do so, navigate to the organization tab and connect the developer instance where you developed the package.
- Once your developer org is tied to the Publisher Console, select your package and sign a publisher agreement. This is where you will decide whether your component is free or not. Your decision will affect the next step.
- Finally, you will need to submit your component for security review. If the component is free, then the security review is free as well. However, if the component is paid, then you will need to accept the ISVForce Checkout agreement and use Checkout as the payment technology.
The security review may take a few weeks, but is vital to ensure that our Community remains a safe place to exchange contributions. It helps us maintain our number one value at Salesforce: Trust.
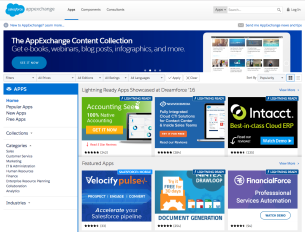
While you are waiting for the security review results, you can prepare your project’s listing. This is where you will describe your component’s features, supported devices, licensing options and provide some – hopefully – appealing media to boost installs. You can see what that looks like below.

Once your project has passed the security review, all that’s left is to push a button to publish your listing to the AppExchange.
From there, I suggest that you use your preferred social media to advertise your work and monitor some analytics such as the number of installs in the Publisher Console. You can see an example of how that looks below.

You will also want to monitor user feedback as they post reviews, request additional information or declare bugs.
Closing words
We have covered the different steps required to take your component from idea all the way to AppExchange. There are limitless apps out there waiting to be built and added to the AppExchange, whether it is an app that forms the cornerstone of your business or a simple, useful app for others. Happy Lightning contributing!
Here are some related links:
- ISVforce Guide (for Independent Software Vendors)
- Introduction to Access Control
- Aura Documentation
- AppExchange
- Salesforce Partner Signup
- Trailhead: Developing for the Lightning Experience