Scheduling appointments or planning field service—there are many opportunities to use weather-related data for enhancing the customer experience. This is one reason why Salesforce and IBM are strategic partners, with the goal of delivering joint solutions designed to leverage AI and enable companies to make smarter decisions. In this blog post you learn how to use weather data from The Weather Company Data, an IBM Business, within the Salesforce platform.
The Weather Company Data
Before we go into the code example it’s important to understand what weather data and services are offered. They can be categorized as:
- Alerts (government-issued weather alerts only – US, Canada and Europe)
- Current conditions
- Forecasts (Intraday, Hourly, Daily)
- Historical data (24 hours past observations)
There are two options available to access the data:
- Signing up for a business API account directly provided by The Weather Company.
- Using the The Weather Company Data APIs on the IBM Bluemix platform.
If you purchase the full weather data or alerting packages from The Weather Company, you will receive richer data sets compared to what’s available in Bluemix. For example, you’ll get 30 years of cleansed historical data, hourly forecasts out to 15 days, a set of proactive alerts based on The Weather Company forecasts, or greater location granularity for current weather conditions. For this blog post we’re focusing on the APIs on the Bluemix platform.
As weather data is location-dependent, most of the API calls must be supplied with either longitude/latitude coordinates or zip code information. You can find the complete list of available calls, their parameters, and their outputs in the The Weather Company REST Explorer.
Example implementation
Let’s check out a common use case for weather data within Salesforce. The following video shows a custom Lightning component that displays weather data on Account, Contact, and Lead record pages:
The elements used from the The Weather Company Data service are:
- Current weather observation
- Min/max temperatures (taken from forecast) and humidity
- 3-day forecast
- Alerts (if applicable)
Let’s dig into how we built it.
Setting up the The Weather Company Data service
As mentioned earlier we’re using a service on IBM’s Bluemix platform. IBM offers several plans for The Weather Company Data service that scale based on your usage, for example, the number of API calls per minute and the number of calls per month.
The first step, after signing up for IBM Bluemix, is to add a new service of type “Weather Company Data” to your Bluemix organization.
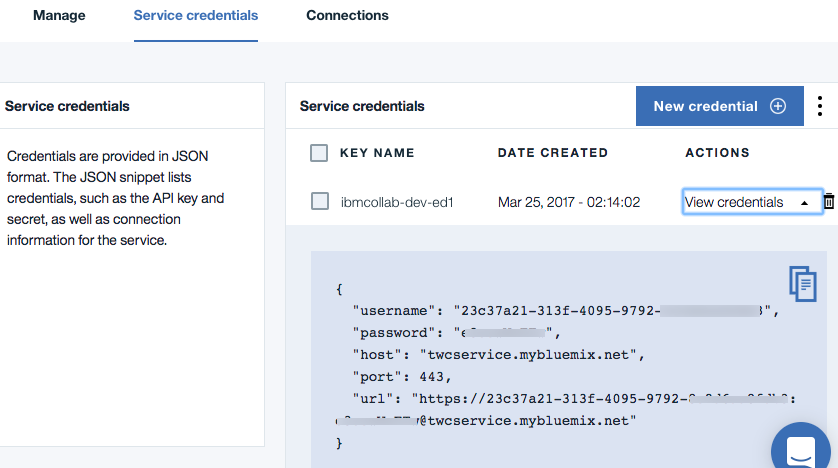
 This creates a new service entry and also a new set of credentials. The authentication of the service is secured via basic authentication, so we need the values for host, username, and password.
 Other authentication methods like OAuth2.0 or OpenID are not available.
Named Credentials
Within your Salesforce org, we set up a new Named Credential. This enables you to administrate the credentials for the service declaratively. For this example we use “IBM Weather” as credential label and “IBM_Weather” as credential name.

Enable automatic geocoding
Most of the weather data services offer queries based on location code (country + zip) or via latitude/longitude data. For the latter option you can enable Data Integration rules in your Salesforce org. This automatically updates all Account, Contact, and Lead records with the respective geocodes.
 We’re using this feature in the Lightning component and the Apex classes to identify the geocodes for displaying location-agnostic weather data.
Weather icons
IBM provides a set of images that can be used to display weather conditions. As those images are not directly accessible, we’re importing them as a static resource into our Salesforce org.
![]()
Back end classes
All calls for the weather data service are handled by a set of Apex classes. These are the primary ones used:
- IBMWeather_Controller—handles the API calls and the communication with the Lightning component
- IBMWeather_Forecast—Apex class that represents the model subset of weather forecast data
- IBMWeather_Observation—Apex class that represents the model subset of weather observation data
- IBMWeather_Alert—Apex class that represents the model subset of weather alert data
Let’s examine how the IBMWeather_Controller handles the request for the weather 3-day forecast:
Code explanation:
- Line 3: Based on the supplied Id of the record, we’re resolving the stored geolocation information.
- Line 4: We’re using the Named Credential as callout for the basic authentication against the weather data APIs. The resolved longitude and latitude data are passed as parts of the API URL.
- Line 5: A generic method getWeatherJson, which handles all API response values of the weather data service, returns a JSONParser object.
- Line 7: The JSONParser object gets cast into the Apex model class for forecasts.
Casting the JSONparser into a model class has several benefits:
- You control which values of the returned JSON data are finally used—and with that, for example, the amount of data sent to a Lightning component (instead of just sending the full verbose JSON string to the browser client).
- The model class can be easily used in other Apex code, for example a Trigger or declaratively within Process Builder.
Given the generic approach of the Apex methods you can add your own calls to other weather data APIs by just adding the needed model class and a modified version of the getWeather3DayForecasts method. The IBMWeather_Controller holds similar calls for observation data and alert data.
Lightning component
The Lightning component is responsible for visualizing the gathered weather data. This markup excerpt shows the main parts:
Code explanation:
- Line 1: The aura:attribute holds returned model data for the weather forecast.
- Line 2: By using the standard attribute “recordId” Lightning automatically prefills it with the ID value of the the current record.
- Line 8: We’re using the supplied icon code value in combination with the static resource to display a weather-related icon.
- Line 11: This part displays the day part of the forecast (that is, “Today”, “Tomorrow”, “Tuesday” and so on) and a textual representation of the narrative.
The Lightning component helper provides several methods for calling each of the available Apex methods:
The called Apex method takes only the record ID as parameter. Upon a successful data fetch, the appropriate aura:attribute (here: weatherForecastData) is populated.
Some considerations
As when working with all third-party APIs, always keep an eye out for a few things:
- During my testing I found out that sometimes not all expected values were returned, that is, the weather icon. Make sure you test accordingly and prepare that your implementation is agnostic to that.
- Every API call counts against your API limit. So validate what kinds of API calls you want to make, how often they’ll occur and so forth. Outsourcing functionality to Heroku is a viable alternative.
Next steps
This blog post showed you how to build your own weather data service integration using The Weather Company Data by displaying current and forecast weather data within Salesforce. You can learn more about the parts of the Salesforce and IBM partnership here.
We also covered many different aspects of the Salesforce platform like:
Feel free to fetch the shown example from my GitHub repo, which includes setup instructions and an installation link for an unmanaged package. To learn more about how to work with third-party APIs, check out our Trailhead module on Apex REST Callouts. Finally, The Weather Company will offer in 2017 new Lightning apps on the Salesforce App Exchange. Stay tuned!
About the author
René Winkelmeyer is as a senior developer evangelist at Salesforce. He focuses on enterprise integrations, mobile, and security with the Salesforce Platform. You can follow him on Twitter @muenzpraeger.