Most apps that access the Force.com APIs do so on behalf of ‘full’ Salesforce users, gaining access to all of the Contacts, Accounts and other standard and custom objects that the user has access to, but it’s also possible for apps to call the APIs on behalf of Portal users, manipulating the Contacts, Cases etc that the Portal user can access. Until now, the only way for apps to authenticate Portal users has been to use the login() SOAP API call, setting orgId and portalId in the SOAP LoginScopeHeader. With the Spring ’13 release, apps can now use OAuth 2.0 (see also Digging Deeper into OAuth 2.0 on Force.com) to obtain tokens for accessing APIs on Portal users’ behalf. Not only do apps no longer need to handle user credentials, Portal users can now authenticate to the Portal via Auth Providers or SAML as well as username/password. Let’s take a closer look…
The first step in enabling OAuth for your Portal users is to associate a Force.com Site with your Portal, if you have not already done so. The Site provides your Portal with a unique URL and allows you to create a custom login page. Apps that wish to login users for the Portal must use the hostname from the Site’s secure URL when redirecting users to the OAuth 2.0 authorization service. For example, rather than redirecting to
instead use
The authorization service will recognize the custom hostname and further redirect the user to the Site login page, assuming the user is not yet authenticated. Note – if your site uses a path as well as the site domain, for example, https://mysite.secure.force.com/mypath, you will need to include that path in the authorization URL:
Here’s a simple Portal login page that allows users to login with username/password or via a Facebook Auth Provider (source code):

Looking at the login page controller, notice that we capture the value of the incoming startURL parameter. Passing that value to the Site.login() Apex call, or as a query parameter to the Facebook Auth Provider, ensures that, once the user is authenticated, they will be redirected back to the app.
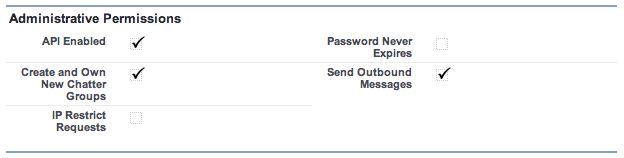
The final piece of the puzzle is that the user must have the ‘API Enabled’ permission on their profile. Since you can’t set this on the default ‘High Volume Customer Portal’ profile, you will need to create a custom profile as a clone of the existing one and check ‘API Enabled’ on that custom profile.
This is all getting a bit abstract; let’s make it real by taking a look at the process in action. Before recording the video, I revoked permissions for my app on my Portal user’s record in Salesforce, and for the Portal on my Facebook account, and logged out from everywhere, so you can see the entire process. Second time round I just logout from my app and the portal. Since I’m still logged in to Facebook, one click at the Portal login page is all it takes to login to the app.
//www.youtube.com/watch?v=qpn-skZmb8U
Now it’s easier than ever to write apps for Portal users, I hope this article has sparked an idea for a new app. Let me know in the comments what you’re thinking…