
The Salesforce Console is designed to boost productivity in fast-paced service and sales environments. The dashboard-like interface reduces clicking and scrolling so that you can quickly find, update, or create records, and the tabs make it easy for you to see records and their related items on one screen, and work on multiple items simultaneously. However, over the course of a day, agents may find that the number of tabs open poses a challenge to navigation.
Enhancing the Salesforce Console with Custom Keyboard Shortcuts
This article gives an example of a custom console component that creates custom keyboard shortcuts to assist with navigation. It adopts shortcut behavior from modern web browsers that gives agents the ability to switch directly to a tab or subtab based on its position in their workspace. This creates an improved navigation experience and allows users to work even faster as their reliance on the mouse is decreased.
Disclaimer: The code presented works at the time of publication. Although our API is backwards compatible this post makes no guarantee of the functionality in the future or any compatibility with potential future console products or APIs. It is best used as a reference for your own implementation.
About the Shortcuts
The shortcuts are similar to Chrome’s shortcuts which use Ctrl+# to jump between tabs, but we’re also adding the ability to move between first and last tabs, as well as differentiating between primary tabs and subtabs. In summary, the shortcuts we’ll be creating provide the following functionality:
- Switch immediately to the very first or very last tab.
- Switch to a tab based on its position in the workspace. For example, switching to the 4th out of 7 total tabs.
- The shortcuts will work for both primary tabs and subtabs.
- The shortcuts will work even if a user reorders their tabs by dragging and dropping them.
Creating the Shortcuts
The shortcuts are created on a Visualforce page, which is then added to the Console as a custom component. The shortcuts are implemented in Javascript, but if you don’t code, we’ll provide the solution for copying and pasting.
Step 1: Create a Visualforce page
The shortcuts are implemented in Javascript, and you need a place to put that. So the first step is to create a Visualforce page.
- In Salesforce, click your name, and then Developer Console.
- Click File | New | Visualforce Page.
- Give your page a descriptive name like KeyboardShortcuts and then click OK.
Step 2: Add the Page to the Console
In this step you create a custom console component. This is how we’ll get the Visualforce page to be able to operate across the entire console.
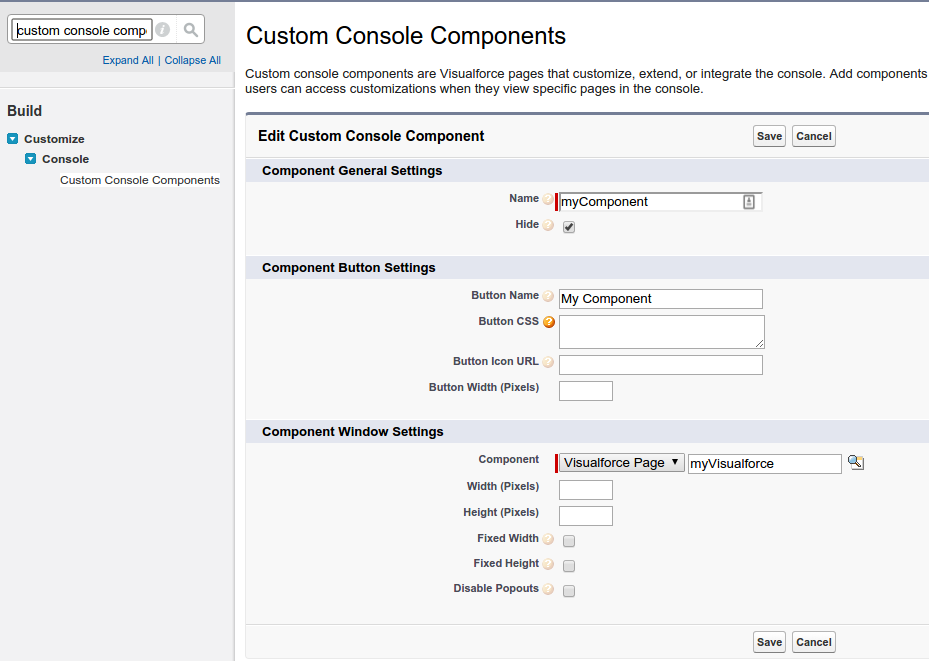
- From Setup, click Customize | Console | Custom Console Components and then click New.
- Give the custom component a name and a button name, and select the ‘Hide’ checkbox.
We want this to handle keyboard shortcuts without cluttering up the workspace, and the Hide option will prevent the component from showing up in the console’s footer. - Under the Component option select Visualforce Page and enter the name of the page you created earlier (KeyboardShortcuts, if you’re following verbatim).
Step 3: Add the custom component to your console app
- In Setup, go to Create | Apps and locate the console you want to modify.
- Click Edit and find the section labeled “Choose Console Components”. You should see your component in the left-hand list. Select the item and add it to the right-hand list and Save your console.

Step 4: Add the Shortcuts to the Console App
Now that your custom keyboard shortcuts are available, you can add them to your console app.
- Edit your console again and click the Customize keyboard shortcuts link.
- Select Edit and then Add Keyboard Shortcut.
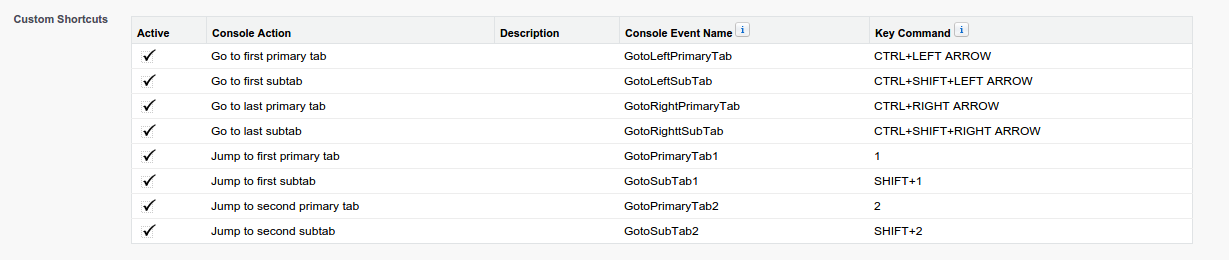
Note that the Console Event Name needs to match with the event listener names we add in the Visualforce page’s code (which you’ll do in the next step when you paste in the code). The Key Command box will automatically read the key combination you press while focus is on that field. - Click OK and then Save the settings.
For this example, add the following items as shown in this screenshot. You can choose your own key commands, but it’s best to avoid using commands which are already browser shortcuts.
Step 5: Paste the Code
- In the Developer Console, your Visualforce page should still be open. If not, open it.
- Replace the <apex: page> opening and closing elements with the following code.
The code takes advantage of the fact that the getPrimaryTabIds and getSubtabIds methods return an array of tab IDs in the same order as they appear in the console. If a user rearranges their tabs, this automagically works. We also don’t include error handling because in the event a user tries to switch to a tab that doesn’t exist, nothing happens. Adding more robust handling is an exercise left for the reader.
What Next?
This is certainly a good start for enhancing your agent’s productivity in the Salesforce Console by providing them with some familiar navigation tools they may already be using outside of the console. While the Salesforce Console isn’t designed to be a copy of a web browser, the similar behavior of tabs often leaves users wishing that certain actions were available. Hopefully this helps you design a console to optimize your own users’ work and gives you an idea of what’s possible with the console toolkit.