The Salesforce1 Platform provides many powerful and flexible ways of integrating two Salesforce orgs through a rich set of APIs, and features such as Canvas and Salesforce-to-Salesforce. However, there are scenarios that require API calls to be made from one Salesforce org to another Salesforce org on behalf of user, without any user intervention. Examples include looking up current product prices, or retrieving inventory master data from a centrally managed org.
Using the OAuth protocol, Salesforce provides multiple flows to allow secure API authorization for applications to access Salesforce1 API resources, even from another Salesforce org. One of these flows is the OAuth 2.0 SAML Bearer Assertion.
OAuth is managed on Salesforce1 using Connected Apps. The ability to control user permissions and revoke tokens via Connected App provide for more administrative control over access to resources. Fortunately, partners may leverage the pattern discussed here as Connected Apps may be packaged and distributed with their apps.
A SAML assertion is an XML security token. A SAML assertion is issued by an identity provider and consumed by a service provider that relies on the assertion content to identify the assertion’s “subject” or user. The SAML assertion is POSTed to the service provider’s OAuth token endpoint, and processed. In the case of Salesforce, upon successful authentication via this flow, a Session ID is obtained which may be used for subsequent API calls to authenticating org.
Please see here for additional details on the OAuth 2.0 SAML Bearer Assertion flow.
Let’s look at a scenario of creating “Hub” org and “Spoke” orgs using the Salesforce OAuth 2.0 SAML Bearer Assertion Flow.

Step 1: Generate a Certificate file and Private Key
The OAuth 2.0 SAML Bearer Assertion Flow utilizes an X509 Certificate. The certificate corresponds to the private key of the remote access application to be developed.
An example of how to create a certificate:
- keytool -keysize 2048 -genkey -alias mycert -keyalg RSA -keystore ./mycert.jks
- keytool -importkeystore -srckeystore mycert.jks -destkeystore mycert.p12 -deststoretype PKCS12
- openssl pkcs12 -in mycert.p12 -out key.pem -nocerts –nodes
- keytool -export -alias mycert -file mycert.crt -keystore mycert.jks -rfc
See here for documentation on keytool.
See here for documentation on openssl.
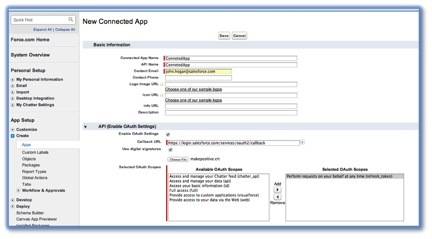
Step 2: Create a Connected App in the Salesforce Hub Org
1. Navigate to App Setup > Create > Apps > Connected Apps > New
2. Complete the required fields in the Basic Information Section:
- Connected App Name
- API Name
- Contact Email
3. In the API (Enable OAuth Settings) Section click the Enable OAuth Settings checkbox.
4. Enter an arbitrary Callback URL, such as https://login.salesforce.com/services/oauth2/callback.
5. For Selected OAuth Scopes, add Perform requests on your behalf at any time (refresh_token), and add other OAuth scopes, as required. It is required to add at least one additional OAuth scope.
6. Click the Use digital signatures checkbox, click the Choose File button and select the Certificate file that was created above (e.g. mycert.cer)
7. Click the Save button.
Step 3: Set OAuth policies
- Navigate to Administration Setup > Manage Apps > Connected Apps
- Click on the link of the name of the Connected App created above.
- Click on the Edit button
- In the Permitted Users drop down, select Admin approved users are pre-authorized, and click OK on the popup.
- For the IP Restrictions drop down, choose Relax IP restrictions, or choose another option based up requirements.
- For the Require Users to Log in radio button, select Refresh Token is valid until revoked.
- Click Save

Step 4: Add Approved Profile to the Connected App
- Identify the user in the Hub org that will be used to authenticate and note the Profile.
- On the Connected App page, in the Profiles section click on the Manage Profiles button.
- Click on the checkbox for the Profile of the user in the org to be used for authentication.
- Click the Save button.

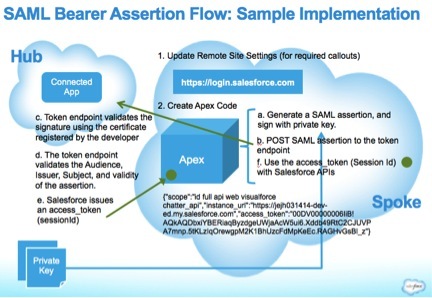
Implementation in the Salesforce Spoke org (Remote Access Application)
Step 1: Update Remote Site Settings
- Ensure that the Remote Site URL (https://login.salesforce.com) is added and active as a remote site.
Step 2: Create Apex Code
Summary
- The developer writes an application that generates a SAML assertion, and signs it with their private key.
- The assertion is POSTed to the token endpoint https://login.salesforce.com/services/oauth2/token.
- The token endpoint validates the signature using the certificate registered by the developer.
- The token endpoint validates the Audience, Issuer, Subject, and validity of the assertion.
- Assuming the assertion is valid and the application has been previously authorized by the user or administrator, Salesforce issues an access_token (sessionId)
Please see here for sample code.
Successful Results
Upon successful authentication via Apex, a JSON formatted response will be returned. For example:
{“scope”:”id full api web visualforce chatter_api”,”instance_url”:”https://jejh031414-dev-ed.my.salesforce.com”,”access_token”:”00DF00000006IiB!VFkAQDbxiYBERiaqByzdgeUWjaAcW5u.i6Qddb49RtC2CJUVPA7mnp_5tKLXIqOrMwpG2K1BhUzcRsMpKeEc.RAGHvGsBl_z”}
The access_token value is a Salesforce Session Id and may be used for API requests to the Hub org.
A best practice is to encrypt and cache the Session Id, e.g. in a Protected Custom Setting for future use. After retrieving and using the Session Id in an API call, if the call fails with an invalid Session Id message, then login, save the Session Id and repeat the API call. Limiting the number of logins will reduce the number of necessary API calls. The private key (used for signature) is too large for a Custom Setting text field, store as a Document in a secure folder, and access with Apex. In the document, store the private key encrypted and decrypt using the Apex Crypto Class upon use.
Conclusion
The Salesforce OAuth 2.0 SAML Bearer Assertion Flow is an option for creating connectivity from one Salesforce org to another Salesforce org on behalf of user without user intervention. The ability to control user permissions and revoke tokens via the Connected App provide for more administrative control over access to orgs (the Hub org, in our example).
This pattern is an alternative to other OAuth flows where user intervention is required, even for initial authentication and authorization. Furthermore, password storage is not required and password changes of the authenticating user in the Hub org will not affect the implementation.