Set Up Authentication with Salesforce External Client Apps
External client apps (ECA) are a new generation of connected apps. ECAs provide single sign-on (SSO) and use OAuth protocols to authorize external apps. The external apps that are integrated with Salesforce can run on the customer success platform and other platforms, devices, or SaaS subscriptions.
For more information on ECAs, including how to configure them in your organization, see External Client Apps.
| USER PERMISSIONS NEEDED | |
|---|---|
| To manage External Client Apps: | Tableau Next Admin permission set or System Administrator |
- To create an ECA for your organization, from the Salesforce Setup page, enter External in the Quick Find box, and then select External Client App Manager.
- Click New External Client App.
- Enter the basic information
- Enter the name for the ECA to display in the External Client App Manager.
- Enter the API name to be used when referring to your app from a program. This field defaults to a version of the app’s name with underscores in place of the spaces.
- Enter the contact email for Salesforce to use in case we want to contact you or your support team.
- Determine the distribution state. To develop an app for your local org, choose Local. To develop an app for packaging and distribution, choose Packaged.
- Click Enable OAuth to configure the OAuth policy.
- Enter the app settings.
- Enter the Callback URL. The callback URL is the app URL where you’re embedding the code and the URL can accept the authentication returned from the Salesforce ECA. An example of a callback URL is
https://<3p-domain>/callback.html. - For OAUTH Scopes, select
Manage user data via APIs (api),Manage user data via Web browsers (web), andAccess Lightning applications (lightning). If you have other OAuth needs, select other scopes as needed.
- Enter the Callback URL. The callback URL is the app URL where you’re embedding the code and the URL can accept the authentication returned from the Salesforce ECA. An example of a callback URL is
- For Flow Enablement, select the appropriate flow for your web app.
- If you select Enable Authorization Code and Credentials Flow, specify if user credentials are required in the POST body.
- If you select Client Credentials Flow, it only works with the
Manage user data via APIs (api),Access Lightning applications (lightning), orManage user data via Web browsers(web)OAuth Scopes. - If you select JWT Bearer Flow, upload a valid public certificate file. Additional setup is needed, see the steps below.
- For Security, select Require secret for Refresh Token and any other options you need.
- Click Create.
If you are generating an access token, on the Settings tab, click Consumer Key and Secret to copy and save the values. You need the consumer key value for the client_id and the consumer secret value for the client_secret.
To use the JWT Bearer authentication flow, after you create your ECA, you must follow these steps.
- Create a custom Tableau Next Consumer permission set.
- In Salesforce Setup, enter Permission Sets in the Quick Find box, and then select Permission Sets.
- Find the Tableau Next Consumer permission set and click Clone.
- Enter a label and API name. For example, set the label to Tableau Next Consumer JWT and the API name to TableauUserJWT.
- Save the customized permission set.
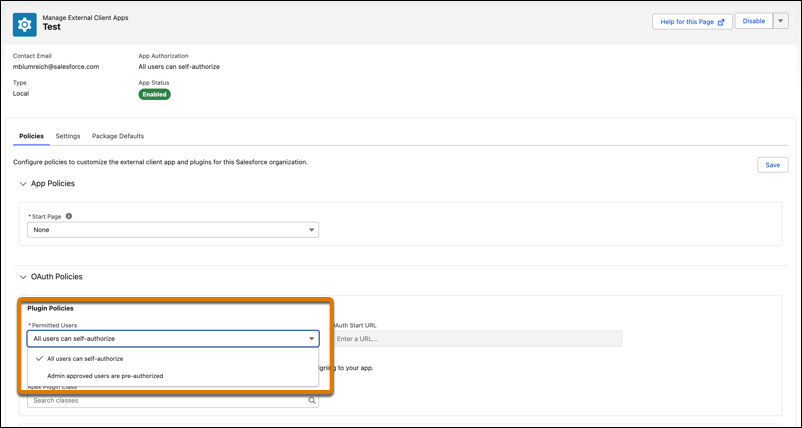
- Update the OAuth Policies for your ECA.
-
In Salesforce Setup, enter External in the Quick Find box, and then select External Client App Manager.
-
To edit your ECA, select it from the list of apps.
-
Click Edit.
-
In the OAuth Policies section, update the Permitted Users value to Admin approved users are pre authorized.
-
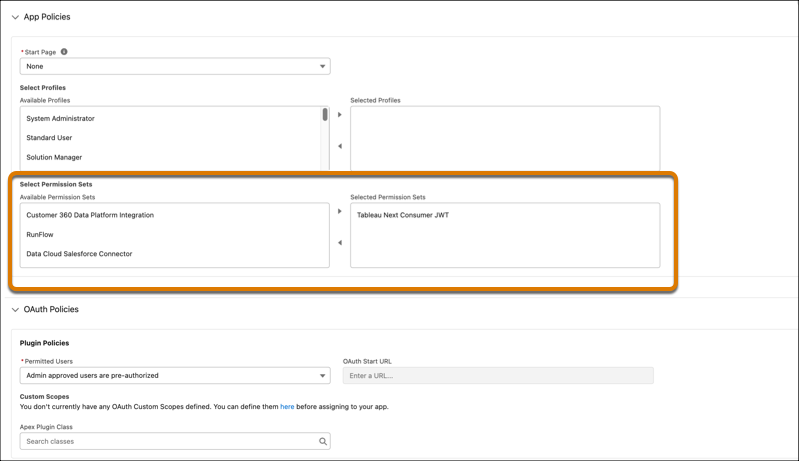
In the App Policies section, add the custom permission set to the Selected Permission Sets list.
-
Save and close
-
For your users that are viewing embedded Tableau Next assets in your web app, assign the custom permission set in place of the standard Tableau Next Consumer permission set. This adds users for pre-authorization. For more information on assigning permission sets to users, see Assign Tableau Next User Permissions.