Create a Notification Flow
After you create a custom notification, you can use it in an autolaunched flow.
- From Setup, in the Quick Find Box, enter
Process Automation, and select Flows. - Create a flow.
- Select Autolaunched Flow, and click Create.
Add resources to the autolaunched flow. For each resource listed in the Record Resources table, navigate to the Manager tab, click New Resource, and fill in the fields accordingly.
| Field | Resource One | Resource Two | Resource Three |
|---|---|---|---|
| Resource Type | Variable | Variable | Variable |
| API Name | OrderSummaryRecord | orderSummaryRecordID | customNotificationRecordId |
| Data Type | Record | Record | Record |
| Object | Order Summary | Order Summary | Custom Notification Type |
| Allow Multiple Values? | No | No | No |
| Availability Outside the Flow | Available for Input | None | None |
| Field | Resource One | Resource Two |
|---|---|---|
| Resource Type | Variable | Variable |
| API Name | customNotificationTypeDevName | RecipientId |
| Data Type | Text | Text |
| Allow Multiple Values? | No | Yes |
| Default Value | Order_Summary_Bell_Notification_TypeNote: Order_Summary_Bell_Notification_Type refers to the name of your custom notification type. | N/A |
On the Element tab, create two Get Records elements using this information.
| Field | Element One | Element Two |
|---|---|---|
| Label | getOrderSummaryRecord | getCustomNotificationTypeRecord |
| API Name | getOrderSummaryRecord | getCustomNotificationTypeRecord |
| Object | Order Summary | Custom Notification Type |
| Conditions |
|
|
| Sort Order | Not Sorted | Not Sorted |
| How Many Records to Store | Only the first record | Only the first record |
| How to Store Record Data | Choose fields and assign variables (advanced) | Choose fields and assign variables (advanced) |
| Where to Store Field Values | Together in a record variable | Together in a record variable |
| Record | orderSummaryRecordID | customNotificationRecordId |
| Select [Object] Fields to Store in Variable |
|
|
-
On the Element tab, drag an Assignment element to the canvas.
-
Fill in the Assignment element form.
-
For Label, enter
assignRecipientId. -
For API Name, enter
assignRecipientId. -
For Variable, select RecipientId.
-
For Operator, select Add.
-
For Value, select orderSummaryRecordID and ownerId. The field value is
{!orderSummaryRecordID.OwnerId}.
-
-
On the Element tab, drag another Action element to canvas.
-
Search all actions, and select Send Custom Notification.
-
Fill in the Action element form.
-
For Label, enter
Send Notifications. -
For API Name, enter
Send_Notifications. -
For Custom Notification Type ID, enter
{!customNotificationRecordId.Id}. -
For Notification Body and Notification Title, enter your message, such as
Your order is confirmed.. -
For Recipient IDs, enter
{!RecipientId}. -
For TargetID, enter
{!orderSummaryRecordID.Id}.
-
-
Connect all your elements, and click Save.
-
Save your flow.
-
For Label, enter
Order Summary Bell Notification Flow. -
For API Name, enter
Order_Summary_Bell_Notification_Flow.
-
-
Click Done, and activate your flow.
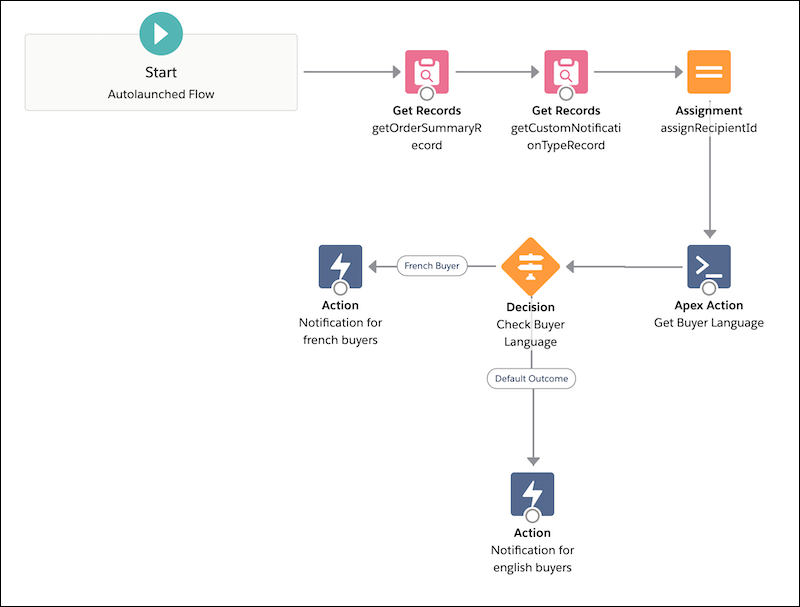
Here’s an example flow with the elements connected.