Headless Identity Implementation Guide
 j
jConfigure Headless Identity Settings in Experience Cloud
| Available in: both Salesforce Classic (not available in all orgs) and Lightning Experience |
| Available in: Enterprise, Unlimited, and Developer Editions |
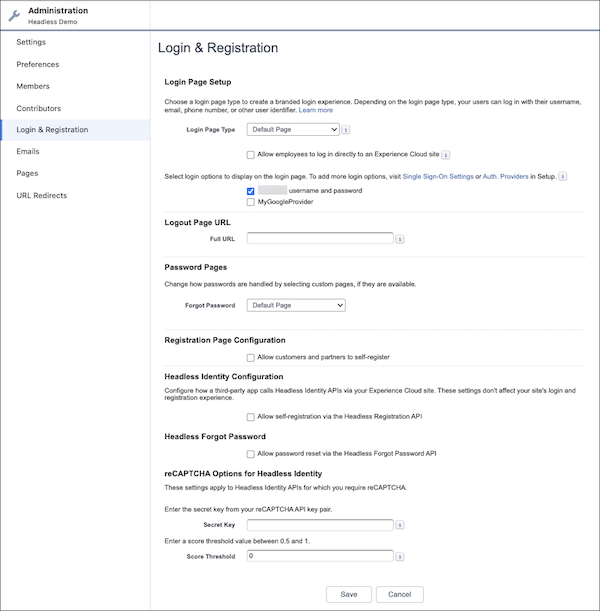
The Login & Registration page is also where you configure identity features for users who interact with your Experience Cloud site directly. Most of the settings on this page, including settings for login, logout, password, and registration pages, affect the identity experiences for your site users.
The settings in the Headless Identity Configuration section are separate and affect how your app calls Headless Identity APIs via your site. Headless Identity Configuration settings don’t affect how users interact with your Experience Cloud site.
In general, only the settings in Headless Identity Configuration are relevant for setting up your implementation. There’s one exception, though. To create a native single sign-on (SSO) experience in your app, you must add the SSO provider to the Experience Cloud login page. During the flow, the browser is briefly redirected to the login page URL so that Salesforce can check to see if the SSO provider is enabled. The browser is then redirected to the provider. The redirection happens so quickly that the user never sees the Experience Cloud login page. The experience feels like headless SSO, even though it technically isn’t.
- Go to the Login & Registration page. From Setup, in the Quick Find box, enter Sites, and then select All Sites. Next to your site name, click Workspaces, select Administration, and then select Login & Registration.
- Add your SSO provider to the Experience Cloud login page. Under Login Page Setup, for login options, enable the Google IDP authentication provider you set up.
-
Enable headless registration.
-
Select Allow self-registration via the Headless Registration
API.
Enabling this setting exposes other settings related to headless registration.
-
Select Require reCAPTCHA to access this API, and leave
Require authentication to access this API deselected.
These settings control whether you need extra information—either a reCAPTCHA token or an access token— in your initial POST request to Headless Registration API. When you configure headless registration, you must require either authentication or reCAPTCHA—you can’t save your settings without at least one of these settings turned on. For this example, which is focused on single-page apps, requiring authentication isn’t recommended. A single-page app submits the registration POST request via the browser, and it can’t keep an access token safe. So requiring reCAPTCHA is the way to go.
- For Default Profile, select the Headless Demo profile you set up. This profile gets assigned to new users automatically.
-
For Registration Handler, click
 , and then select your headless registration
handler class.
, and then select your headless registration
handler class.
-
For Run As, click , and then select your admin user.
This user runs the headless registration handler. They must be able to access the account that contains your end users, and they must be assigned to the Headless Identity Admin role that you created. For this example, you can select yourself as the Run As user to make testing easier. In production, select a user that isn’t tied to a real person. That way, you don’t experience service disruptions if someone leaves the company and their account is disabled.
-
Select Allow self-registration via the Headless Registration
API.
-
Enable headless password reset.
- Select Allow password reset via the Headless Forgot Password API.
-
Select Require reCAPTCHA to access this API, and leave
Require authentication to access this API deselected.
These settings work the same way for headless password reset as they do for headless registration. Similarly, we recommend requiring reCAPTCHA and not authentication for this example.
- For the maximum number of password reset attempts, keep the default of 5 attempts.
-
Configure reCAPTCHA options.
The reCAPTCHA options apply to Headless Registration API and Headless Forgot Password API.
- For Secret Key, enter the secret key from your reCAPTCHA API key pair. You get this information from Google when you set up reCAPTCHA.
-
For Score Threshold, enter 0.7.
The score threshold is the lowest value that you accept for the reCAPTCHA score issued by Google. This score helps you determine whether new registration requests are valid. Scores closer to 0 are more likely to be bots, while scores closer to 1 are more likely to be valid users. The minimum score threshold that Salesforce allows is 0.5.
- Save your settings.