Visualforce Developer Guide
 j
jOrder of Execution Example
Set Up the Example
The page in our example shows the name of an account, Northern Trail Outfitters, the number of its employees, and its industry. The user can edit these account details if the URL query parameter key is set to true. The page also displays the original value of key and its updated values that are set during the initialization of a custom component.
- Create a controller for a custom component named PageValuesController.
1public with sharing class PageValuesController { 2 public Boolean controllerKey {get; set;} 3 4 public Boolean getNewKey() { 5 // return the opposite of controllerKey 6 return !controllerKey; 7 } 8} - Create a custom component named PageValues.
1<apex:component controller="PageValuesController"> 2 <apex:attribute name="originalKey" type="Boolean" 3 description="The original key." assignTo="{!controllerKey}"/> 4 <p> 5 Original Key = {!originalKey}<br/> 6 Controller Key = {!controllerKey}<br/> 7 New Key = {!newKey}<br/> 8 </p> 9</apex:component> - Create a custom controller named AccountInfoController.
1public with sharing class AccountInfoController { 2 3 private final Account account; 4 5 public AccountInfoController() { 6 account = [select id, name, site, NumberOfEmployees, Industry from Account 7 where id = :ApexPages.currentPage().getParameters().get('id')]; 8 } 9 10 public Account getAccount() { 11 return account; 12 } 13 14 public PageReference save() { 15 update account; 16 return null; 17 } 18} - Create a controller extension named AccountInfoControllerExtension.
1public with sharing class AccountInfoControllerExtension { 2 private final Account acct; 3 Integer empAdd; 4 5 public AccountInfoControllerExtension(AccountInfoController controller) { 6 this.acct = (Account)controller.getAccount(); 7 } 8 9 public String getGreeting() { 10 return acct.name + ' Current Information'; 11 } 12 13 public void resetNumberOfEmployees() { 14 acct.NumberOfEmployees = 1; 15 update acct; 16 } 17} - Create a page named AccountInfo.
1<apex:page controller="AccountInfoController" tabStyle="Account"
2 extensions="AccountInfoControllerExtension" action="{!resetNumberOfEmployees}">
3    <apex:messages />
4    <apex:pageBlock title="{!greeting}">
5        <apex:outputLabel value="{!$ObjectType.account.fields.Name.label}: "
6            for="acctName"/>
7        <apex:outputField value="{!account.name}" id="acctName"/>
8        <br/>
9        <apex:outputLabel value="{!$ObjectType.account.fields.NumberOfEmployees.label}: "
10            for="emps"/>
11        <apex:outputField value="{!account.NumberOfEmployees}" id="emps"/>
12        <br/>
13        <apex:outputLabel value="{!$ObjectType.account.fields.Industry.label}: "
14            for="industry"/>
15        <apex:outputField value="{!account.Industry}" id="industry"/>
16        <br/>
17    </apex:pageBlock>
18    <apex:pageBlock title="Page Values">
19        <c:PageValues originalKey="{!IF($CurrentPage.parameters.key = 'true', true, false)}"/>
20    </apex:pageBlock>
21    <apex:form rendered="{!$CurrentPage.parameters.key = 'true'}">
22        <apex:pageBlock title="Update the Account" id="updateBlock">
23            <apex:pageBlockSection columns="1">
24                <apex:inputField id="aName" value="{!account.name}"/>
25                <apex:inputField value="{!account.NumberOfEmployees}"/>
26                <apex:pageBlockSectionItem >
27                    <apex:outputLabel value="{!$ObjectType.account.fields.Industry.label}"
28                        for="acctIndustry"/>
29                    <apex:actionRegion >
30                        <apex:inputField value="{!account.Industry}" id="acctIndustry">
31                            <apex:actionSupport event="onchange" rerender="updateBlock"/>
32                        </apex:inputField>
33                    </apex:actionRegion>
34                </apex:pageBlockSectionItem>
35            </apex:pageBlockSection>
36            <apex:pageBlockButtons location="bottom">
37                <apex:commandButton action="{!save}" value="Save"/>
38            </apex:pageBlockButtons>
39        </apex:pageBlock>
40        </apex:form>
41</apex:page>
Follow the Order of Execution for a Get Request
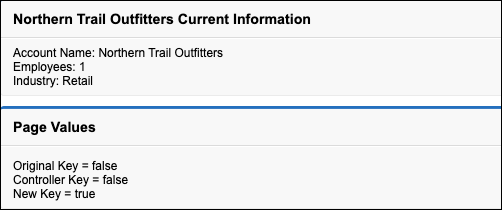
Visit the AccountInfo page using the URL https://MyDomain_login_URL/apex/AccountInfo?id=recordId&key=false, where MyDomain_login_URL is the name of your instance and recordID is the ID of an account record in your organization. Notice that the URL query parameter key is set to false. You requested the page directly by entering a URL, so this page is the result of a get request, not a postback request.
A page appears:
These steps are executed during the get request.
- The constructor methods of the custom controller AccountInfoController and the controller extension AccountInfoControllerExtension execute. The controller has a variable called account set to the result of a SOQL query for an account. The query uses the account id passed in as the URL query parameter. The extension has a variable called acct that’s created by calling the getAccount method on the controller.
- The custom component PageValues initializes.
This custom component has its own associated controller. Because the controller has no explicit constructor, the controller object is created using an implicit, no-argument, public constructor.
As part of creating the custom component, the originalKey attribute on the custom component is set. You set the key parameter in the URL to false, so the originalKey attribute evaluates to false.
- After the custom component initializes, the assignTo attribute on
that custom component executes. An assignTo attribute is a
setter method that assigns the value of this attribute to a
class variable in the associated custom component
controller.
PageValues has an assignTo method set to {!controllerKey}. In PageValuesController, the value of controllerKey is set to the value of originalKey. The getNewKey method sets newKey to the opposite of the controllerKey value. The controllerKey attribute is set to false, so newKey is set to true.
- The <apex:page>
component has an action attribute that calls the resetEmp method on the
controller extension. That method sets the
NumberofEmployees field on the
account object to 1.
There are also several expressions that evaluate on the page. The order of these evaluations is indeterminate, which means that the specific order can differ each time that the page loads. Let's focus on two expressions:
-
<apex:pageBlock
title="{!greeting}">
The title attribute on <apex:pageblock> calls the getGreeting method in the controller extension. The page displays “Northern Trail Outfitters Current Information.”
-
<apex:form
rendered="{!$CurrentPage.parameters.key =
'false'}">
The rendered attribute on <apex:form> is set based on the value of the key parameter. You set key to false when calling the page, so the form doesn’t render.
-
<apex:pageBlock
title="{!greeting}">
- Because the <apex:form> component doesn’t render, a view state isn’t maintained.
- The HTML is sent to the browser, which renders the HTML.
Follow the Order of Execution for a Postback Request
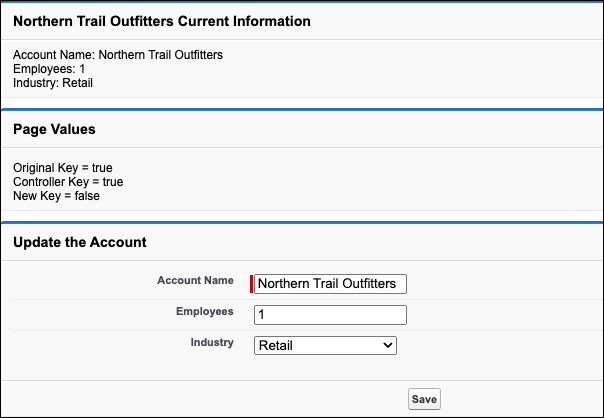
To understand how a postback request executes, visit the AccountInfo page using the URL https://MyDomain_login_URL/apex/AccountInfo?id=recordId&key=true. MyDomain_login_URL is the name of your instance, and recordID is the ID of an account record. Notice that the URL query parameter key is set to true.
A page with a form appears:
In the page’s Update the Account section, change the Account Name to NTO, the Employees to 42, and the Industry to Other. Then click Save to initiate a postback request.
These steps are executed during the postback request.
- The view state is decoded. The view state contains all of the information required to update the values on the page.
- All expressions are evaluated, and methods on controllers
and controller extensions execute. The order of these
expressions is indeterminate. Here’s how two of these
expressions evaluate:
-
<apex:pageBlock
title="{!greeting}">
The title attribute on <apex:pageblock> calls the getGreeting method in the controller extension. Because you changed the account name, the value of greeting changes to “NTO Current Information.”
-
<apex:form
rendered="{!$CurrentPage.parameters.key =
'true'}">
The rendered attribute on <apex:form> is set based on the value of the key parameter. You didn’t change the key parameter, so the value in the view state is used. Because the value was true when the view state was created, the form renders.
-
<apex:pageBlock
title="{!greeting}">
- The save action that
triggered the postback request evaluates. The save action is this method
on the
controller:
1public PageReference save() {
2    update account;
3    return null;
4}
If there aren’t any errors, the method updates the record with the new data. Because the action that triggered the postback didn’t include a page redirect, the view state updates. The resulting HTML is sent to the browser, and the updated account information appears.
The save method can fail if the user doesn’t have permission to update the record or if there are validation rules that the change triggers. In this case, the page displays with error messages that describe the errors. The values that the user entered remain in the input fields so that the user can edit them and then resubmit the form.
- After the postback request executes successfully, the
updated page appears:
