In addition to overriding standard buttons and links, you can also create custom list buttons that link to pages that use a standard list controller. These list buttons can be used on a list page, search results, and any related list for the object and allow you to take actions on a group of selected records. To indicate the set of records that have been selected, use the {!selected} expression.
For example, to add a custom button to a related list for opportunities that allows you to edit and save the opportunity stage and close date on selected records:
-
Create the following Apex class:
1public class tenPageSizeExt {
2
3    public tenPageSizeExt(ApexPages.StandardSetController controller) {
4        controller.setPageSize(10);
5    }
6}
-
Create the following page and call it oppEditStageAndCloseDate:
1<apex:page standardController="Opportunity" recordSetVar="opportunities" tabStyle="Opportunity" extensions="tenPageSizeExt">
2    <apex:form >
3        <apex:pageBlock  title="Edit Stage and Close Date" mode="edit">
4            <apex:pageMessages />
5            <apex:pageBlockButtons location="top">
6                <apex:commandButton value="Save" action="{!save}"/>
7                <apex:commandButton value="Cancel" action="{!cancel}"/>
8            </apex:pageBlockButtons>
9            <apex:pageBlockTable value="{!selected}" var="opp">
10                <apex:column value="{!opp.name}"/>
11                <apex:column headerValue="Stage">
12                    <apex:inputField value="{!opp.stageName}"/>
13                </apex:column>
14                <apex:column headerValue="Close Date">
15                    <apex:inputField value="{!opp.closeDate}"/>
16                </apex:column>
17            </apex:pageBlockTable>
18        </apex:pageBlock>
19    </apex:form>
20    </apex:page>
-
Make the page available to all users.
- From Setup, enter
Visualforce Pages in the Quick Find box, then select Visualforce Pages.
- Click Security for the oppEditStageAndCloseDate page.
- Add the appropriate profiles to the
Enabled Profiles list.
- Click Save.
-
Create a custom button on opportunities.
- From the object management settings for opportunities, go to Buttons, Links, and Actions.
- Click the button for creating a new button or link.
- Set the
Label to Edit Stage & Date.
- Set the
Display Type to List Button.
- Set the Content Source to
Visualforce Page.
- From the Content drop-down list, select
oppEditStageAndCloseDate.
- Click Save.
- A warning will display notifying you that the button will not be displayed until you have updated page layouts. Click OK.
-
Add the custom button to an account page layout.
- From the object management settings for accounts, go to Page Layouts.
- Click Edit for the appropriate page layout.
- In the Related List Section, click on Opportunities, then click
 to edit the properties.
- In the Custom Buttons section, select Edit Stage & Date in the Available Buttons list and add it to the Selected Buttons list.
- Click OK.
- Click Save.
Now, when you visit the account page, there is a new button in the opportunities related list.
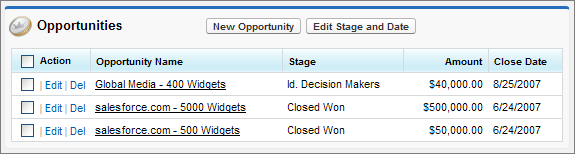
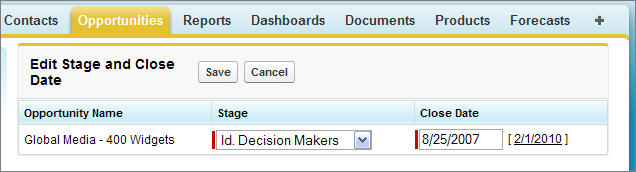
When you select an opportunity and click Edit Stage & Date, you are taken to your custom edit page.
See Also


 j
j