Create Storefront Next in Business Manager with a GitHub Repository
Create a storefront and its dependent API and Managed Runtime (MRT) resources in Business Manager by connecting to GitHub. Storefront setup creates a GitHub repository to store the generated storefront code.
- A developer B2C Commerce instance or on-demand sandbox (ODS) instance. See Create On-Demand Sandboxes for B2C Commerce in Salesforce Help.
- Managed Runtime User or Managed Runtime Admin role in Account Manager.
- Business Administrator role in Account Manager or a role for the Business Manager Module and Organization context with read-write access to storefronts. See Create a Role in B2C Commerce in Salesforce Help.
- A GitHub account with the owner role in the GitHub organization. See the GitHub documentation for organization roles in Permissions of predefined roles, and Permission levels for a personal account repository for personal accounts.
- A B2C Commerce site associated with a catalog, price book, and an inventory. See Create and Manage Sites for Development and Merchandising Your Site in B2C Commerce in Salesforce Help.
- Storefront setup supports only one storefront per site. A site can’t be associated with more than one storefront.
- If storefront setup fails, you must delete and recreate the storefront.
-
In Business Manager, click App Launcher
 and then select Administration > Sites > Storefronts > New Storefront.
 -
Select the template that’s suitable for your storefront’s merchandise. The built-in templates provide the layout, theme, and style that are customized for the products to sell, and product attributes specific to an industry. To check the layout of a template on a demo site, click View Demo. To select a template to build your storefront with, click Use Template.
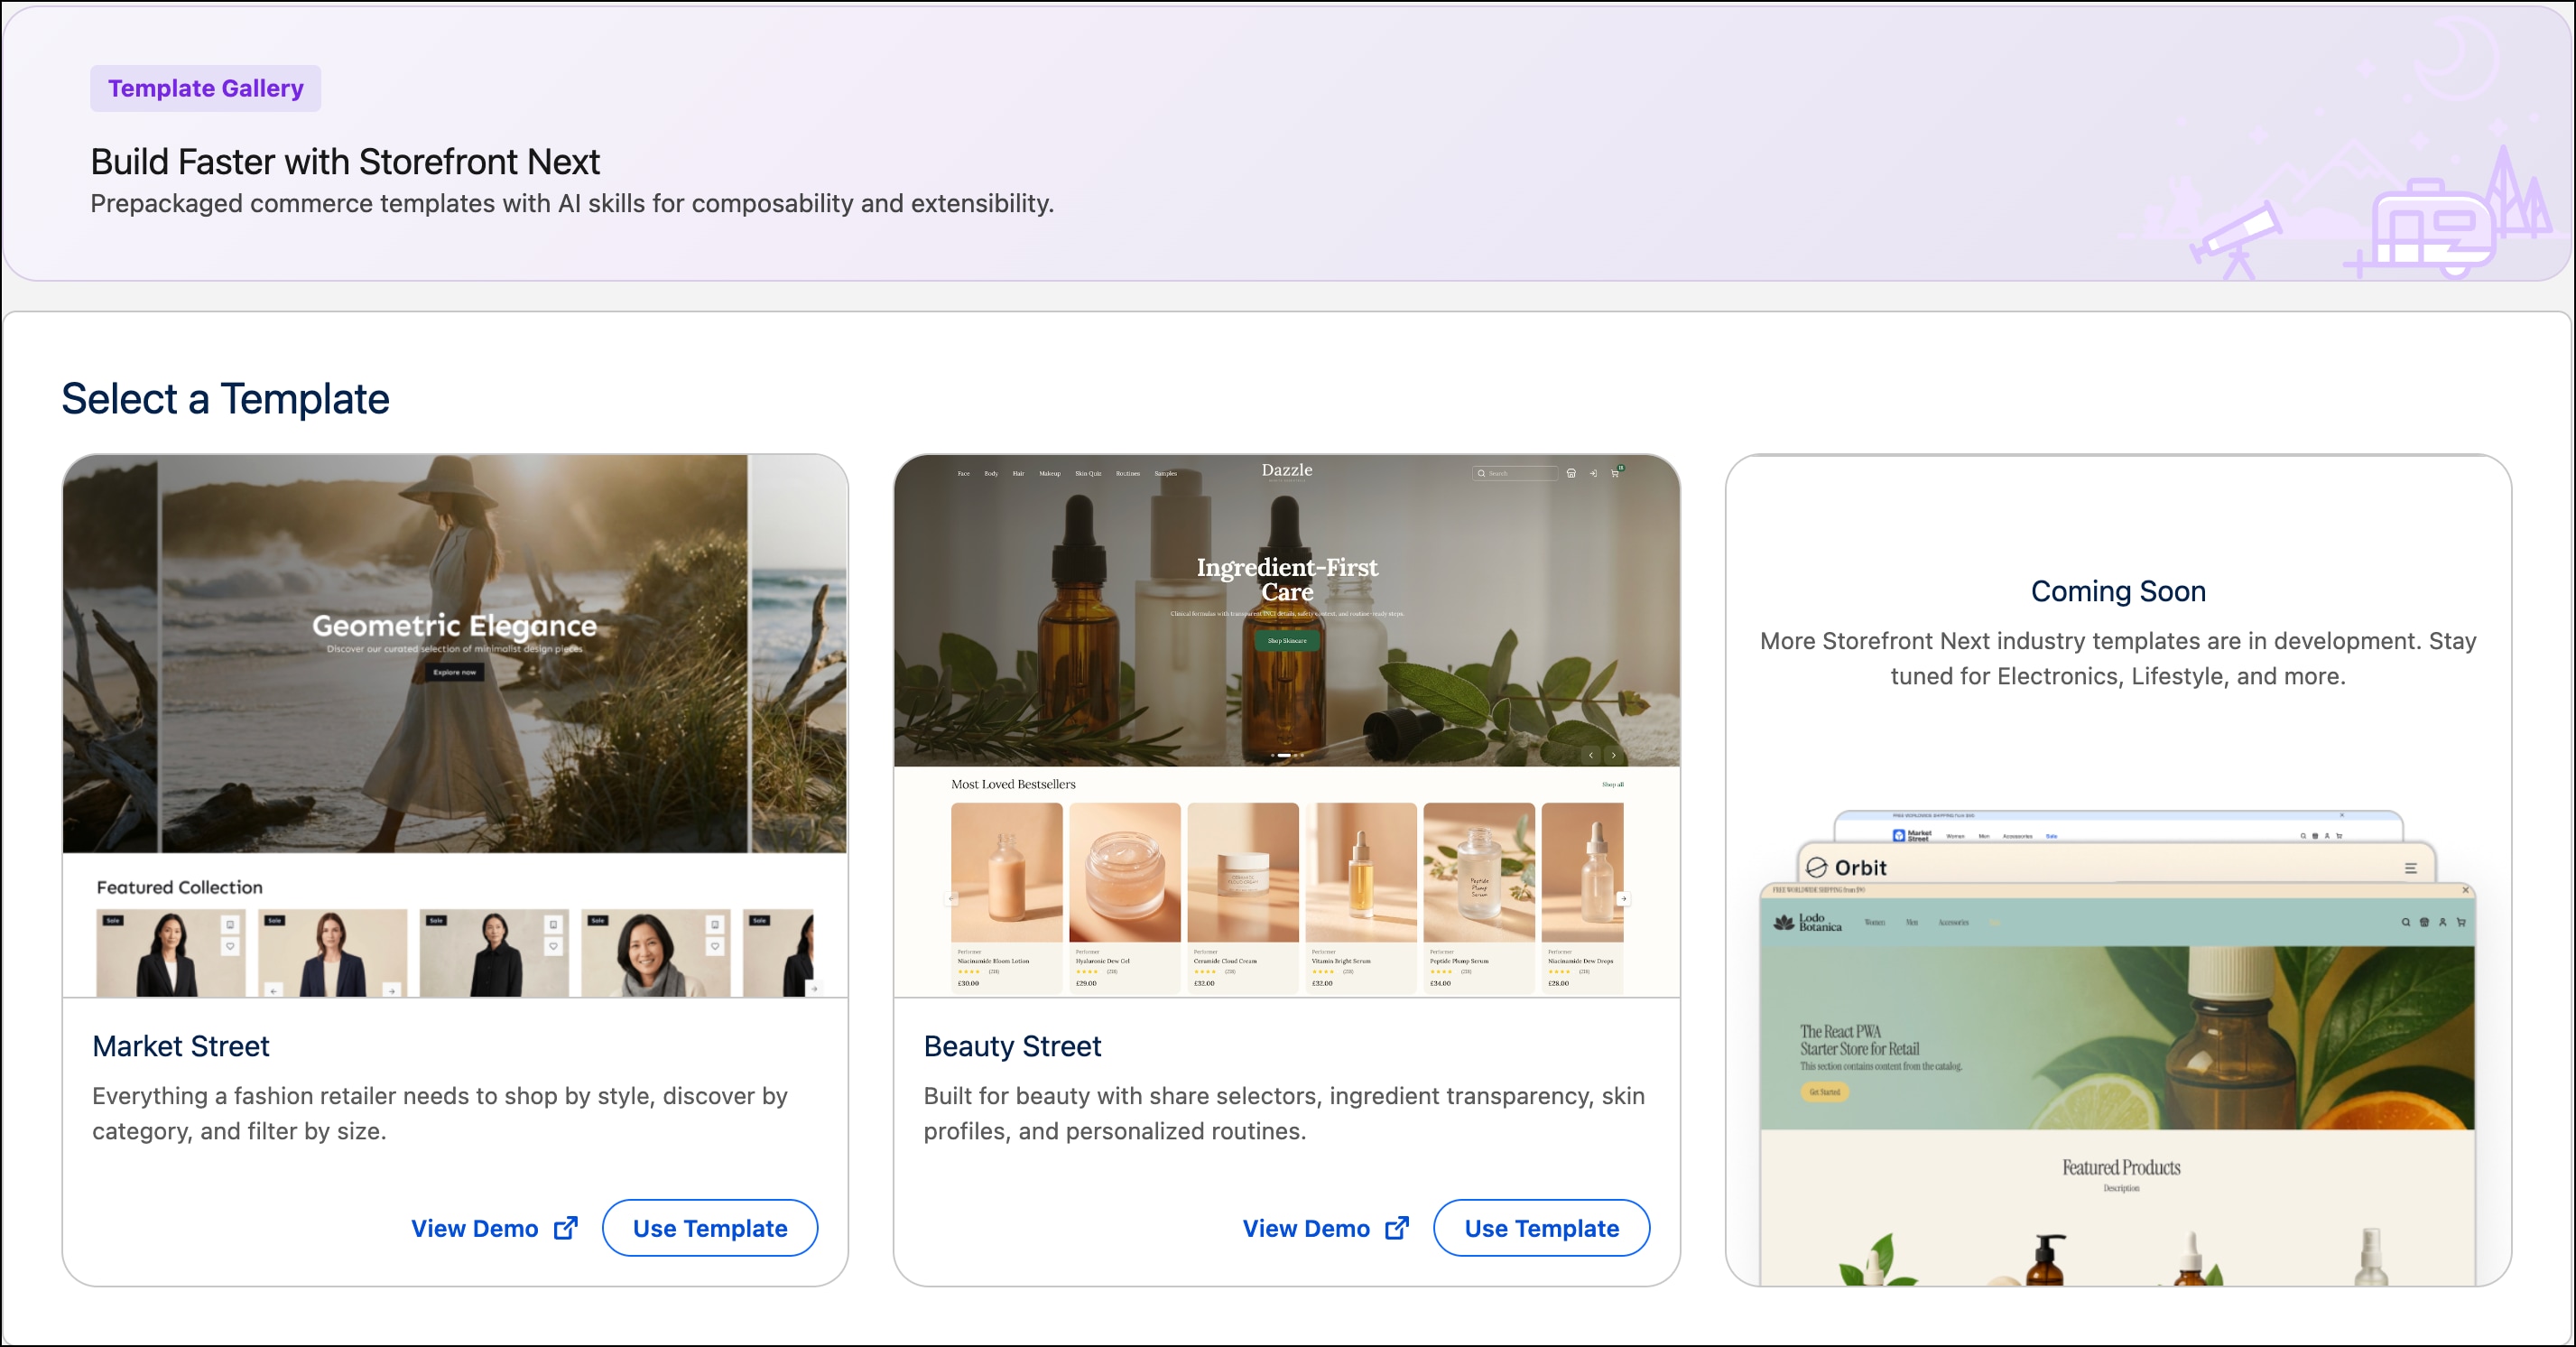
a. Select the Market Street template for personal and household goods, including clothing, shoes, electronics, and so on. See the Market Street demo site.
b. Select the Beauty Street template for beauty and cosmetic products. See the Beauty Street demo site.
-
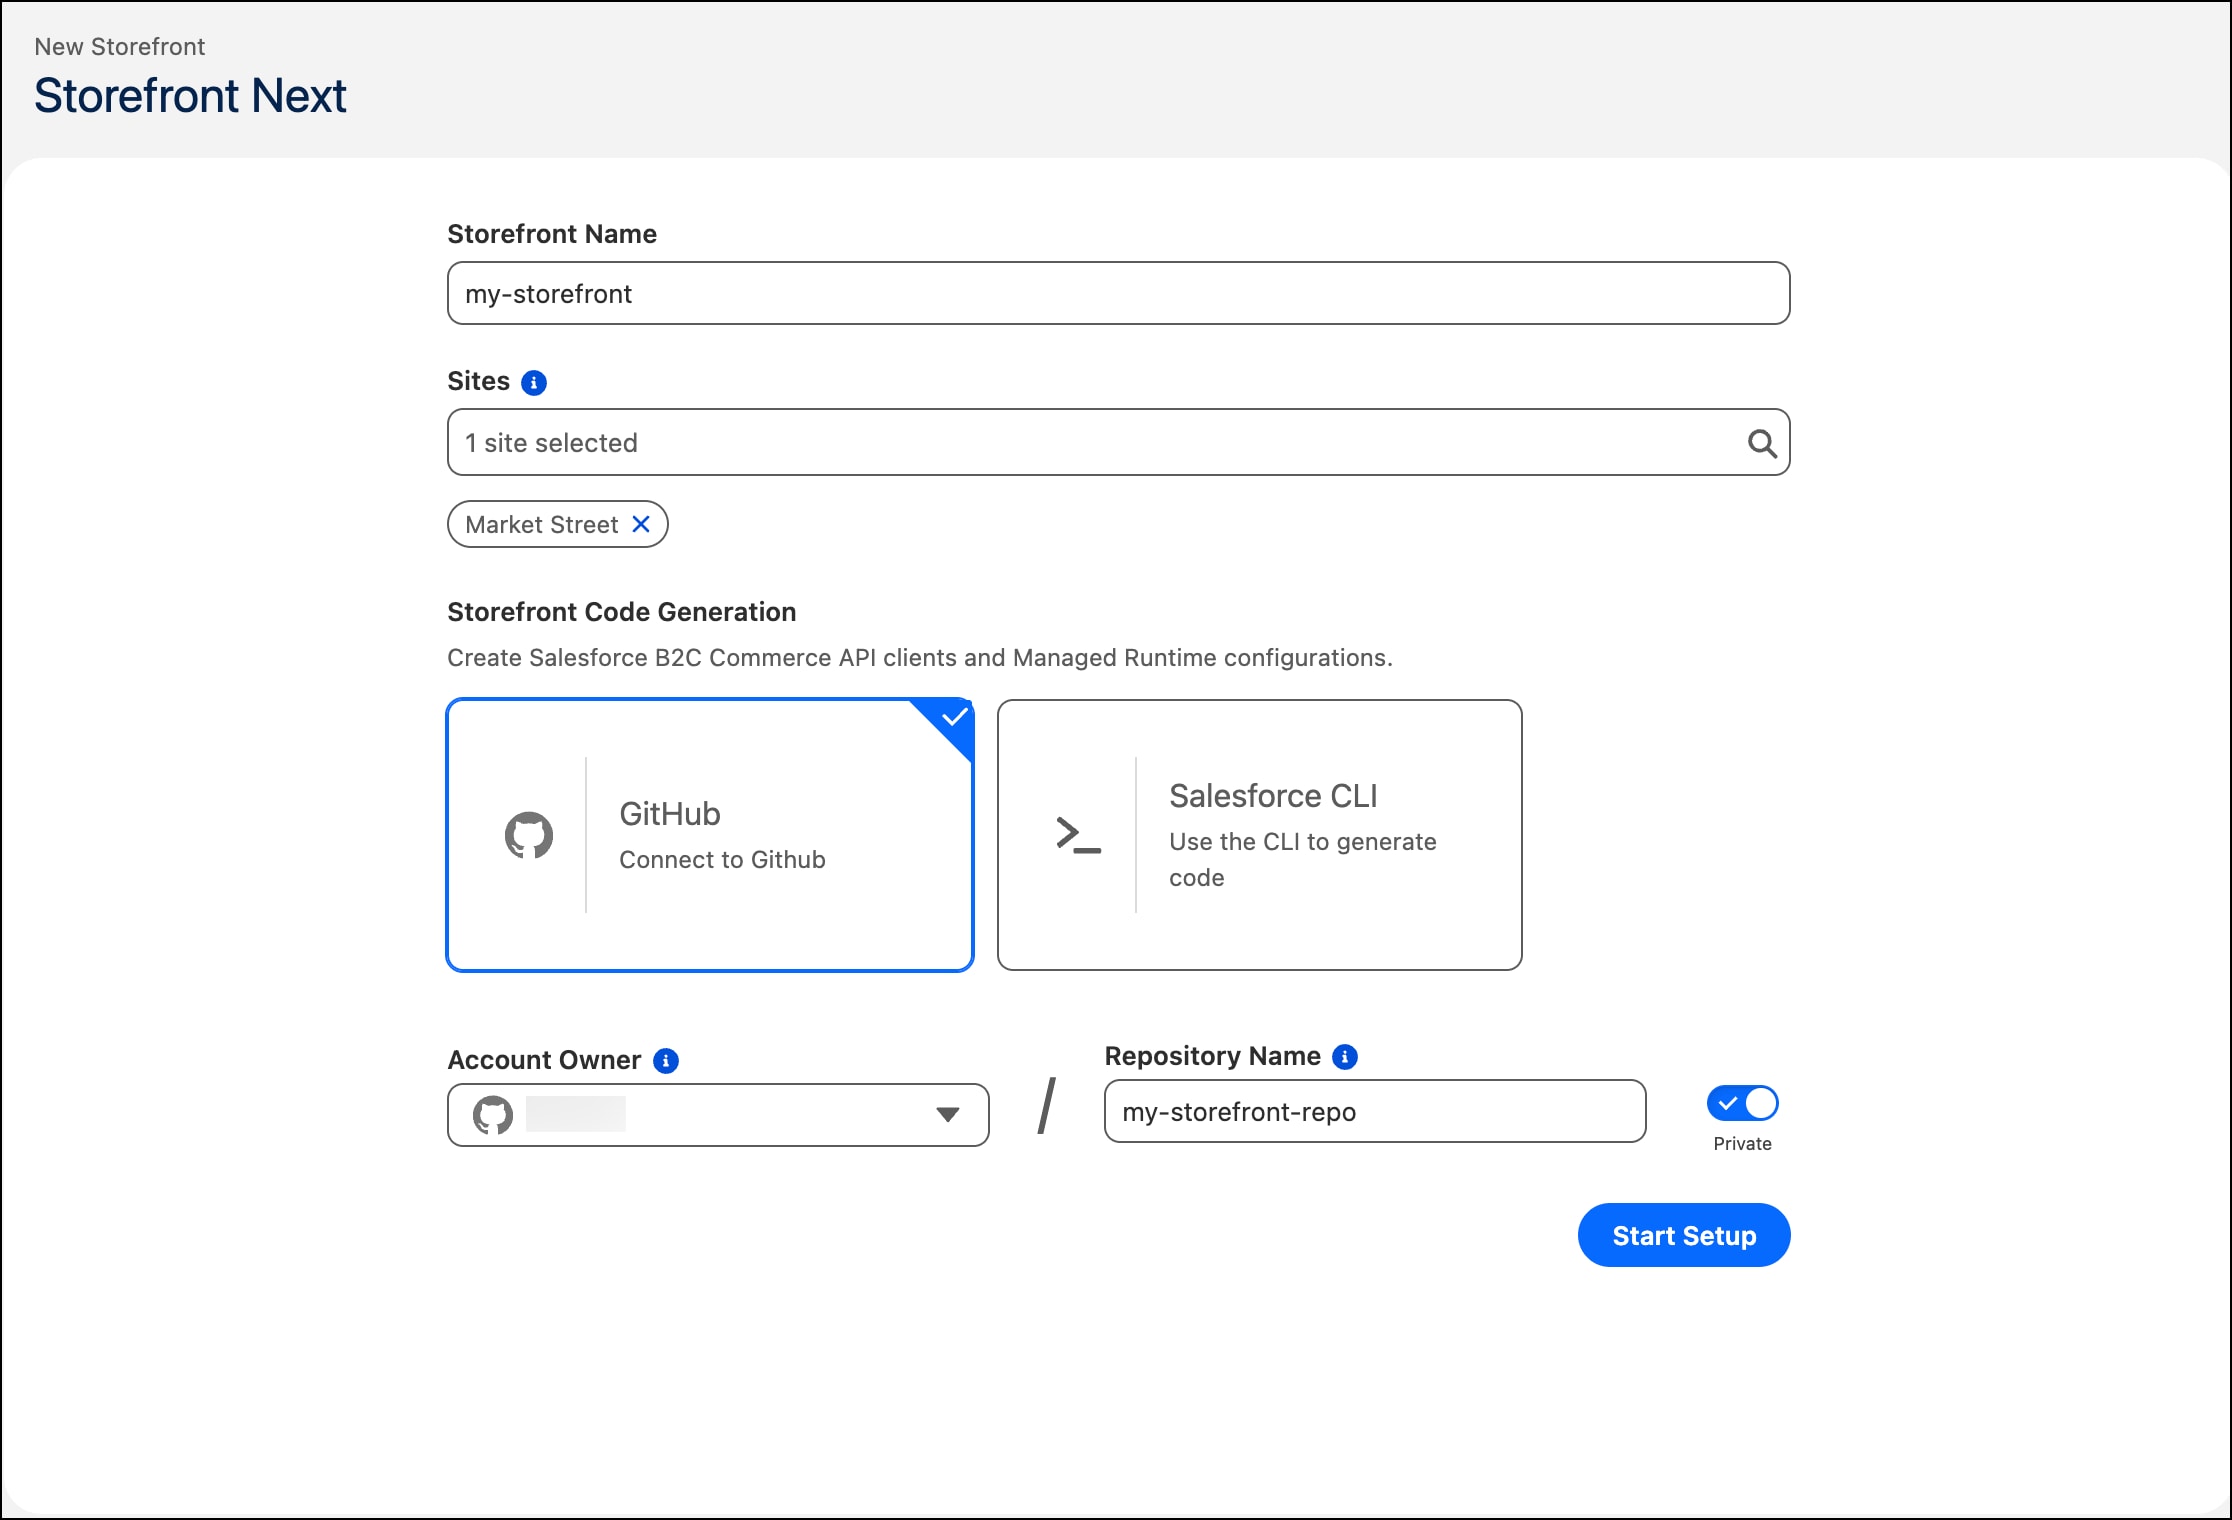
Enter the storefront name. For example,
my-storefront. -
Select a site. You can select one or more sites for your storefront. For this task, select one site.
You can assign a site to one storefront only. You can’t reuse it for another storefront.
-
Select GitHub to create a storefront in your GitHub repository and store the generated storefront code.
-
Click Add GitHub Account, and then from the B2C Commerce GitHub integration, select a GitHub account to use for the repository.
Make sure that your GitHub account has the owner role for the GitHub organization. See Prerequisites.
-
Choose where you want to create the repository. Select a GitHub organization to share the repository with your team, or select a personal account for your own use. Make sure that you have owner access to the GitHub organization that you select.
-
Grant the GitHub integration app access to all your repositories or specific repositories that you select from the list.
-
If you haven’t installed the integration app earlier, click Install. If you installed the integration app earlier, click Save.
-
Authenticate your GitHub account. After you authenticate your GitHub account, you return to the storefront setup page.
-
Enter a name for the GitHub repository that setup creates.
-
To make the repository public, turn off the toggle next to the repository name. The new repository is private by default.
-
Click Start Setup.
-
After setup completes, in the Source Code section, click Download .env to download the
env.txtenvironment file. It contains your storefront’s configuration, Business Manager settings, and your Account Manager and Shopper Login and API Access Service (SLAS) credentials.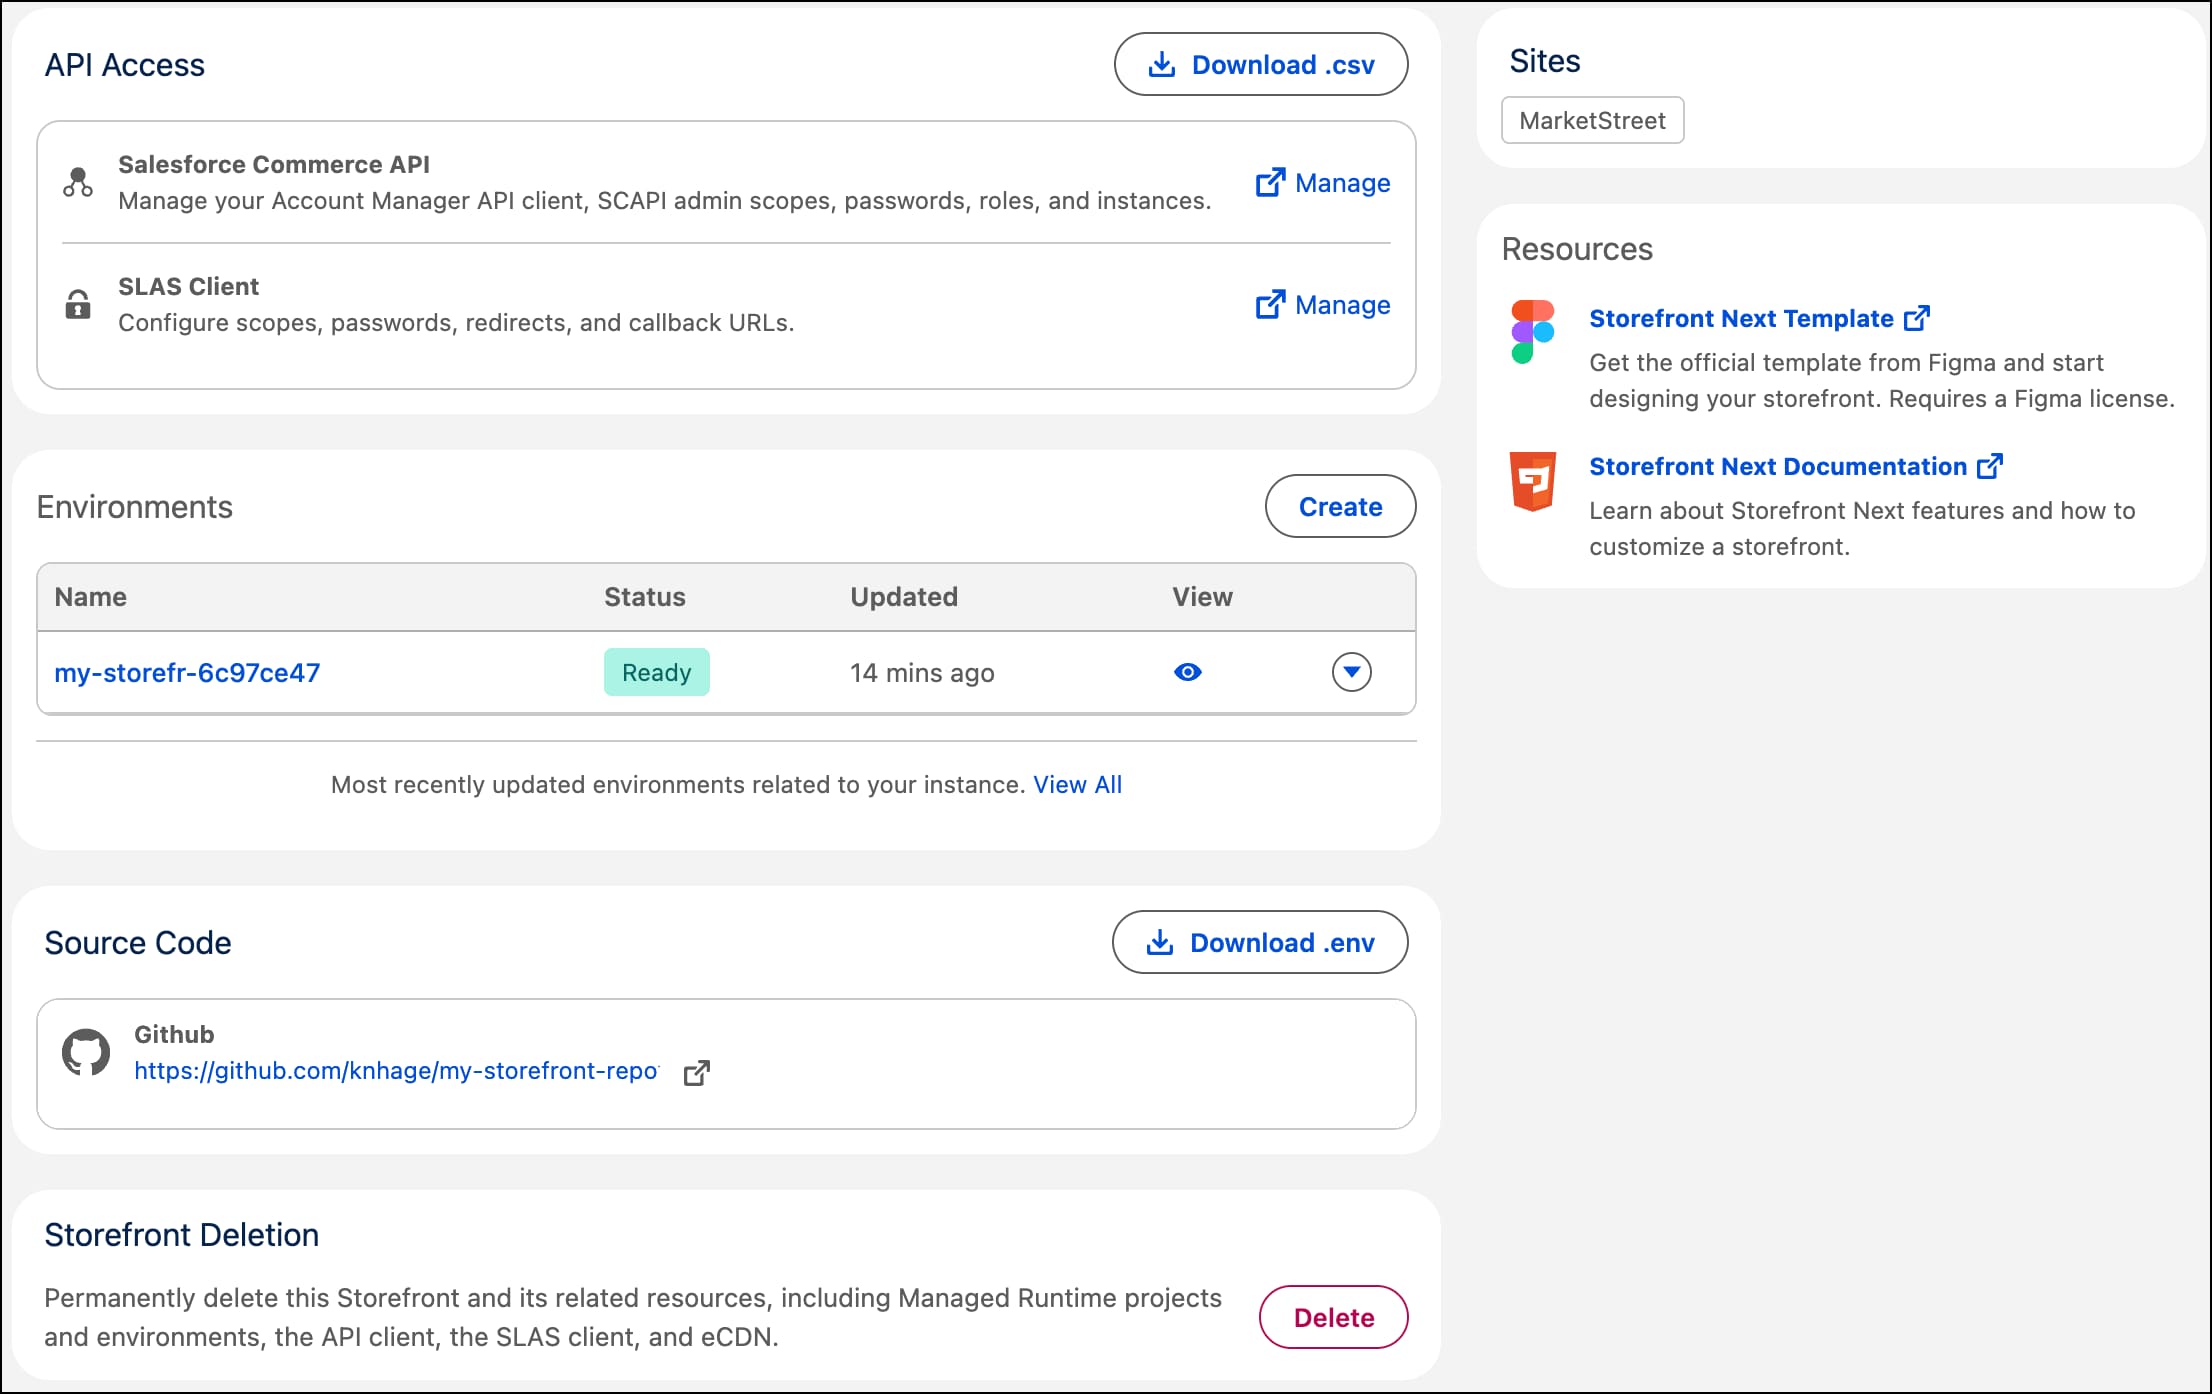
For your security, the client secrets are available for download only once and are deleted on subsequent downloads. You use the Account Manager and SLAS client credentials to run the storefront locally. When you run the storefront on MRT, MRT uses the autocreated environment variables.
-
To view the storefront on MRT, click the view icon next to the environment.

The new environment links to deployments and environment variables on MRT, and shows the eCDN routing rules for the default domain. Setup created an MRT project and sent an initial deployment of the storefront.
-
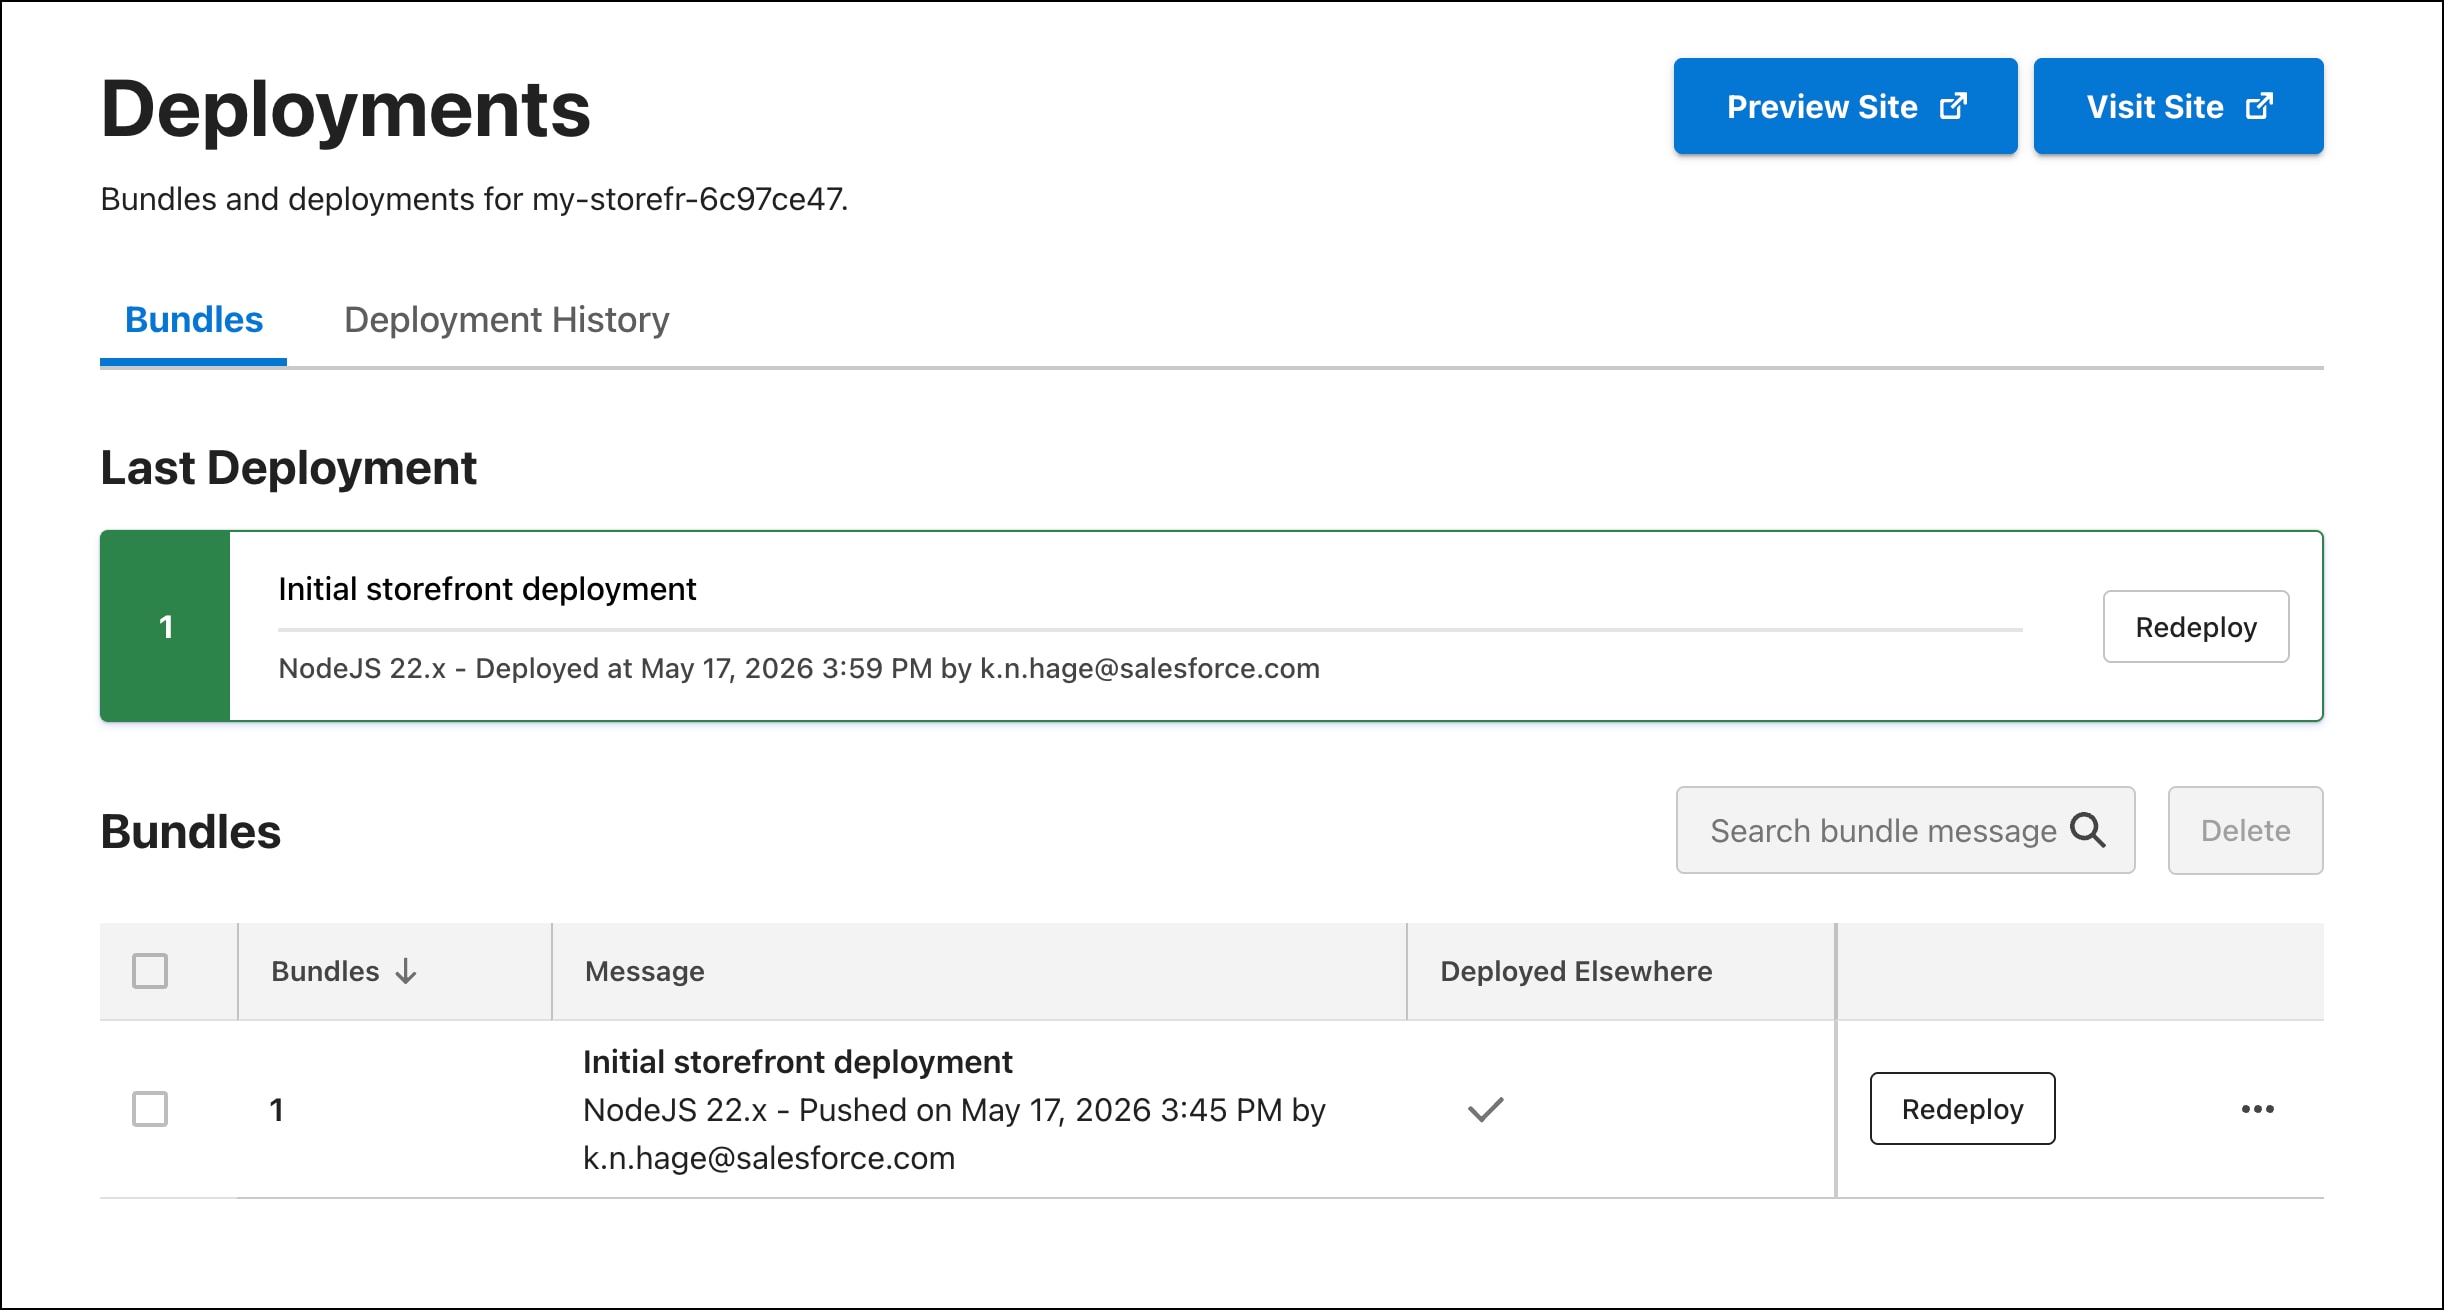
To view the deployment on MRT, from the storefront page in Business Manager, click Manage in the Deployments section. Take note of the MRT project name and environment name because you use them later.
-
To check out the GitHub repository that contains the generated storefront code, on your storefront page, click GitHub Repository.
-
To customize the storefront locally, clone the GitHub repository to your local system, configure it, and build it.
a. To run the storefront locally, create an
.envfile from the downloaded file.These environment variable configuration steps in the
.envfile are required only for running your storefront on your local system. The deployed storefront on Managed Runtime doesn’t need the local environment settings. It uses the environment variables in Managed Runtime instead, which the storefront setup process created for you in Runtime Admin.b. Open the storefront project folder in an IDE. In your project root directory, create a file with the name
.env.c. Replace the contents of
{project-folder}/.envwith the contents of the downloadedenv.txtfile, which contains values specific to the new storefront and the B2C Commerce instance.The MRT project has a name and an ID, which are different. The environment file contains the MRT project ID.
d. Make sure that your site’s search indexes are up-to-date. For more information, see Generate Search Indexes in Salesforce Help.
e. In a terminal window, go to the storefront folder.
f. Install Storefront Next project dependencies that are specified in
package.json.g. Build the storefront.
h. Run the development server locally.
i. Open the development server URL shown in the output to view the storefront in the browser. For example, the URL with the default port is
http://localhost:5173.