Create a Promotion Subflow for an Existing Checkout Flow
Checkout flows created before Winter ’22 didn’t support promotions. To add promotion capability to a flow created before Winter ’22, create a subflow.
| Required Editions |
|---|
| Available in: Enterprise, Unlimited, and Developer Editions |
| Required Editions |
|---|
| Available in: B2B Commerce |
Your flow must be based on the legacy checkout flow template.
-
From Setup, in the Quick Find box, enter
Flows, and then select Flows. -
Click New Flow.
-
Click All + Templates.
-
Click Checkout Flow, select Checkout Flow, and then click Next.
-
Click Freeform.
-
Drag the Action element onto the canvas.
-
In the New Action screen, locate Promotions, and select Calculate Cart Promotions.
-
Define the action.
-
For the label, enter
Calculate Cart Promotions. -
For Cart Id, select + New Resource.
-
For Resource Type, select Variable.
-
For API Name, enter
cartId. -
For Data Type, select Text.
-
Select Available for input.
-
On the New Resource screen, click Done.
-
On the New Action screen, click Done.
-
-
Drag another Action element onto the canvas.
-
In the New Action screen, search for "Session" and select Update Checkout Session Action.
-
Define the action.
-
Enter
Update Checkout Sessionas the label. -
In the Checkout Session Id field, select + New Resource.
-
Select Variable as the Resource Type.
-
Enter
checkoutSessionIdas the API Name. -
Select Text as the Data Type.
-
Select Available for input.
-
Click Done in the New Resource screen.
-
In the Next State field, select + New Resource.
-
Select Variable as the Resource Type.
-
Enter
nextStateas the API Name. -
Select Text as the Data Type.
-
Select Available for input.
-
Click Done in the New Resource screen.
-
Select Include for the Expected Current State field.
-
In the Expected Current State field, select + New Resource.
-
Select Variable as the Resource Type.
-
Enter
currentStateas the API Name. -
Select Text as the Data Type.
-
Select Available for input.
-
Click Done in the New Resource screen.
-
Click Done in the New Action screen.
-
-
Drag the Subflow element onto the canvas.
-
In the New Subflow screen, search for “Error” and select Subflow - Error.
-
Configure the subflow.
-
Enter
Show Erroras the Label. -
Select Include for the cartId field.
-
Select the cartId variable for the cartId field.
-
Select Include for the ErrorMessage field.
-
Select the Flow.FaultMessage variable for the ErrorMessage field.
-
Click Done in the New Subflow screen.
-
-
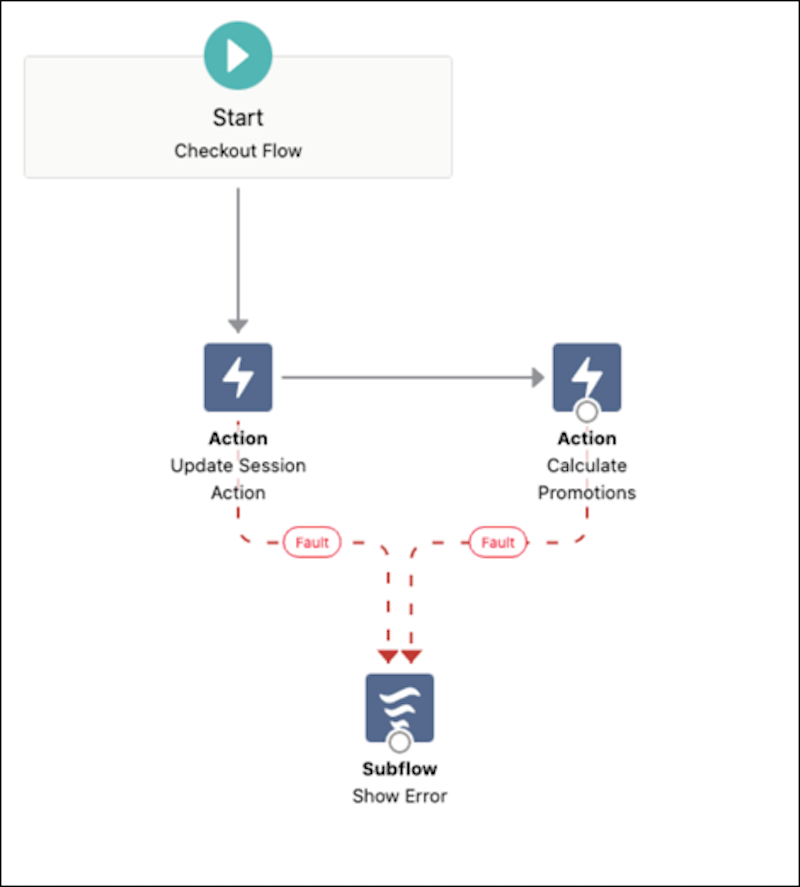
Drag a connector line from the Start node to the Update Checkout Session action.
-
Drag a connector line from the Update Checkout Session to the Calculate Cart Promotions action.
-
Drag a connector line from the Update Checkout Session action to the Show Error subflow.
-
Drag two connector lines from the Calculate Cart Promotions action to the Show Error subflow, and delete the solid line.
The first connector line you drag is solid, and the second is a dashed fault line. Delete the solid line.
Your subflow looks like this.

-
Click Save.
-
On the Save the flow screen, enter a label (for example,
Calculate Promotions) and click Save. -
Click Activate.
You can now add the subflow to your primary checkout flow.