Create a Flow for Localized Notifications
Create a flow that uses your Apex action to localize notifications.
This task creates a flow for bell notifications, but you can create a similar flow for email notifications. See App, Push, and Bell Order Confirmations.
-
From Setup, in the Quick Find Box, enter
Process Automation, and select Flows. -
Create a flow.
-
Select Autolaunched Flow, and click Create.
-
On the Manager tab, click New Resource.
-
Fill in the New Resource form.
-
For Resource Type, select Variable.
-
For API Name, enter
UserLanguage. -
For Data Type, select Record.
-
For Object, enter
User.
-
-
On the Element tab, drag an Action element to the canvas.
-
Fill in the New Action form.
-
For Filter By, select Type.
-
Click Apex Action.
-
Click Search Apex Actions, and select GetBuyerUserLanguageAction.
-
For Label, enter
Get Buyer Language. -
For API Name, enter
Get_Buyer_Language. -
Under Set Input Values, include orderSummaryIds.
-
Select Enter value of search resources, and enter
{!OrderSummaryRecord.Id}. -
Select Manually assign variables (advanced).
-
Click Search variables, and enter
{!UserLanguage}. -
Click Done.
-
-
On the Element tab, drag a Decision element to the canvas.
-
Fill in the New Decision form.
-
For Label, enter
Check Buyer Language. -
For API Name, enter
Check_Buyer_Language. -
Fill in the Outcome Detail.
- For Label, enter
French Buyer. - For Outcome API Name, enter
French_Buyer - For When to Execute Outcome, select All Conditions are Met.
- For Resource, enter
{!UserLanguage.LanguageLocaleKey}, which uses the output of the Apex class created in Localize a Notification. - For Operator, select Equals.
- For Value, enter
fr. - Click Done.
- For Label, enter
-
-
On the Element tab, drag an Action element to the canvas.
-
Fill in the Action element form.
-
For Search All Actions, select Send Custom Notifications.
-
For Label, enter
Notifications for French Buyers. -
For API Name, enter
Notifications_for_French_Buyers. -
For Custom Notification Type ID, enter
{!customNotificationRecordId.Id}. -
For Notification Body and Notification Title, enter
Votre commande a été confirmée. You can also customize this message. -
For Recipient IDs, enter {!RecipientId}.
-
For TargetID, enter
{!orderSummaryRecordID.Id}. -
Click Done.
-
-
On the Element tab, drag another Action element to the canvas.
-
Fill in the Action element form.
-
For Search All Actions, select Send Custom Notifications.
-
For Label, enter
Notifications for English Buyers. -
For API Name, enter
Notifications_for_English_Buyers. -
For Custom Notification Type ID, enter
{!customNotificationRecordId.Id}. -
For Notification Body and Notification Title, enter
Your Order is Confirmed. You can also customize this message. -
For Recipient IDs, enter {!RecipientId}.
-
For TargetID, enter
{!orderSummaryRecordID.Id}. -
Click Done.
-
-
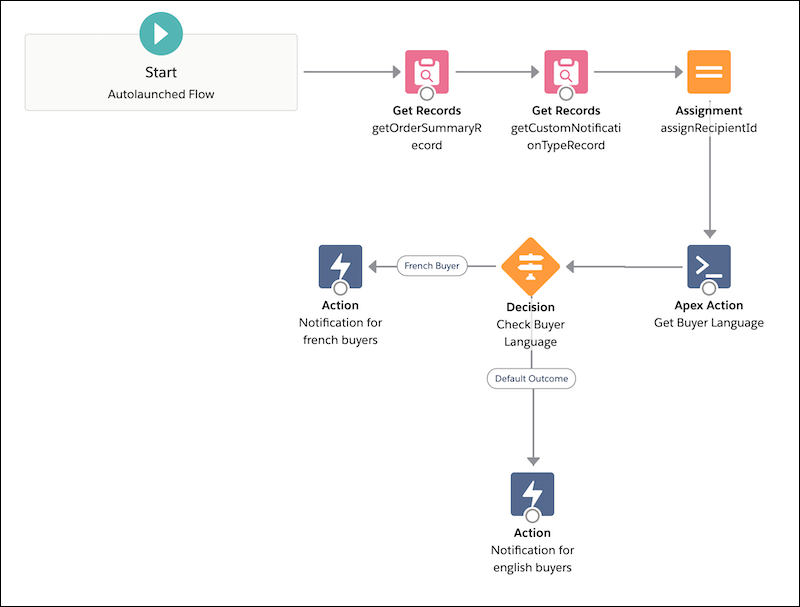
Connect your elements. Start connects to getOrderSummaryRecord, connects to getCustomNotificationTypeRecord, connects to assignRecipientId, connects to Get Buyer Language, connects to Check Buyer language, which connects to both Notification for English Buyers and Notification for French Buyers. Notification for English Buyers is the default outcome.
Here’s an example flow with the elements connected.