Generate OpenAPI and Metadata Documents and Configure an Agent Action
Follow these steps to create your first OpenAPI document. Use the sample Apex REST class and the generated files that we’re providing to quickly learn about the workflow. If you prefer, you can use one of the Apex REST classes you retrieved.
- In VS Code or Agentforce Vibes IDE, open the Command Palette (⇧⌘P) and run the command SFDX: Create Project command to create a new Salesforce project.
- Run SFDX: Set a Default Org to select the org to which you want to deploy the new OAS.
- If you aren’t using a class you retrieved, run SFDX: Create Apex Class to create a new Apex class. For example, create a class called
CaseManager. - Write your Apex class using Apex REST annotations. For example, you can copy this code and paste it into the
CaseManager.clsfile that you just created.
- Run SFDX: Refresh SObjects Definitions to bring org metadata in the form of object definitions into your project. Select All SObjects.
- Run SFDX: Create OpenAPI Document from this Class from the command palette or the context menu.
- Enter the folder where you want to store the generated files or accept the default
externalServiceRegistrationfolder.
The command generates the files<ApexClass>.yaml, and<ApexClass>.externalServiceRegistration-meta.xml.The description that appears in your org's API catalog comes from the top-level description mapping in the YAML file, not the
<description>element of the XML file. - To verify the validity of the generated YAML and XML files, see Verify Metadata and OpenAPI Documents. Also, check the Problems in the Panel bar for error messages and warnings and fix the generated files as needed.
- Run SFDX: Validate OpenAPI Document on the corrected YAML file to ensure all the errors and warnings are gone.
If the MuleSoft for Agentforce Extension Pack is installed, then SFDX: Validate OpenAPI Document isn’t available. Use the governance rules in the MuleSoft for Agentforce Extension Pack to validate your OpenAPI document. For details, see Verify Metadata and OpenAPI Specification Documents.
- Run the SFDX: Deploy This Source to Org command to deploy the
CaseManager.clsclass , or the class you’re working with, to your org. - Next deploy the generated XML file to the org. Note that the command to deploy isn't available on the YAML file.
You can regenerate an OpenAPI document if you modify the Apex class associated with it:
- Make the changes to the Apex class associated with the OpenAPI document.
- Run the SFDX: Create OpenAPI Document from this Class command.
- Select Overwrite or Manually merge with existing ESR the popup window. Overwrite directly overwrite the existing OpenAPI document (This action is irreversible). The Manually Merge with Existing ESR option opens a diff window comparing the original and new OpenAPI documents.
The new files are generated with the naming format:
<ApexClass>_<timestamp>.externalServiceRegistration-meta.xmland<ApexClass>_<timestamp>.yaml.These files are located in theesr_files_for_mergefolder in the root directory of your Salesforce project. - Check the Problems tab for any errors or warnings in the new OpenAPI document (identified by the timestamp) and manually merge the changes from the newly generated OpenAPI document into the original document.
- Run the SFDX: Validate OpenAPI Document command on the merged or overwritten OpenAPI document.
- Deploy the validated OpenAPI document to your Salesforce org.
You may encounter API Catalog limits when deploying. See Limits.
Once deployed, your API and its operations are available in your org's API catalog.
- From Setup, in the Quick Find box, enter API Catalog and select it. See View Apex APIs in API Catalog.
- Click the Apex tab. The deployed API is listed.
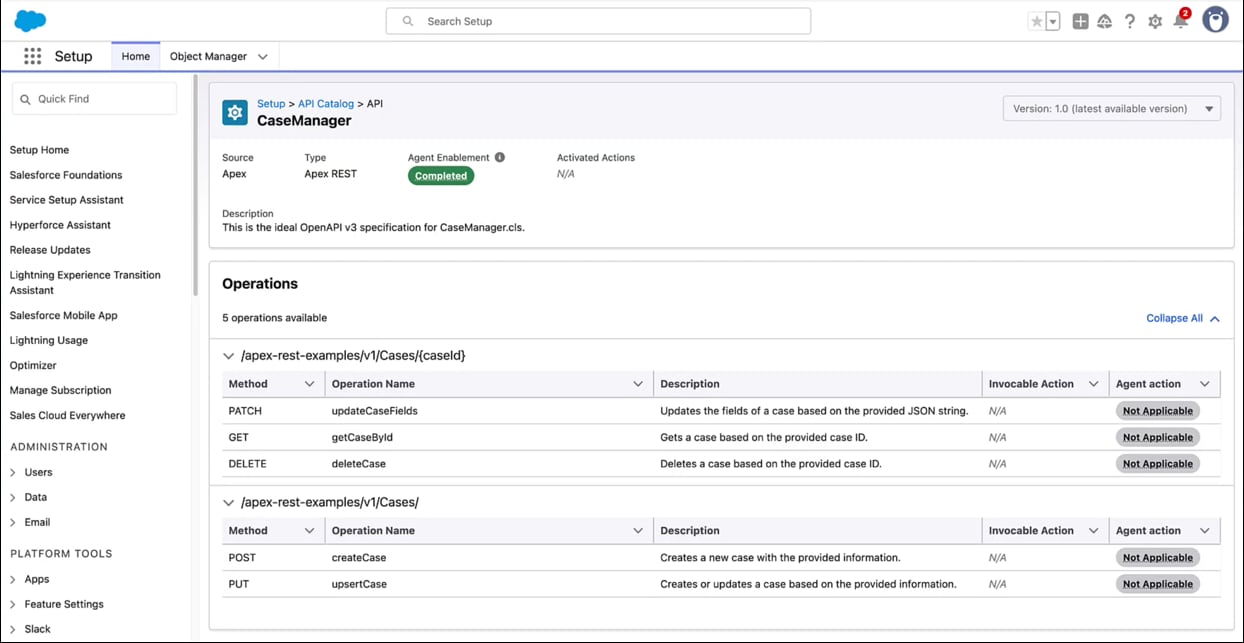
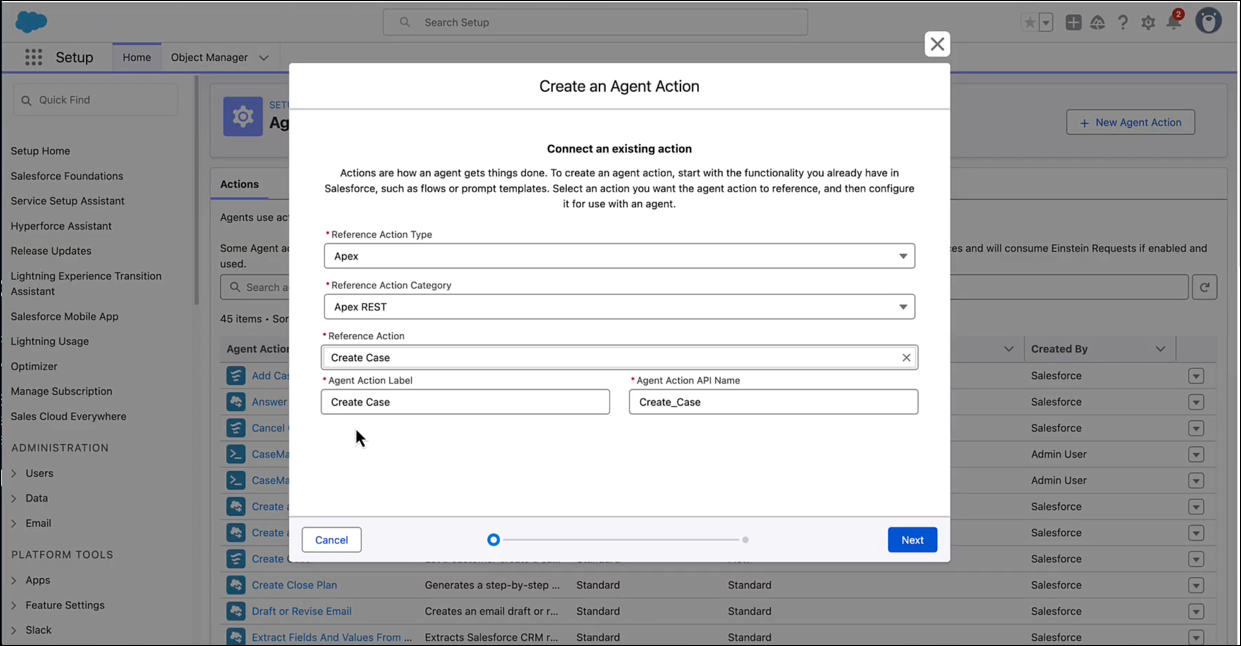
- The API and its operations are now available as an Apex Reference Action type that can be used to Create a Custom Agent Action.