Generate an Agent Spec File
You optionally use an agent spec file to generate an authoring bundle. Authoring bundles contain the Agent Script file that in turn provides the blueprint of the agent.
An agent spec is a YAML-formatted file that contains basic information about the agent, such as its role and details about your company. The spec file also contains an LLM-generated list of subagents based on this information. Subagents define the range of jobs that your agent can handle.
While using an agent spec is optional, we recommend that you do it because the Agent Script file in the generated authoring bundle will be more customized for your specific agent.
The easiest way to generate an agent spec is to run this command from VS Code’s integrated terminal. The command prompts you for the required agent properties.
If you’ve set a default development org, such as your sandbox, in your DX project, specifying --target-org is optional.
As with all Salesforce CLI commands, you can also generate an agent spec by opening a terminal (macOS, Linux) or command prompt (Windows), changing to your DX project directory, and running the agent generate agent-spec CLI command.
The command prompts you for the type of agent, such as customer-facing or internal to your company. It also prompts you for information about the agent’s role and your company. Use natural language for this information, and be thoughtful about your descriptions. The LLM associated with your development org uses the information to generate a list of subagents. The more accurate, specific, and complete your input descriptions are, the better the LLM-generated outputted list of subagents is.
After the agent generate agent-spec command finishes, the generated agent spec file called agentSpec.yaml is in the specs sub-directory of your DX project. The structure of the agent spec file is simple. The top part contains the agent properties, including some default ones that you weren’t prompted for. The bottom part contains the LLM-generated list of subagents. See Agent Spec File Example and Agent Spec File Reference.
The agent generate agent-spec command also has flags that you can use to provide the required and optional agent properties without being prompted, such as --type, --company-description, --max-topics, and --tone. In this example, you’re prompted for only the role of the agent because the command uses all the flags except for --role:
To show the full list and descriptions of the available flags, run the command with the --help flag:
Here’s an example of an agent spec file with the default name (specs/agentSpec.yaml) in the agentforcedx Salesforce DX project:
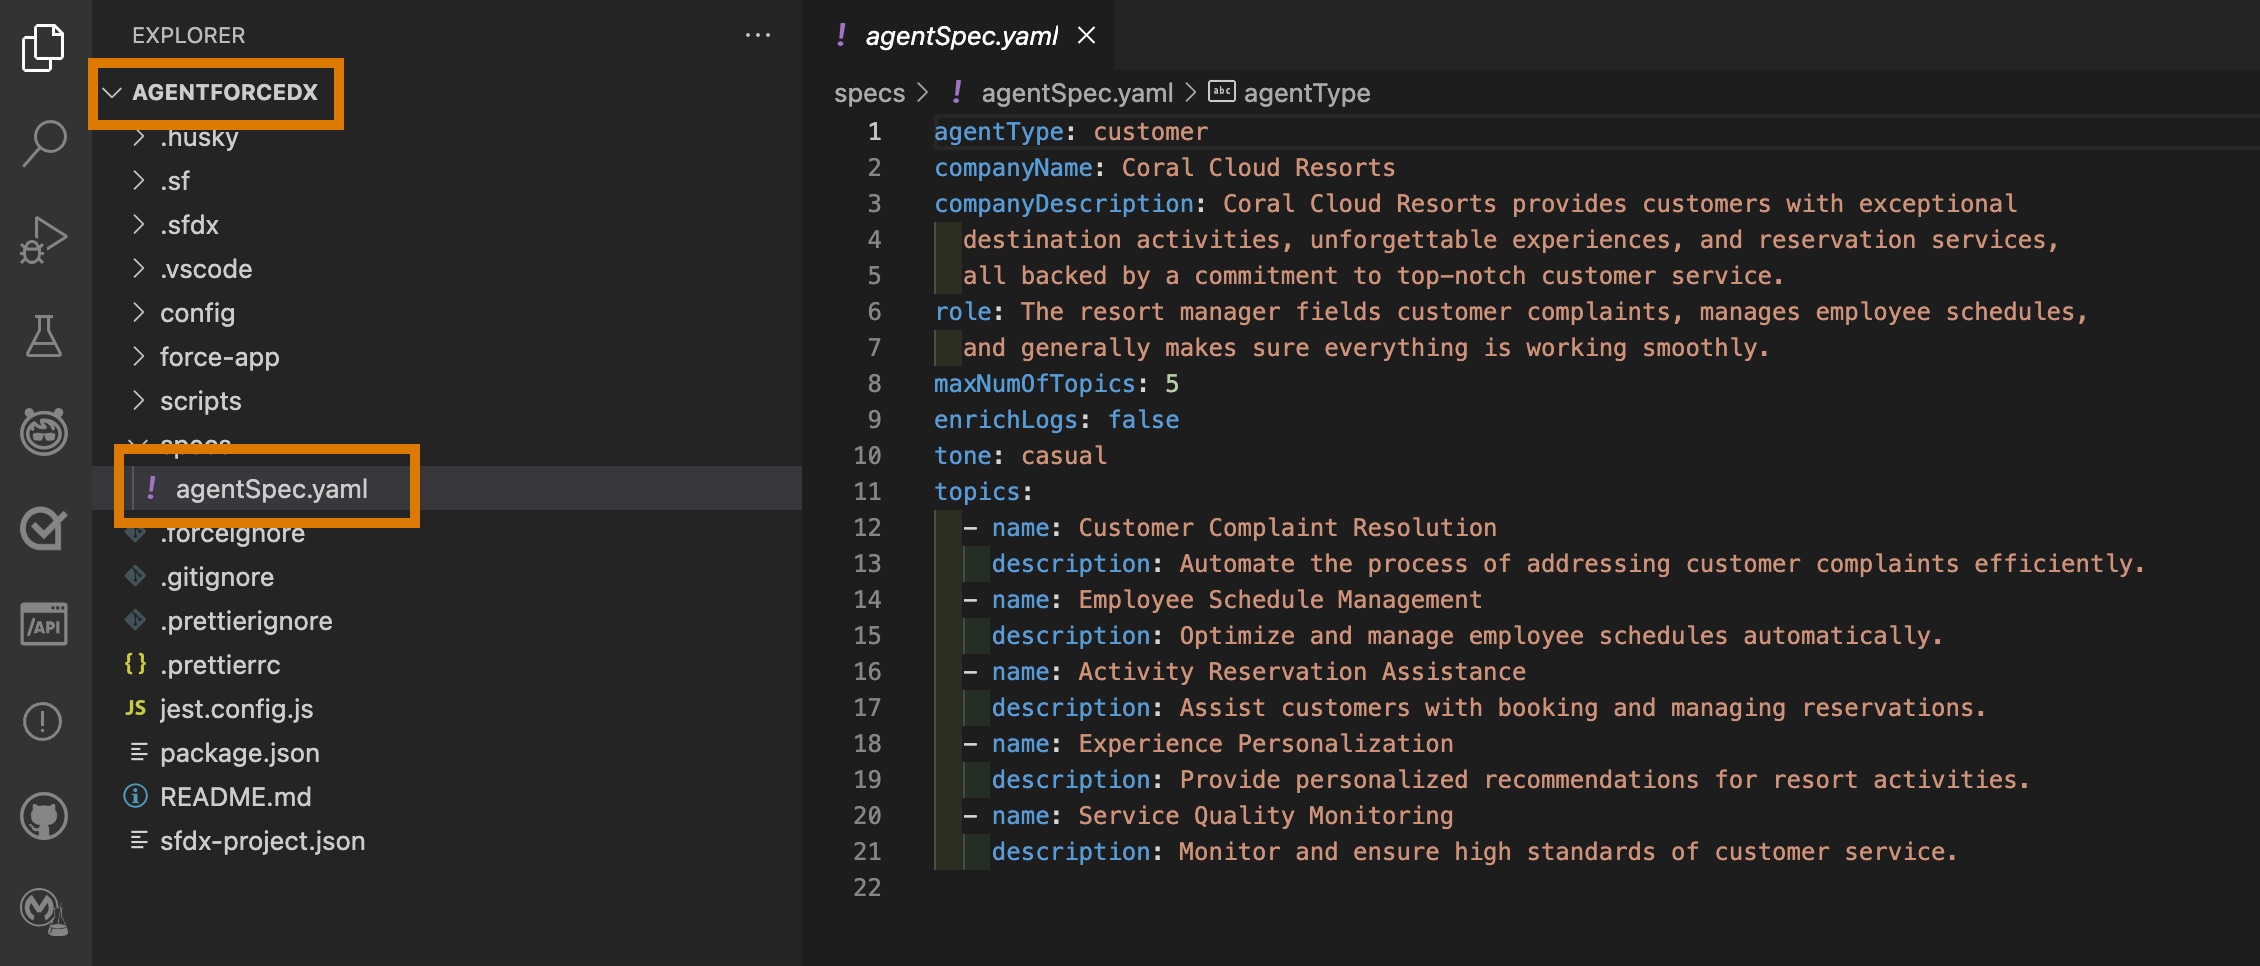
The properties in the top part of the YAML file describe the agent. You initially provided this information to the agent generate agent-spec command. Some properties are required, such as agentType, companyName, and role. The list includes optional properties, such as the maximum number of subagents and whether to add agent conversation data to org event logs.
The topics section contains the list of subagents that the LLM generated based on the agent properties. Each subagent has a name and a description, both generated by AI.
If the first time you run agent generate agent-spec you’re thrilled with the list of LLM-generated subagents, then you’re all set. But if you’re not, you can use the --spec flag to pass the same agent spec file to a new execution of the command, along with improved agent properties, and keep improving the spec.
As discussed earlier, the spec file consists of two main sections: the upper part (agent properties) that you provide and the lower part (generated subagents) that the LLM generates. Each time you adjust the agent properties, such as the agent’s role, the list of generated subagents changes, ideally improving with each iteration. By running the command multiple times, and each time passing in the most recent spec and refining the agent properties further, you eventually end up with an agent spec you’re satisfied with. Refine the agent properties by either editing the spec file directly or by specifying the appropriate flag, such as --role.
Let’s see how this works. For example, here’s an initial command run in which the agent information is terse and generic:
As a result of not providing many details, the AI-list of subagents might be too broad and not particularly useful. For example:
Rerun the command and embellish the agent role, but specify that you want to keep the other properties the same in the existing spec file (specs/agentSpec.yaml by default):
The command asks whether you want to overwrite specs/agentSpec.yaml, which you do because you’re iteratively refining the file. You can optionally use --output-file to create a new agent spec file. And this time, the list of subagents in the spec is better, because you provided a better role description.
Let’s do more! What if you provide a better company description?
You can iterate this way as much as you want and end up with the perfect agent spec file.
-
When you run
agent generate agent-spec, focus on providing the most accurate, specific, and complete descriptions about your company, the role of the agent, and so on. Better descriptions result in a better LLM-generated list of subagents. -
Because the agent spec file is in YAML format, it’s easy to edit manually in the VS Code editor after you creat an initial file. You must, however, rerun
agent generate agent-specto get a new set of AI-generated subagents. -
When you create an agent using the agent spec file (described later), the LLM associated with your development org generates an initial list of actions and instructions based on the spec. You can add natural language hints directly in the subagent descriptions to help the LLM come up with a good list.
For example, you can tell the LLM to use only a specific action that you know exists in your org: