Digital Commerce Server SDK Installation
After running the steps in this topic, you can host or deploy the ServerSDK to a Node.js server, or you can run ServerSDK in local mode.
-
Navigate to the Salesforce Industries Process Library and download the serverSDK reference app zip file.
-
Unzip the folder and add it to your IDE.
Navigate to
vop_server_sdk/secure-server-reference-app; this will be the root folder. -
Set up the org.
ServerSDK uses OAuth 2.0 JSON Web Token (JWT) bearer flow to authenticate the server. Therefore, you must generate a public/private key pair and create a Connected App. See https://github.com/lekkimworld/salesforce-jwt-generator.
-
Generate a public/private key pair.
Generate a public/private key pair using
openssland fill in the required information when you generate the certificate, as shown here: -
Create connected APP and upload the CER (certificate) file to SFDC.
In Salesforce, create a Connected App using the App Manager in Setup and upload the public key (public_key.cer) to the app. Be sure to select the offline_access scope as well as other required scopes. Save the Connected App and make a note of the consumer key (issuer_id).
-
-
Configure Authentication
The ServerSDK application has an authentication layer which is responsible for validating a user identity against an authentication server such as Firebase, Cognito and so on. A reference implementation using Firebase as an authentication strategy has been used in the app by default. However, you may easily swap Firebase for any other third-party authentication system by creating a custom authentication strategy.
-
Create a folder in the
vop_server_sdk/secure-server-reference-app/authentication/strategiesdirectory. In the folder, create a file and Implement the IAuthenticationStrategy interface. The implementing class should define the properties with the corresponding method of the third-party authentication system. For example, the implementation of sign-In method should have the sign-In logic of the third-party authentication system you want to use. -
After you have created your custom authentication strategy, open the
AuthenticationStrategy.tsfile and import your customize strategy and initialize it inside the constructor.
-
-
Set up the
config.jsonfile.Locate the
config.jsonfile invop_server_sdk/secure-server-reference-app/config.json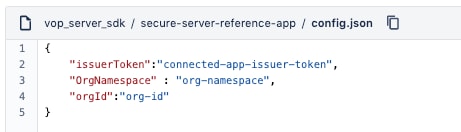
-
Enter the consumer key (issuer_id) that you noted in step 2.
-
In the org Id field, enter the username of the salesforce user.org namespace.
-
In the org.namespace field, enter the SF org namespace.
-
-
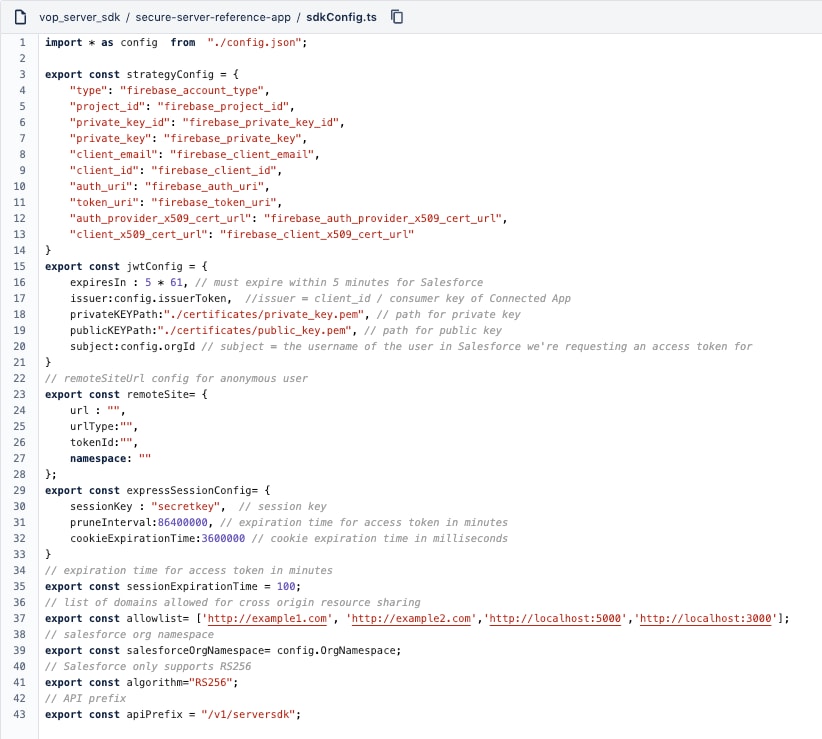
Configure the
sdkConfig.tsfile.Locate the
sdkConfig.tsfile located invop_server_sdk/secure-server-reference-app/sdkConfig.ts.Make the following changes in the section indicated:
strategyConfig - If you are using Firebase as the authentication server then set a strategyConfig object.
jwtConfig - Paste the
private_key.pemandpublic_key.pemfiles generated from step2 in vop_server_sdk/secure-server-reference-app/certificates folder for JWT signremoteSite - For anonymous users, the URL is an anonymous URL of the org and namespace will be the org namespace.
allowlist - When you are requesting from a CORS domain, you must specify the domain here.
-
Configure the
package.jsonfile.In the
vop_server_sdk/secure-server-reference-app/package.jsonfile, under the dependencies object, update SDKs with version 109, as shown here:
Ensure that you add the
.npmrcfile. The.npmrcfile is required to authenticate with the Vlocity private npm registry. For public access, use the default access token.