API V5 for Flow Development Guide
With API V5 for Flow, admins can manage their content and customize their management processes in powerful, new ways.
Use API V5 Flow for these actions.
- Import Content Templates
- Connect external content builders to Account Engagement
- Copy content and assets between business units
- Copy assets from Sandbox to Production orgs and vice versa
Build custom user interfaces, create custom tasks, and schedule automated workflows by using Salesforce Flow.
This guide focuses on-screen flow use cases. To learn about other Salesforce Flow use cases, and to learn more about flow in general, refer to these Trailheads.
This guide assumes you have a baseline understanding of Salesforce Flow. Flow will seem familiar to users of Engagement Studio, in that it also includes:
- A Visual Builder Interface using a Canvas
- Top-to-Bottom Workflow using Steps
- Salesforce Object Triggers (Flow doesn’t have the concept of triggers within a flow)
- Three basic concepts for screen flows:
- Screens - Used to Interact with User and Gather Input
- Actions - Used to Retrieve Data or Execute an Action
- Conditions - Used to create criteria to determine a path
Because it’s designed for general processes, Flow is more advanced than Engagement Studio. Note these capabilities.
- Define objects
- Add custom actions
- Perform loops
- Package Flows
API V5 is integrated into Flow using Apex Invocable Actions, which expose the Account Engagement API to Flow. With Flow, you can perform these general functions.
- Generate Picklists
-
Use: A user can search for and select a record.
-
Input:
- Object Name
- Business Unit ID
-
Output
- JSON String of Content Name, Content Record IDs
- Create an Asset
-
Use: Creates a content record.
-
Action Naming Schema: Create X Record
-
Input:
- Asset ID
- Read an Asset
-
Use: Retrieve all the data for an asset.
-
Action Naming Schema: Read X Record
-
Input:
- Asset ID
-
Output:
- Content Record
To store the results of the Read and Create actions, each supported object needs an associated Apex Defined Object Class to represent the data in the object.
- Access to Salesforce org with Marketing Cloud Account Engagement
- User Access to build and run Flows
- User Access to relevant business units
- Install the latest Marketing Cloud Account Engagement Managed Package
Get My Business Unit
Retrieves the list of business units relevant to a given user.
| API Object | Inputs | Outputs | Additional Details |
|---|---|---|---|
| Business Unit Context | From Sandbox (Boolean) Choose to query for Business Units from the Sandbox (applicable for Sandbox-Production Bulk Asset Copy Flow).Overrides the Folder Named Credential (String) Use for Salesforce Metadata API Access. | Picklist Output (Object List) A list of business units names and IDs.Overrides the Folder | The results only include the business units that the active user of the flow has access to. |
Generate Flow Context
Combine all the variables, and then generate a context that can be used as an input for all the invocable actions.
| Inputs | Outputs | Additional Details |
|---|---|---|
| Interview Guide (String) The value of $Flow.InterviewGuide.Overrides the Folder Named Credential to Use for Account Engagement API Access (String - Optional) API name to access cross-org Account Engagement API.Overrides the Folder Production Business Unit ID (String - Optional) Sandbox Business Unit ID (String - Optional) Copy from Production to Sandbox (Boolean - Optional) True when copying from Sandbox to Production org. The default value is null. | Message (String) An action success or failure message. Is Success? (Boolean) An action success or failure indicator. Flow Context (FlowContextModel) The generated Flow Context. | All the fields except the Interview Guide are only applicable when copying assets from Sandbox to Production orgs and vice versa. |
Get Dropdown Options
Retrieves a list of options for the given object and business unit.
| API Object | Inputs | Outputs | Additional Details |
|---|---|---|---|
| Multiple | Business Unit ID (String) The ID of the business unit to access. Query Object (String) The V5 API name of the object that you want to retrieve dropdown options. Field Parameters (String - Optional) The fields to use for the name and value for the dropdown. The default is “id, name” and, for most objects, doesn’t require a change. Flow Context (FlowContextModel) Context generated using Generate Flow Context invocable action. | Picklist Output (PickListOutput[]) The names and values of the returned object records | The action uses the API V5 query API, so it follows any query data restrictions that exist for that object. For example, the HTML field for email templates can’t be returned in a query. Objects Supported:
|
Get Email Template
Retrieves the details of an Email Template.
| API Object | Inputs | Outputs |
|---|---|---|
| Email Template | Business Unit ID (String) The ID of the business unit to access. Email Template (Object) An Email Template object record. Able to pass the object returned in the Get Email Template action. | Message (String) An action success or failure message. Is Success? (Boolean) An action success or failure indicator. Email Template (Object) The Email Template represented by the input ID. |
Copy Email Template
Creates an Email Template by using the provided inputs.
| API Object | Inputs | Outputs |
|---|---|---|
| Email Template | Business Unit ID (String) The ID of the business unit to access. Campaign ID (String - Optional) Overrides the Campaign to use when creating the Email Template. Folder ID (String - Optional) Overrides the Folder to use when creating the email template. Tracker Domain ID (String - Optional) Overrides the tracker domain to use when creating the email template. Email Template (Object) An email template object record. Able to pass the object returned in the Get Email Template action. | Message (String) An action success or failure message. Is Success? (Boolean) An action success or failure indicator. Email Template (Object) The newly created Email Template. |
Get Custom Redirect
Retrieves the details of a Custom Redirect.
| API Object | Inputs | Outputs |
|---|---|---|
| Custom Redirect | Business Unit ID (String) The ID of the business unit to access. Custom Redirect (String) The ID of the Custom Redirect that you want to retrieve. Flow Context (FlowContextModel - Optional) Flow context generated using Generate Flow Context invocable action. | Message (String) An action success or failure message. Is Success? (Boolean) An action success or failure indicator. Custom Redirect (Object) The Custom Redirect represented by the input ID. |
Copy Custom Redirect
Creates a Custom Redirect by using the provided inputs.
| API Object | Inputs | Outputs |
|---|---|---|
| Custom Redirect | Business Unit ID (String) The ID of the business unit to access. Campaign ID (String) Overrides the Campaign to use when creating the Custom Redirect. Folder ID (String) Overrides the Folder used to use when creating the Custom Redirect. Tracker Domain ID (String) Overrides the Tracker Domain to use when creating the Custom Redirect. Custom Redirect (CustomRedirectModel) A Custom Redirect object record. Can pass the object returned in the Get Custom Redirect action as an input. Flow Context (FlowContextModel) Flow context generated using Generate Flow Context invocable action. | Message (String) An action success or failure message. Is Success? (Boolean) An action success or failure indicator. Custom Redirect (Object) The newly created Custom Redirect. |
Get Custom Field
Retrieves the details of a Custom Field.
| API Object | Inputs | Outputs |
|---|---|---|
| Custom Field | Business Unit ID (String) The ID of the business unit to access. Custom Field ID (String) The ID of the Custom Field that you want to retrieve. Flow Context (FlowContextModel) Flow context generated using Generate Flow Context invocable action. | Message (String) An action success or failure message. Is Success? (Boolean) An action success or failure indicator. Custom Field (CustomFieldModel) The Custom Field represented by the input ID. |
Copy Custom Field
Creates a Custom Field using the provided inputs.
| API Object | Inputs | Outputs |
|---|---|---|
| Custom Redirect | Business Unit ID (String) The ID of the business unit to access. Campaign ID (String) Overrides the Campaign to use when creating the Custom Redirect. Folder ID (String) Overrides the Folder used to use when creating the Custom Redirect. Tracker Domain ID (String) Overrides the Tracker Domain to use when creating the Custom Redirect. Custom Redirect (CustomRedirectModel) A Custom Redirect object record. Can pass the object returned in the Get Custom Redirect action as an input. Flow Context (FlowContextModel) Flow context generated using Generate Flow Context invocable action. | Message (String) An action success or failure message. Is Success? (Boolean) An action success or failure indicator. Custom Redirect (Object) The newly created Custom Field. |
Get Dynamic Content
Retrieves the details of Dynamic Content.
| API Object | Inputs | Outputs |
|---|---|---|
| Dynamic Content | Business Unit ID (String) The ID of the business unit to access. Custom Dynamic Content ID (String) The ID of the Dynamic Content that you want to retrieve. Flow Context (FlowContextModel - Optional) Flow context generated using Generate Flow Context invocable action. | Message (String) An action success or failure message. Is Success? (Boolean) An action success or failure indicator. Dynamic Content(DynamicContentModel) The Dynamic Content represented by the input ID. |
Copy Dynamic Content
Creates new Dynamic Content using the provided inputs.
| API Object | Inputs | Outputs |
|---|---|---|
| Dynamic Content | Business Unit ID (String) The ID of the business unit to access. Folder ID (String) Overrides the Folder to use when creating the Dynamic Content. >Flow Context (FlowContextModel - Optional) Flow context generated using Generate Flow Context invocable action. | Message (String) An action success or failure message. Is Success? (Boolean) An action success or failure indicator. Dynamic Content (DynamicContentModel) The newly created Dynamic Content. |
Get Engagement Studio Program
Retrieves the details of an Engagement Studio Program.
| API Object | Inputs | Outputs |
|---|---|---|
| Engagement Studio Program | Business Unit ID (String) The ID of the business unit to access. Engagement Studio Program ID (String) The ID of the Engagement Studio Program that you want to retrieve. Flow Context (FlowContextModel - Optional) Flow context generated using Generate Flow Context invocable action. | Message (String) An action success or failure message. Is Success? (Boolean) An action success or failure indicator. Engagement Studio Program (EngagementStudioProgramModel) The Engagement Studio Program represented by the input ID. |
Copy Engagement Studio Program
Creates an Engagement Studio Program using the provided inputs.
| API Object | Inputs | Outputs |
|---|---|---|
| Engagement Studio Program | Business Unit ID (String) The ID of the business unit to access. Destination Business Unit ID (String) The ID of the business unit to access. Folder ID (String) Overrides the Folder to use when creating the Engagement Studio Program. Engagement Studio Program (EngagementStudioProgramModel) An Engagement Studio Program object record. Can pass the object returned in the Get Engagement Studio Program action as an input. Flow Context (FlowContextModel - Optional) Flow context generated using Generate Flow Context invocable action. | Message (String) An action success or failure message. Is Success? (Boolean) An action success or failure indicator. Engagement Studio Program (EngagementStudioProgramModel) The newly created Engagement Studio Program. |
Get File
Retrieves the details of a File.
| API Object | Inputs | Outputs |
|---|---|---|
| File | Business Unit ID (String) The ID of the business unit to access. File ID (String) The ID of the File that you want to retrieve. Flow Context (FlowContextModel - Optional) Flow context generated using Generate Flow Context invocable action. | Message (String) An action success or failure message. Is Success? (Boolean) An action success or failure indicator. File (FileModel) The File represented by the input ID. |
Copy File
Creates a File using the provided inputs.
| API Object | Inputs | Outputs |
|---|---|---|
| File | Business Unit ID (String) The ID of the business unit to access. File ID (String) Campaign ID (String - Optional) Overrides the Campaign to use when creating the file. Folder Id (String) Overrides the Folder to use when creating the File. Tracker Domain ID (String) Overrides the tracker domain to use when creating the File. File (FileModel) A File object record. Can pass the object returned in the Get File action as an input. Flow Context (FlowContextModel - Optional) Flow context generated using Generate Flow Context invocable action. | Message (String) An action success or failure message. Is Success? (Boolean) An action success or failure indicator. File (FileModel) The newly created File. |
Get Form
Retrieves the details of a Form.
| API Object | Inputs | Outputs |
|---|---|---|
| Form | Business Unit ID (String) The ID of the business unit to access. Form ID (String) The ID of the Form that you want to retrieve. Flow Context (FlowContextModel - Optional) Flow context generated using Generate Flow Context invocable action. | Message (String) An action success or failure message. Is Success? (Boolean) An action success or failure indicator. Form (FormModel) The Form represented by the input ID. |
Copy Form
Creates a Form by using the provided inputs.
| API Object | Inputs | Outputs |
|---|---|---|
| Form | Source Business Unit ID (String) The ID of the business unit to access. Destination Business Unit ID The ID of the business unit to access. Campaign ID (String) Overrides the Campaign to use when creating the Form. Folder ID (String) Overrides the Folder to use when creating the Form. Tracker Domain ID (String) Overrides the tracker domain to use when creating the Form. Layout Template ID (String) Overrides layout template to use when creating the Form. Form (FormModel) A Form object record. Can pass the object returned in the Get Form action as an input. Flow Context (FlowContextModel - Optional) Flow context generated using Generate Flow Context invocable action. | Message (String) An action success or failure message. Is Success? (Boolean) An action success or failure indicator. Form (FormModel) The newly created Form. |
Get Form Handler
Retrieves the details of a Form Handler.
| API Object | Inputs | Outputs |
|---|---|---|
| Form Handler | Business Unit ID (String) The ID of the business unit to access. Form Handler ID (String) The ID of the Form Handler that you want to retrieve. Flow Context (FlowContextModel - Optional) Flow context generated using Generate Flow Context invocable action. | Message (String) An action success or failure message. Is Success? (Boolean) An action success or failure indicator. Form Handler (FormHandlerModel) The Form Handler represented by the input ID. |
Copy Form Handler
Creates a Form Handler using the provided inputs.
| API Object | Inputs | Outputs |
|---|---|---|
| Form Handler | Source Business Unit ID (String) The ID of the business unit to access. Destination Business Unit ID The ID of the business unit to access. Campaign ID (String) Overrides the Campaign to use when creating the Form. Folder ID (String) Overrides the Folder to use when creating the Form. Tracker Domain ID (String) Overrides the tracker domain to use when creating the Form Handler. Form Handler (FormHandlerModel) A Form Handler object record. Can pass the object returned in the Get Form Handler action as an input. Flow Context (FlowContextModel - Optional) Flow context generated using Generate Flow Context invocable action. | Message (String) An action success or failure message. Is Success? (Boolean) An action success or failure indicator. Form Handler (FormHandlerModel) The newly created Form Handler. |
Get Layout Template
Retrieves the details of a Layout Template.
| API Object | Inputs | Outputs |
|---|---|---|
| Layout Template | Business Unit ID (String) The ID of the business unit to access. Layout Template ID (String) The ID of the Layout Template that you want to retrieve. Flow Context (FlowContextModel - Optional) Flow context generated using Generate Flow Context invocable action. | Message (String) An action success or failure message. Is Success? (Boolean) An action success or failure indicator. Layout Template (LayoutTemplateModel) The Layout Template represented by the input ID. |
Copy Layout Template
Creates a Layout Template using the provided inputs.
| API Object | Inputs | Outputs |
|---|---|---|
| Layout Template | Business Unit ID (String) The ID of the business unit to access. Folder ID (String) Overrides the Folder to use when creating the Layout Template. Layout Template ID (String) Overrides the layout template object record. Can pass the object returned in the Get Layout Template action as an input. Layout Template (LayoutTemplateModel) A Layout Template object record. Can pass the object returned in the Get Layout Template action as an input. Flow Context (FlowContextModel - Optional) Flow context generated using Generate Flow Context invocable action. | Message (String) An action success or failure message. Is Success? (Boolean) An action success or failure indicator. Layout Template (LayoutTemplateModel) The newly created Layout Template. |
Get Landing Page
Retrieves the details of a Landing Page.
| API Object | Inputs | Outputs |
|---|---|---|
| Landing Page | Business Unit ID (String) The ID of the business unit to access. Landing Page ID (String) The ID of the Landing Page that you want to retrieve. Flow Context (FlowContextModel - Optional) Flow context generated using Generate Flow Context invocable action. | Message (String) An action success or failure message. Is Success? (Boolean) An action success or failure indicator. Landing Page (LandingPageModel) The Landing Page represented by the input ID. |
Copy Landing Page
Creates a Landing Page using the provided inputs.
| API Object | Inputs | Outputs |
|---|---|---|
| Landing Page | Source Business Unit ID (String) The ID of the business unit to access. Destination Business Unit ID The ID of the business unit to access. Campaign ID (String - Optional) Overrides the Campaign to use when creating the Landing Page. Folder ID (String) Overrides the Folder to use when creating the Landing Page. Folder ID (String) Overrides the Folder to use when creating the Landing Page. Tracker Domain ID (String - Optional) Overrides the tracker domain to use when creating the Landing Page. Landing Page (LandingPageModel) A Landing Page object record. Can pass the object returned in the Get Landing Page action as an input. Flow Context (FlowContextModel - Optional) Flow context generated using Generate Flow Context invocable action. | Message (String) An action success or failure message. Is Success? (Boolean) An action success or failure indicator. Landing Page (LandingPageModel) The newly created Landing Page. |
| LWC | Purpose | Input | Output |
|---|---|---|---|
| combobox | Type ahead search with multi-select/single-select option. | label: String:required: BooleanmultiSelect: Boolean whether the combobox is multi-select or not messageWhenInvalid: StringDisplays the given error with this message if necessary is true and the user doesn’t select the value. options: PicklistOutput[] | selectedValue: StringReturns selected value for single-select combobox. selectedValues: String[]Returns a list of selected values for a multi-select combobox. |
| previewAssets | Preview the asset in a tabular format with given data. | emailTemplates: EmailTemplateModel[]customRedirects: CustomRedirectModel[]files: FileModel[]customFields: CustomFieldModel[]engagementStudioPrograms: EngagementStudioProgramModel[]] layoutTemplates: LayoutTemplateModel[] formHandlers: FormHandlerModel[]dynamicContent: DynamicContentModel[]forms: FormModel[]landingPages: LandingPageModel[] | Displays the assets on the flow screen. |
| progressIndicator | Displays progress based on provided current step. | currentStep: Integer | Displays the progress indicator (steps) on the flow screen. |
These sections detail the unique objects provided in the API V5 for Flow toolkit.
The following is a general class to store picklist values for Account Engagement objects. A picklist output includes a display value that shows the user, and a reference ID to retrieve the record the user selects.
The Email Template model represents an Account Engagement Email Template.
The custom redirect model represents an Account Engagement Custom Redirect.
The Custom Field model represents an Account Engagement Custom Field.
The File model represents an Account Engagement File.
The Engagement Studio Program model represents an Account Engagement Studio Program.
The Form model represents an Account Engagement Form.
The Form Handler model represents an Account Engagement Form Handler.
The Dynamic Content model represents an Account Engagement Dynamic Content.
The Landing Page model represents an Account Engagement Landing Page.
The Layout Template model represents an Account Engagement Layout Template.
The Flow Context model represents a GenerateFlowContext invocable action.
You can find the provided flow, Account Engagement Bulk Asset Copy, from Setup →Flow. This default flow provides a moderately complex example of how a copy flow is built.
The flow just repeats the same basic pattern on multiple assets.
The steps are:
- Determine the Business Unit that contains the assets you want to copy, and the Business Unit that you want to copy those assets into
- Select the assets to copy
- Read the assets to copy
- Configure the assets for copying
- Create the copied assets
To start, pull the available Business Units and select the source and destination.
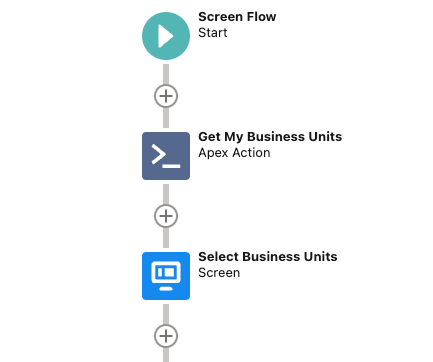
Next, pull the picklist values used for the rest of the flow.
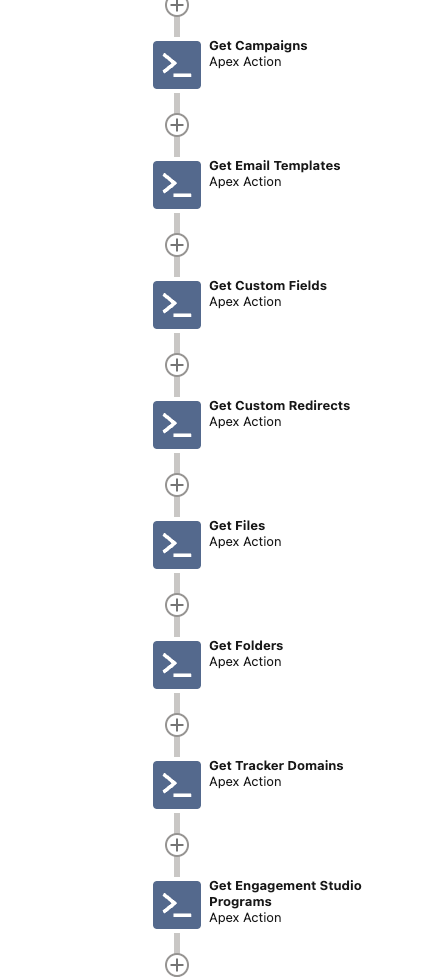
These queries are made to prepare for selecting and configuring the assets to copy.
- Configuration
- Campaigns
- Folders
- Tracker Domains
- Assets
- Email Templates
- Custom Fields
- Custom Redirects
- Files
- Engagement Studio Programs
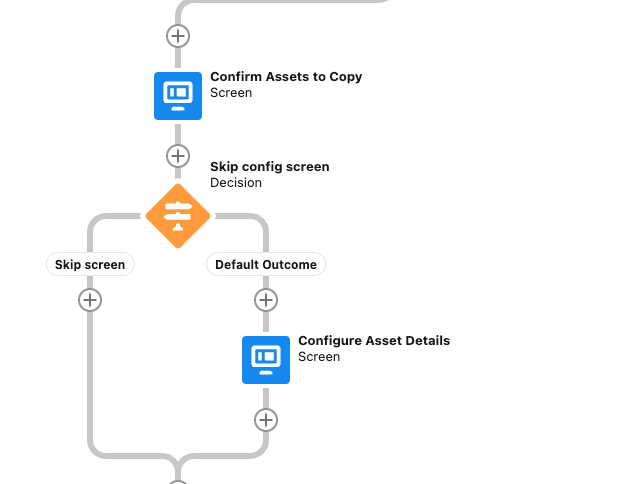
Select the assets to copy and validate to ensure a copy can occur.
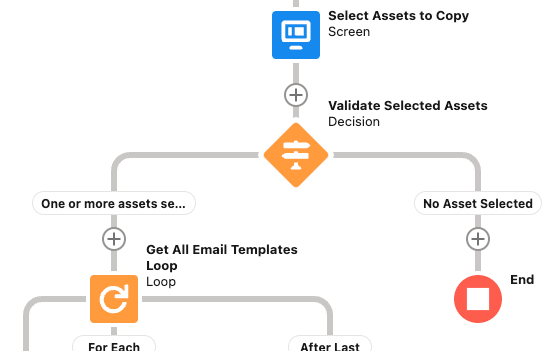
A screen presents a dropdown for each asset using a multi-select picklist, allowing for multiple options per dropdown.
If any assets are selected, the process continues to read the assets.
The following loops, repeated for each asset, pull the asset data from the source business unit.
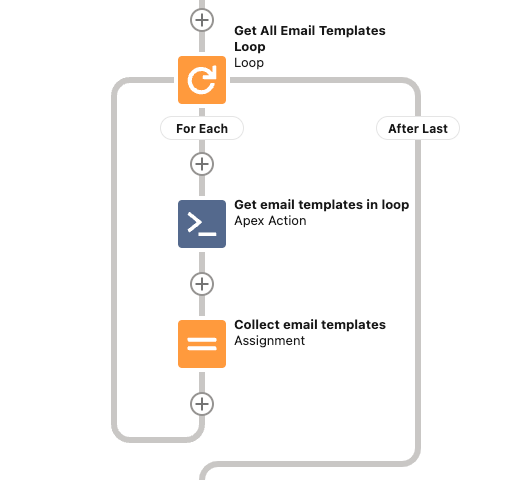
The loop goes through each asset selected and reads its record from the source business unit, adding it to a new collection.
The loop repeats for each asset so that all the data for copying is available for later steps.
After all the information is read, summary information is presented to confirm the correct files are copied.
From here, configure the campaign, folder, and tracker domain to use in the destination business unit.
The second set of loops go through each copy request and creates the record in the destination business unit.
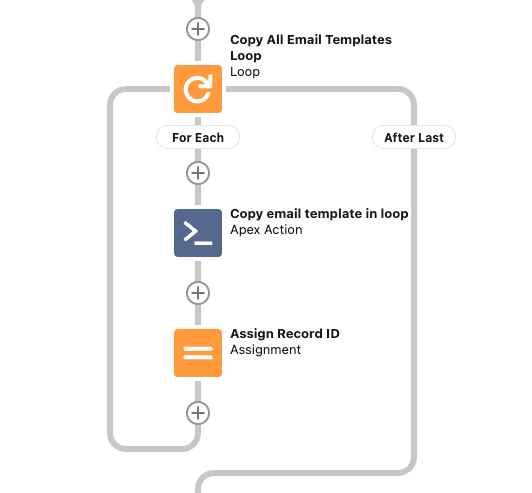
The loop cycles through the selected asset records, using the field settings as input to the copy action.
The final step records the new records ID and provides success confirmation.

The same patterns apply for custom flows, only with a different set of loops to build a different bulk copy flow. With custom flows, you can also remove the loop to create copies one at a time.
Note: We recommend an understanding of the standard flow before attempting a custom flow.
Create a custom copy flow to move the right assets between business units. The standard process for a copy is to select the assets to copy, read the assets, and then create the assets using the read data.
Select an asset in an external location and copy it into Account Engagement.
Note: This use case requires an invocable action be built for the external builder service to retrieve the desired content.
After the content is received, the remainder of the flow is the same.
- Configure the asset.
- Create the asset.
Select an asset URL to embed into another piece of content.
This use case is more advanced and requires development to parse and embed the desired content. However, it’s possible to read the URL for forms, files, and custom redirects to embed them into HTML.
Flows built with API V5 for Flow can be packaged, so you can share them via AppExchange or make it easy to install into production.
The process of packaging a flow is the same as other packages. Under Salesforce Setup, go to Package Manager, and follow these steps.
- Create a package
- Add components to the package
- Select the type Flow Definition.
- Select your desired Flow Definition.
- Upload the package
- Install via the provided URL